
How To Render 10,000 Animated Characters With 20 Draw Calls In Unity
This is an English translation of a blog I wrote in Chinese in 2017. Although the original blog was a few years ago, I found this article very interesting, so I decided to translate it into English.
0x00 Introduction
I think a lot of game developers hope that the more objects they can render in their scene, the better. Unfortunately, rendering and managing a large number of game objects is at the expense of CPU and GPU performance, because there may be too many Draw Calls, if the game object is animated, it will also involve the CPU skinning overhead, so we must find other solutions.
So, this article will talk about using GPU to achieve efficient rendering of animated characters and reduce the skinning overhead on the CPU side. At the same time, reduce the number of Draw Calls of rendering 10,000 animated characters from 10,000+ to 20. (The model comes from RTS Mini Legion Footman Handpainted)
0x01 Problems with Animator and SkinnedMeshRender
In the usual way, we will use Animator to manage the animation of the character, and the character must also be rendered using SkinnedMeshRender.

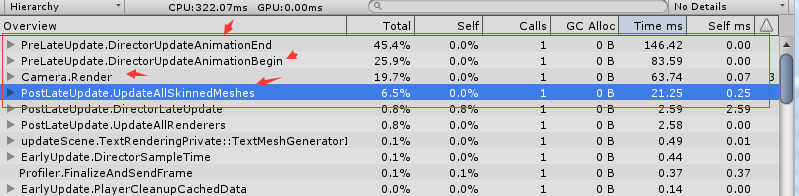
For example, as you can see at the above gif, there are 10,000 soldier models with animation are rendered by default in my test scene, and you can see that the performance at this time is very bad: CPU 320 + ms, DrawCall: 8700+.
Therefore, it can be found that if the number of animated characters to be rendered is large, there are mainly two main issues:
- CPU performance overhead when processing animations
- The cost of rendering characters(Draw Calls).
These two problems that cause CPU performance overhead limit the possibility of rendering a large number of animated characters using traditional methods. So some alternatives such as billboard technology are used in this situation. But to be realistic, the effect of billboard technology in this situation is not good.
So is it possible for us to render a large number of animated characters with little overhead? In fact, we only need to go back and look at the reasons for the high cost. The solution is already hidden in the problem.
First of all, one of the main bottlenecks is that character animation processing is concentrated on the CPU side. So a simple idea is whether we can transfer this part of the overhead to the GPU? Because the GPU’s computing power is its strong point.
Second, the second bottleneck is the Draw Call problem between the CPU and GPU. This problem can be solved by using batch processing (including Static Batching and Dynamic Batching) or GPU Instancing introduced after Unity5.4. However, unfortunately neither of these technologies supports SkinnedMeshRender for animated characters.
Then the solution is ready, which is to transfer the animation-related process from the CPU side to the GPU side. At the same time, because the CPU does not need to process the animation calculation, the SkinnedMeshRender can also be replaced by the common MeshRender, so that we can happily use GPU Instancing to reduce the number of Draw Call.
0x02 vertex shader and animation map
Readers who have written shaders may be very clear that we can easily change the vertex position of the mesh in the vertex shader. Therefore, some simple animation effects can often be achieved in a vertex shader.
So can we use a vertex shader to set the vertex position to play our character animation?
The answer is yes. But it’s different from the simple animation of the flying flag. This time, we not only use a few simple vertex shader’s attributes to achieve the animation effect but bake the character’s animation information into a texture for the vertex shader to use.
To put it simply, we sample the character animation at a fixed frequency and record the position information of each vertex on the character’s mesh, then save the position of the vertex (Vector3 (float x, float y, float z)) into a texture.
In this way, the map records the position of the character mesh vertices at each sampling point during the entire animation time. I call this map AnimMap. Of course, a small problem needs to be considered when using the color attribute to save the position information of the vertex, and I will talk about it later.
The structure of an AnimMap is as follows:
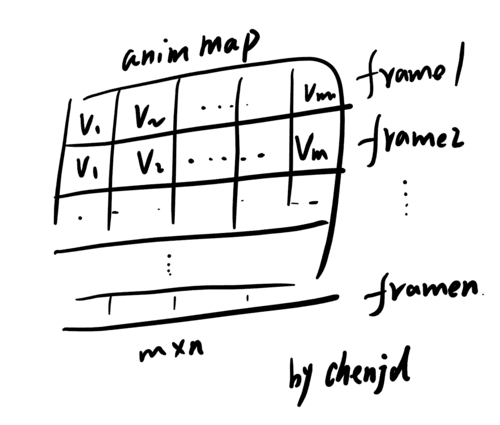
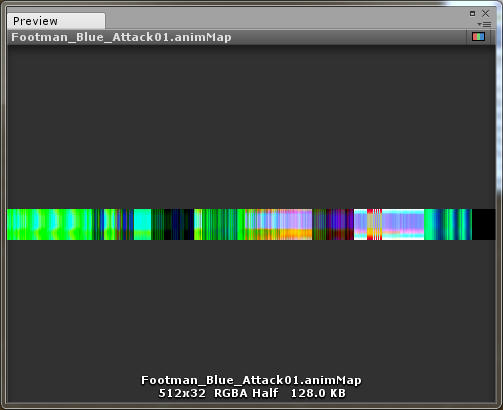
In the real project, an AnimMap looks like this. The position of each vertex of the mesh is recorded in the horizontal direction, and the time is in the vertical direction.
The above gif shows remove the character’s Animator and Animation, replace SkinnedMeshRender with a general Mesh Render, and only use AnimMap and Vertex Shader to modify the vertex position over time.
Now we have completed the purpose of transferring the animation process from the CPU side to the GPU side. We can see that there is no animation related content in the CPU overhead statistics. However, in the rendering statistics, the number of Draw Calls has not been reduced. At this time, there are still 10 Draw Calls(Including render the skybox, etc) in the scene of rendering 8 characters. So in the next step we will use GPU Instancing technology to reduce the number of Draw Calls.
0x03 I Love GPU Instancing
In addition to using batch, another good way to improve graphics performance is to use GPU Instancing (batch can merge different meshes, and GPU Instancing is mainly for the same mesh).
The biggest advantage of GPU Instancing is that it can reduce memory usage and CPU overhead. When using GPU Instancing, there is no need to turn on static/dynamic batch. To take advantage of GPU Instancing, you must use the same material and pass additional parameters to the shader, such as color, floating-point, etc.
However, GPU Instancing does not support SkinnedMeshRender, that is, in the usual way, our animated characters cannot use GPU Instancing to reduce Draw Calls, so we must first complete the goal of the previous section and transfer the animation process from the CPU to the GPU, you can use Mesh Render and give up SkinnedMeshRender now.
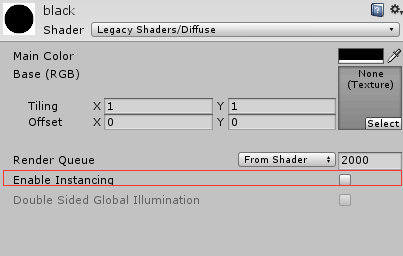
Many build-in shaders have the option to enable GPU Instancing by default, but the shader that we use AnimMap to achieve character animation is obviously not a build-in, so we need to enable GPU Instancing ourselves.
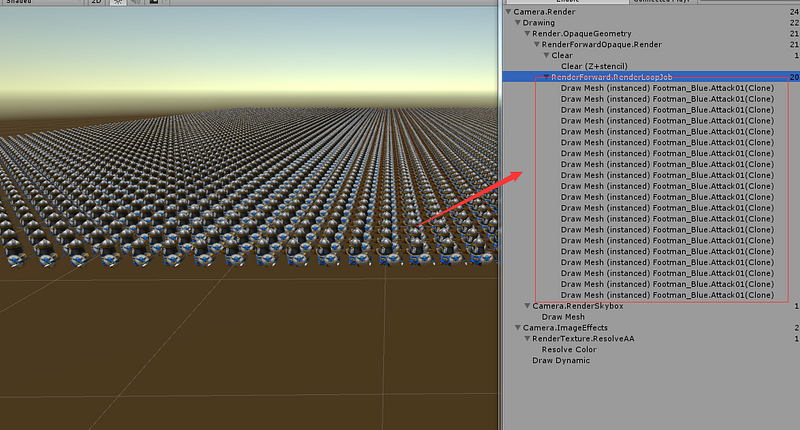
After using GPU Instancing, the number of Draw Calls for rendering 10,000 soldiers was reduced from around 10,000 to around 20. Of course, you can find more information about GPU Instancing in the reference links at the end of the article.
0x04 color precision and vertex position
Remember that I mentioned a small problem that needs to be considered when using the color attribute of the texture texel to save the position of the vertex?
Yes, that is the color precision.
Since RGB now represents the x, y, and z coordinates respectively, the precision of RGB should be carefully considered. For example, rgba32, each channel has only 8 bits, that is, there are only 256 possibilities for the position in a certain direction, which is a bad limitation for the position.
So is there a solution?
Of course, there is. Since this is a problem related to color precision, the simplest solution is to increase precision. For example, when writing this article, I used the RGBAHalf texture format, and its precision is 16 bits per channel.
ref:
【1】GPUInstancing 【2】How to take advantage of textures in the vertex shader 【3】GPU Gems 3 Chapter 2. Animated Crowd Rendering
My new book!
Hey friends, I am truly excited to announce that my new book is ready for pre-order on Amazon!
In this book, we will explore how to use the Unity game engine and the Microsoft Game Dev, including the Microsoft Azure Cloud and Microsoft Azure PlayFab services, to create games.


