
How To Publish A Private Repository Via GitHub Packages, GitHub Workflows, And Gradle
Publish your Android or JVM library via GitHub Packages and GitHub Actions
GitHub is likely the most well-known service for hosting Git repositories.
While many projects are publicly available and published under an open-source license like Apache-2.0, organizations or even individuals may have the desire to keep their code private while still being able to easily incorporate their codebase into other own private projects.
In this article, you will learn how you can publish your private GitHub project as a library with the help of GitHub Actions and GitHub Packages and afterward see how you can include it in your projects.
Step 1: Create a GitHub repository for your library
Because we will use GitHub Actions and GitHub Packages, to follow along it is required that you host your repository on GitHub.
GitHub Actions are bundled tasks that can be included and combined in so-called “workflows”. A workflow can be used to build up continuous integration (CI) and continuous deployment (CD). It is an automated process that can be triggered either manually or based on custom triggers like a git push on a specific branch.
GitHub Packages on the other hand is a package hosting service like the Maven Central Repository for example. It allows us to host our library so that other people can download them into their projects.
While Maven Central repositories are generally accessible to the public, you’ll need to provide credentials for authentication to download and install a library from GitHub Packages.
The benefit of using GitHub Packages, however, is that, if you already have your repository on GitHub, you don’t have the hustle to set up further things on other package hosting services and have it all in one place.
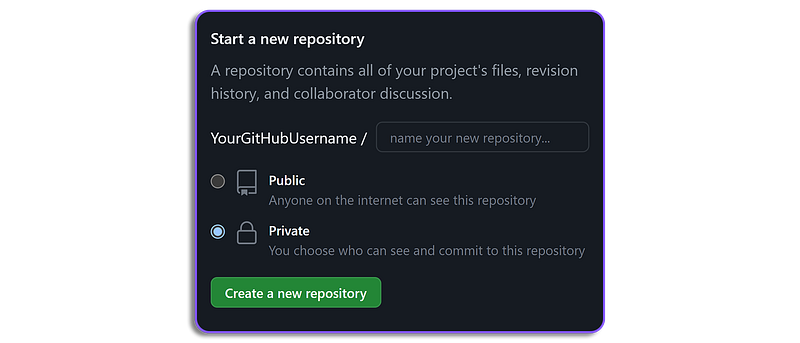
1.1 Create a new public repository
If you don’t already have one, the first step is to create a new private GitHub repository.
Of course, the content of this article also works for a publicly available GitHub repository.
Note: Even if you can publish your library to GitHub Packages also on a public repository, GitHub Packages is not feasible for hosting libraries that should be publicly available or to be more specific, available without authentication.
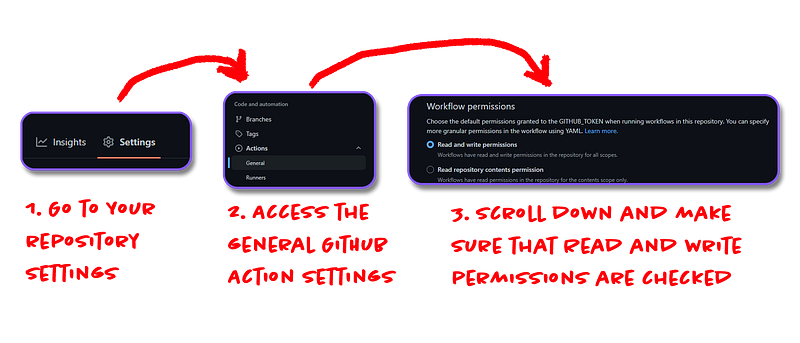
1.2.1 Grant permission to the GitHub workflows
Uploading packages to GitHub Packages requires specific permissions. Because we want to use a GitHub workflow, we need to make sure that it has sufficient rights.
Even if per default the settings should be fine, make sure that the Workflow permissions are correctly set to Read and write permissions.
To access these settings, go to your repository Settings tab → Actions → General and then scroll to the very bottom of the page.
You can take a look at the graphic below for a visualization of this step.
Step 2: Set up your library for publishing
To publish a project via Gradle, we use the maven-publish plugin. Include it in your build.gradle by adding it to the plugins block.
Groovy
plugins {
  ..
  id("maven-publish")
}
Kotlin DSL
plugins {
  ..
  `maven-publish`
}
Next, we need to define the package repository or service we want to deploy to. Because we want to publish our package to our repository’s GitHub Packages, we need to define the respective URL with the schema https://maven.pkg.github.com/YOUR_GITHUB_USERNAME/YOUR_REPOSITORY_NAME.
Groovy:
publishing {
    repositories {
        maven {
            name = "GitHubPackages"
            // Note that your GitHub username should be in lowercase.
            url = uri("https://maven.pkg.github.com/YOUR_GITHUB_USERNAME/YOUR_REPOSITORY_NAME")
            credentials {
                username = System.getenv("GITHUB_ACTOR")
                password = System.getenv("GITHUB_TOKEN")
            }
        }
    }
    ..
}
Kotlin DSL:
publishing {
    repositories {
        // Note that your GitHub username should be in lowercase.
        maven("https://maven.pkg.github.com/YOUR_GITHUB_USERNAME/YOUR_REPOSITORY_NAME") {
            name = "GitHubPackages"
            credentials {
                username = System.getenv("GITHUB_ACTOR")
                password = System.getenv("GITHUB_TOKEN")
            }
        }
    }
    ..
}
Next, we need to add some info for our package. We can do that inside the publishing block by adding a publications block.
Take a look at the following for an example:
Groovy:
publishing {
    ..
    publications {
        gpr(MavenPublication) {
            groupId = "com.yourgroupid"
            artifactId = "yourArtifactId"
            version = "1.0.0"

            from(components.java)
    }
}
Kotlin DSL:
publishing {
    ..
    publications {
        register<MavenPublication>("gpr") {
            groupId = "com.yourgroupid"
            artifactId = "yourArtifactId"
            version = "1.0.0"

            from(components["java"])
    }
}
Step 3: Setup the publishing GitHub workflow
To automate the process of publishing a new version of a library, we make use of GitHub Actions.
The goal of the workflow is to automatically execute the publish gradle task we set up in the previous step, as soon as we publish a new release of our library in our GitHub repository.
We can create a sequence of GitHub Actions in form of a GitHub workflow. To create that workflow for our repository, create a new file in your repository with the following folder structure: .github/workflows/publish-library-workflow.yml.
The complete workflow snippet for the publish-library-workflow.yml that allows publishing a JVM/Android library via Gradle can be taken from the snippet below:
name: Publish package to GitHub Packages
on:
  release:
    types: [created]
jobs:
  publish:
    runs-on: ubuntu-latest
    permissions:
      contents: read
      packages: write
    steps:
      - uses: actions/checkout@v3
      - uses: actions/setup-java@v3
        with:
          java-version: '17'
          distribution: 'adopt'
      - name: Validate Gradle wrapper
        uses: gradle/wrapper-validation-action@e6e38bacfdf1a337459f332974bb2327a31aaf4b
      - name: Publish package
        uses: gradle/gradle-build-action@67421db6bd0bf253fb4bd25b31ebb98943c375e1
        with:
          arguments: publish
        env:
          GITHUB_ACTOR: ${{ secrets.GITHUB_ACTOR }}
          GITHUB_TOKEN: ${{ secrets.GITHUB_TOKEN }}
Let’s quickly discuss what this snippet does:
on.release.types: [created]: The workflow is triggered as soon as a new release of our GitHub repository gets published.- uses: actions/checkout@v3: We check out the current state of our repository- uses: actions/checkout@v3: We set up a Java environment with version 17 of the JDK.- uses: gradle/wrapper-validation-action: Verifies that the gradle wrapper is executable.- uses: gradle/gradle-build-actions: Allows us to execute a Gradle task from our checked-out repository project. Thewith.arguments: publishexecuted thepublishgradle task.
In step 1.2.1, we granted permissions to GitHub workflows within our repository so they can authenticate properly with GitHub Packages and automatically upload new versions of our library.
To do this, we provide the GITHUB_TOKEN and GITHUB_ACTOR secrets as environment variables in our process. The GITHUB_TOKEN grants access permissions, while GITHUB_ACTOR is equal to the GitHub account name that triggered the workflow.
Both secrets are automatically available to GitHub Workflows as GitHub secrets, but we must explicitly supply them as environment variables for our Gradle process to access them.
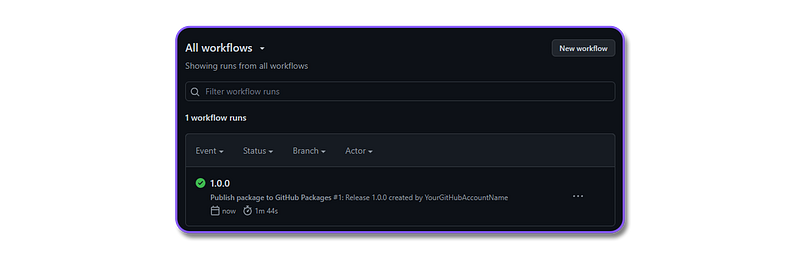
Step 4: Publish Your Library
Now that we have our workflow correctly set up, let’s see how we can trigger the process of publishing a new version of our library.
The graphic below shows you how you can publish a new library version.
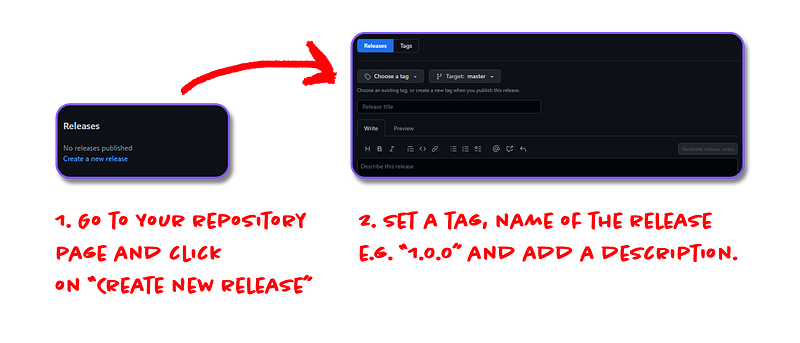
After you clicked on publish, the workflow will be triggered. If you go to the Actions tab, you will see that our previously created publish-workflow runs.
Step 5: Use your published library in a project
In the following section, we will see how we can use our published library in another gradle project.
5.1 Setup A GitHub Personal Access Token
Because GitHub Packages requires a personal access token in the classic variation for downloading and installing, we need to create a new personal access token that will allow us to authenticate and download our package.
To create a new personal access token, you need to go to your Developer settings page. Click on your profile image → Settings and on your profile settings page click on the bottom left on Developer settings like it’s visualized in the graphic below.

Next, create a new personal access token (classic). Take a look at the graphic below to see how you get to the respective creation page. Note that you will need to type in your GitHub password if you want to access the token generation page.

On this page, you have to set a few configurations:
- Note — Enter some information about what the purpose of this key is going to be. In our case, we will need it to download new versions of our library from GitHub Packages.
- Expiration — Determines how long will your token be valid. After expiration, you will need to generate a new token.
- Selected scopes — Here we define what our token is capable of. For downloading GitHub packages, make sure you have at least
read:packagesactivated. For further information about the scopes and their capabilities check out the official documentation.
5.2 Include the library in a project
Every repository’s GitHub Package acts as its own repository. To finally use your published library in a project, we first need to add the repository including our credentials in our build.gradle file.
We don’t want to provide our credentials directly in our build.gradle but either receive them from environment variables, you set in your OS, or by providing the credentials via gradle.properties file.
For the properties variation, create a new gradle.properties file in the project’s root folder and add the following two variables:
gpr.user=yourGitHubUsername
gpr.key=thePersonalAccessTokenWeCreatedInSection5.1
The samples below show how you have to add the GitHub Packages repository to your build Gradle’s repositories block. Note how we use here the variables from the gradle.properties file or the USERNAME and TOKEN environment variable respectively if the properties variable cannot be found by Gradle.
Note: Please make sure that you don’t this file into GitHub. You should directly add the file to your
.gitignoreto not accidentally publish it.
Groovy
repositories {
    maven {
        url = uri("https://maven.pkg.github.com/YOUR_GITHUB_USERNAME/YOUR_REPOSITORY_NAME")
        credentials {
            username = project.findProperty("gpr.user") ?: System.getenv("USERNAME")
            password = project.findProperty("gpr.key") ?: System.getenv("TOKEN")
        }
    }
}
Kotlin-DSL
repositories {
    maven {
        url = uri("https://maven.pkg.github.com/YOUR_GITHUB_USERNAME/YOUR_REPOSITORY_NAME")
        credentials {
            username = project.findProperty("gpr.user") as String? ?: System.getenv("USERNAME")
            password = project.findProperty("gpr.key") as String? ?: System.getenv("TOKEN")
        }
    }
}
Now that we have the repository in place, the last remaining part is to add the dependency to the dependencies block as you’d normally do it with any other library.
Groovy
dependencies {
  ..
  implementation "com.yourgroupid:yourartifactid:1.0.0"
}
Kotlin DSL
dependencies {
  ..
  implementation("com.yourgroupid:yourartifactid:1.0.0")
}
Now, after syncing your Gradle files, you should be able to access your library.
Conclusion
When working on private projects or in an organization, you often have the case where you need to use specific code snippets repetitively in not only one but multiple of your projects.
Even if your project cannot be published as a publicly available library, it often makes sense to publish it as a private library so you don’t have to include it manually as a module for every new project and also have the flexibility to dynamically provide new versions of the library.
In this article, we saw how we can publish a private GitHub repository as a library with the help of GitHub Workflows.
However, the main disadvantage of this approach is that you not only need to provide the GitHub Packages URL directly but also maintain the credentials to access it.
Another disadvantage is, at the time of writing, that even if you set your repository public, you will still need to authenticate to access the GitHub Packages. So using GitHub Packages is at the time of writing not feasible for hosting libraries that should be publicly available.
I hope you had some takeaways, clap if you liked my article, make sure to subscribe to get notified via e-mail, and follow for more!
Level Up Coding
Thanks for being a part of our community! Before you go:
- 👏 Clap for the story and follow the author 👉
- 📰 View more content in the Level Up Coding publication
- 🔔 Follow us: Twitter | LinkedIn | Newsletter
🚀👉 Join the Level Up talent collective and find an amazing job


