How to properly use CloudFront to Cache an API with Cache-Control and HTTP 304 to provide cache revalidation functionality.
HTTP Developer Documentation from Mozilla explains HTTP Caching very well. However how does that relate to the AWS technology stack? Cache control allows the origin to have control over what is cached, how long it is cached, and how to invalidate a cached response.
Let’s start with a diagram. The original work is located in the MDN documentation under the freshness section.

Looking at the diagram above you can see three requests. A new request, one 10 seconds later, and then one 110 seconds after the first request. This is useful to demonstrate when the Origin (API Gateway) is queried and how it handles stale data.
First Request
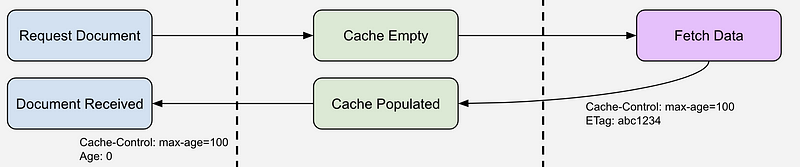
As expected, the first request hits the CloudFront CDN and the request is not in cache. CloudFront will request the data from the origin. Depending how you have your CloudFront Behavior configured this includes passing request headers and/or querystring parameters back to the origin. For API requests we minimally want to pass querystring parameters back. The origin fetches the data and returns it along with two additional headers: Cache-Control and ETag.
These additional headers work together to manage when the CDN validates the data in its cache. First, the Cache-Control header’s max-age option tells the cache how long it can blindly serve up a piece of content from its cache. It is important to know that after the max-age has been exceeded it does NOT mean that the cached content will be removed. It also does NOT mean the cached content will persist in the cache. In fact it is up to the prioritization algorithm in the cache implementation to determine which content stays or for how long. However the max-age attribute allows us to recommend to the cache how long it should persist. When the max-age value (in seconds by the way) is exceeded the cache is expected to revalidate the data by asking the origin (API Gateway) if the underlying data for the request is different from what the cache has as stale data. More about that later.
The ETag header is instrumental in this process as it effectively marks the data in the cache with either a timestamp or hash of the data. This ETag is used when re-validating the contents of the cache. In the third request I will discuss how this works in more detail.
Second Request

In the diagram above, the second request was made 10 seconds after the first request. The max-age was set to 100 seconds by the origin’s response and therefore the cache has been instructed to return its copy of the data to the requestor regardless if new data is available at the origin. So the cache sends its cached copy back to the requestor and nothing else happens.
Third Request

The diagram has a third request at 110 seconds after the original request. 10 seconds after the max-age attribute indicates. In this case the cache is responsible for revalidating the ‘freshness’ of the data it has in its cache. How does it do that? Enter the If-None-Match request header. The cache gathers up the ETag that was returned from the origin when the data was originally requested and passes the ETag value in the If-None-Match header when making a revalidation request to the origin. Basically this request is the same as the original request from data in the first request except that you will now see the If-None-Match header in the request headers.
The origin now has to quickly determine if the underlying data has changed since it was cached. If the data has changed we simply return the new data with a standard HTTP 200 response. If the data has not changed and the copy that the cache has is still valid the origin returns an HTTP 304 with no payload. This 304 instructs the cache to reset the age of the data in the cache and to return the cached copy to the requestor.
The ETag calculation is extremely important in determining Cache and Origin performance. One method of generating an ETag is to perform a hash on the data. For example, if you have an API that returns a JSON response you may want to stringify the response and simply perform a SHA1 hash on the string. If the data changes the hash also changes. You could return this hash as the ETag. The drawback to this approach is that it requires you to fully query, deserialize, and hash the FULL data set in order to generate the ETag.
For small datasets or very fast queries this is a fine approach. However if you have more complicated, slower, or large datasets this approach will end up only saving you some network bandwidth and the time it takes to transport the result from the origin to the cache.
Timestamps as ETags A more efficient way to leverage the ETag is to return a timestamp as your ETag. Why? Because with most back ends you can more efficiently compute the last change in a data set than you can compute a hash of the total record set.
For example, let’s pretend that you are searching an orders data set. Maybe the api request looks like this:
HTTP GET /api/orders?search=C-3POThis search request may result in code like the following:
const records = await this.db
      .collection(collection)
      .find(query)
      .project(projection)
      .sort({createdAt:-1})
      .skip(skip)
      .limit(limitTotal)
      .toArray();
There may be hundreds or thousands of records in the result array. If you were using a hash for the ETag you would need to query this full recordset and then create the hash. However, if you use a timestamp instead you could simply query the most recent record like this:
const records = await this.db
      .collection(collection)
      .find(query)
      .project({createdAt: 1})
      .sort({createdAt:-1})
      .limit(1)
      .toArray();
This query simply plucks the MOST recent record from the dataset and uses the createdAt (or whatever created/modified timestamp column you have on your data set) value for the ETag.
So how does this help? Again, on small record sets it does not help much. On large or complicated data sets it is very helpful as it gives a performance increase on the query, the transfer of the data to hash, and the actual hashing time.
So when constructing an ETag it may be best for you to use the timestamp of the most updated record in the data set. Then, when the cache asks you to revalidate the request you can perform a very simple query to fetch the latest timestamp from the database and use that to compare.
Example in action.
The example below is very crude. Please note there is a lot of error handling and other things missing from this. Take this as a rough example of how to handle cache revalidation and not an example of how to write TypeScript.
In the code snippet above you can see that we are always performing two calls. One to get the most recent created at timestamp and one to get the records based on the query. Notice that we first check to see if there are any records at all. If not, we just return a 204 and we are done. Otherwise we look to see if there is an if-none-match header. If so, we compare the value of the header to the value of the mostRecentCreatedAt value (which is just a JS timestamp in this data set). If the header value matches the value from the data set we can simply return a 304 with no payload. The cache will return the data is has stored to the requestor.
However, if there is no if-none-match header or the header value does not match the mostRecentCreatedAt value then we will make the full dataset query, set the new ETag header and return the full payload.
Using Postman to tell what is happening in the cache. Where did my data come from? Was it cached in the CDN? Was it stale but still the same? Or did my data come directly from the origin?
These are some questions you may have about your cached data. You can answer these question by examining the response headers in postman when making calls to your API.
For example, on the very first call to your API you will see an X-Cache header with the value Miss from cloudfront.

In that response you can see that the max-age is set to 300 seconds. So all requests in the next 300 seconds will be delivered directly from cache and the origin will be none the wiser.
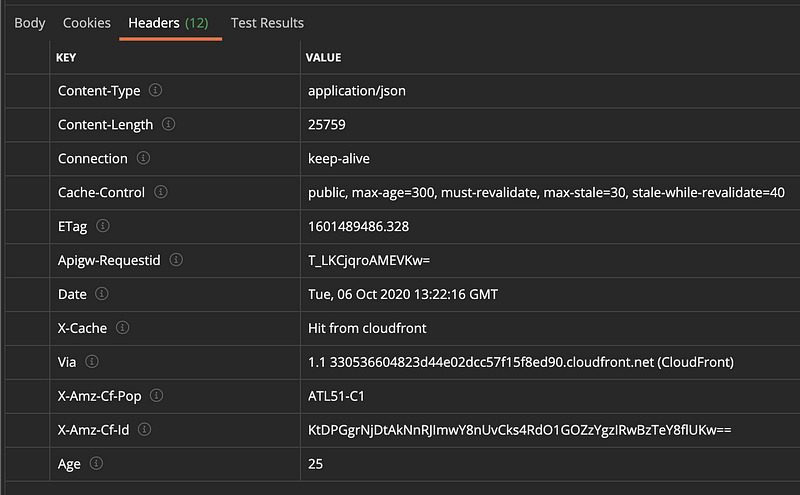
In the screen clipping above, note the Age header that was returned. This is the time in seconds that the response has been sitting in the cache. In this case the data returned to the requestor (postman in this instance) has been sitting there for 25 seconds.

But what happens if the Age of the data in the cache exceeds the max-age of the cache-control header? This causes CloudFront to ask the origin if the data it has cached is still valid. In the screen shot above you can see that the origin sent the cache back an HTP 304 message with no data. The cache saw that and gave the requestor back the data it had in its cache even though the data in its cache was older than the max-age. This is the performance optimization of properly using the right ETag and properly responding to a cache revalidation request.
But what happens to the data in the cache if the origin sent back a 304. Is it still expired? No. The age of the content in the cache is reset. This is evidenced in the screen clipping below.

After the cache revalidates the data in the cache, the Age of the data in the cache is reset to 0. This means that a request 3 seconds after a successful revalidate request will result in a Cache Hit and an age of 3.
What about Edge-Optimized API Gateway endpoints?
Edge-Optimized API Gateway endpoints basically sets up a CloudFront distribution and maps the origin and the behavior to your API Gateway. It gives you a simple way to distribute your API closer to your end users. It does not however do anything special for managing cache control for you unless you are also leveraging the built in API Gateway Response Caching. In which case the cache control is also largely handled for you. However you still have the issue of cache revalidation and cache invalidation that you need to account for in your API Code. There is no way for the cache to know if your underlying data has changed without actually asking your api.
Hopefully this provides a better understanding of how CloudFront caching with API Gateway works and how you can build your API’s to properly handle cache revalidation.


