
How to Properly Setup Your Github Repository — Windows Version
If you wish to see this post in action, you can check this playlist on YouTube: Getting Started with Git and Github — Windows Version.
As a data scientist, I interact frequently with people who are aspiring data scientists, and usually one of my recommendations to them is to start working on projects and publishing their work and code on a public platform in order to be able to showcase their work to prospective employers. One such public platform is Github.
If you do not yet know what Github is, suffice to know that it is a development platform that provides teams, developers, and even individuals with the ability to host, review, and maintain their code and control it with version control. Also, one can fork a repository, meaning copy the source code, and then customize it for their own applications without impacting the original source code. In summary, it is an awesome platform, as being familiar with version control systems is a must-have skill for any aspiring data scientist.
However, I often get approached by aspiring data scientists having trouble with creating a Github repository and setting it up properly so that they are able to continuously save their work to the repository, or to sync it with the local version of the repository, without any issues. Therefore, I decided to write this post to walk those having difficulties with Github through the process of creating a Github repository and setting it up properly so that they are able to seamlessly sync it with its local version.
Prerequisites:
Please make sure that you have a Github account. If you do not, head over to github.com and click on the Sign up button on the top right corner and follow the instructions to create your account.
Please note that the steps and instructions described in this post are relevant to a Windows computer, so if you are using a Mac computer, please check the Mac version of this post.
Also, this post assumes that you already have Git installed. If that is not the case, then please take a moment and install Git Bash for Windows. You can select the default options throughout the installation wizard.
Step 1: Authenticate Yourself and Your Machine
Now that you have your Github account created, the first step is to connect your machine to your Github account through an SSH key. With an SSH key, Github is able to authenticate you automatically every time you try to manipulate your repository without the need to provide your username or password, which is super convenient.
To create an SSH key, simply follow the steps outlined below:
1. Launch Git Bash.
2. Type the following, replacing
ssh-keygen -t rsa -b 4096 -C "<your email address>"This will generate a new SSH key.
3. Next, you will be prompted to enter a directory to save the key. I simply press Enter to accept the default location, which is a .ssh folder in the home directory. In other words, you will be able to locate the key in “~/.ssh/id_rsa”.
4. You will then be prompted to choose a passphrase. I prefer not to have a passphrase; so just press Enter and Enter again to confirm the empty passphrase.
Now, if you navigate to the .ssh subdirectory, i.e., if you run the following in the Git Bash terminal,
cd ~/.sshand then,
lsto the list the contents of the .ssh subdirectory, you should find “id_rsa” and “id_rsa.pub” in the list of contents, where “id_rsa” is the private version of your key and “id_rsa.pub” is the public version of your key.
5. Finally, you will need to add the SSH key to the ssh-agent, which is meant to help with the authentication process. To do that, first you need to start the ssh-agent, so run the following in the Git Bash terminal:
eval "$(ssh-agent -s)"And then add the key to the agent by running the following in the Git Bash terminal:
ssh-add ~/.ssh/id_rsaStep 2: Add the Key to Your Github Account
The next step is to add the SSH key to your Github account. The first thing to do, is to run the following in the Git Bash terminal:
cat ~/.ssh/id_rsa.pub | clipWhat this does is it copies the public version of your key to the clipboard buffer.
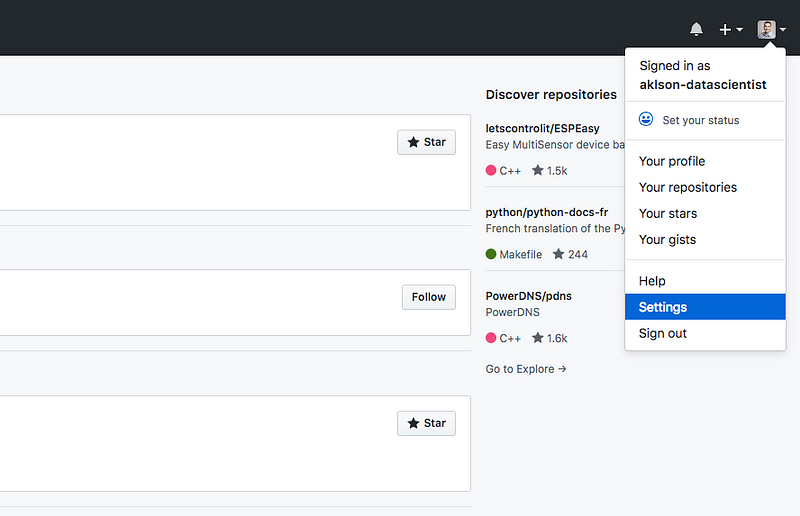
Then, go to your Github account, and click your profile pic in the top right corner of your Github account and select “Settings” from the drop-down menu, as shown below:
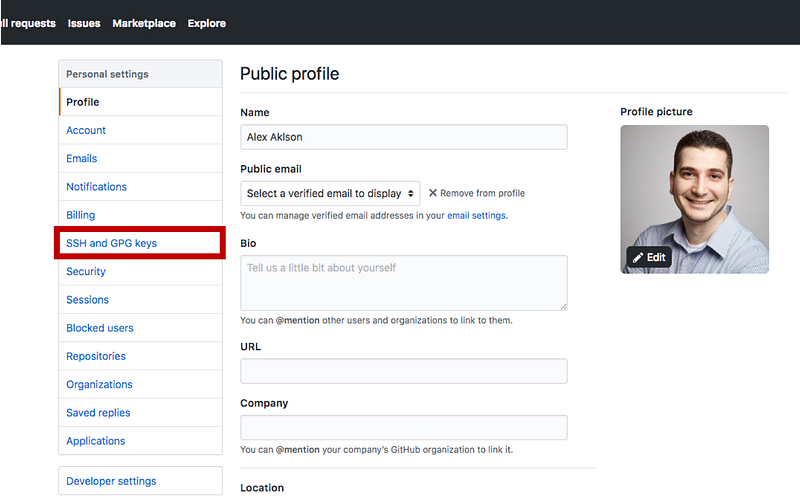
Under Personal settings, select “SSH and GPG keys”, as shown below:
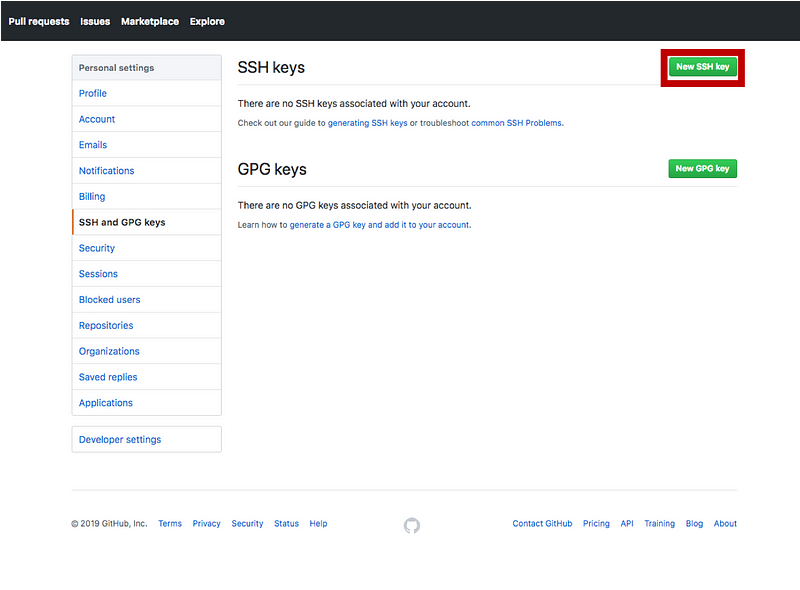
On the next page, click the button to add a new SSH key to your account, as shown below:
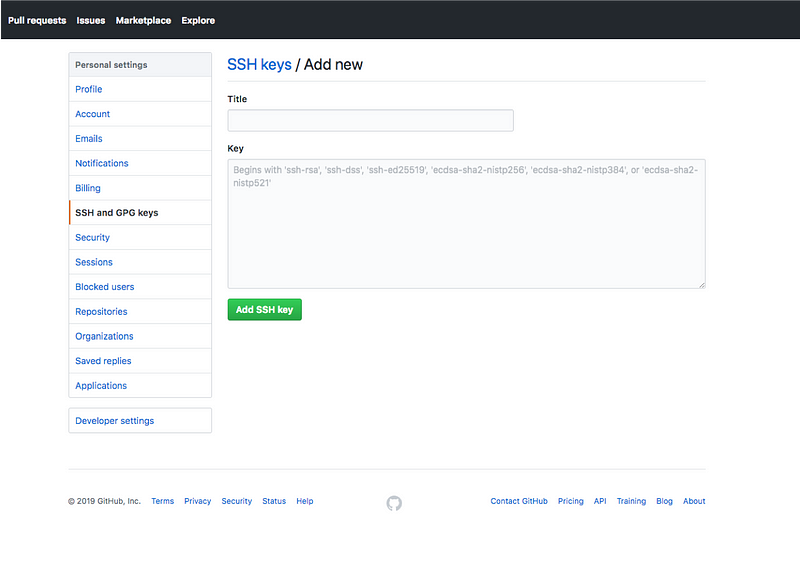
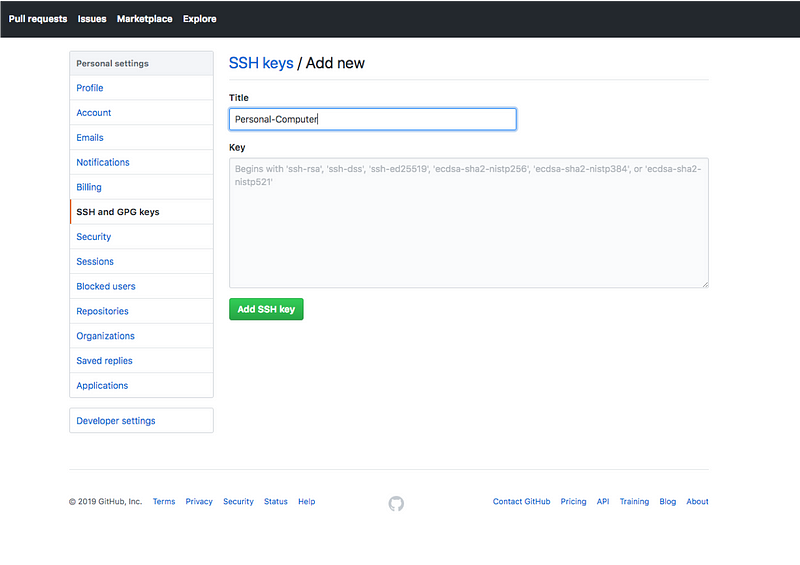
This will start a new form where you will have to add the key and give it a name as well.
For the title, you give the key a name that describes the machine associated with it. So, if it is your personal computer, then you can name it “Personal-Computer”, as shown below:
Then, select the Key field, and press Ctrl-v to paste the key from the clipboard buffer. The pasted key should have your email address at the end, as shown below:
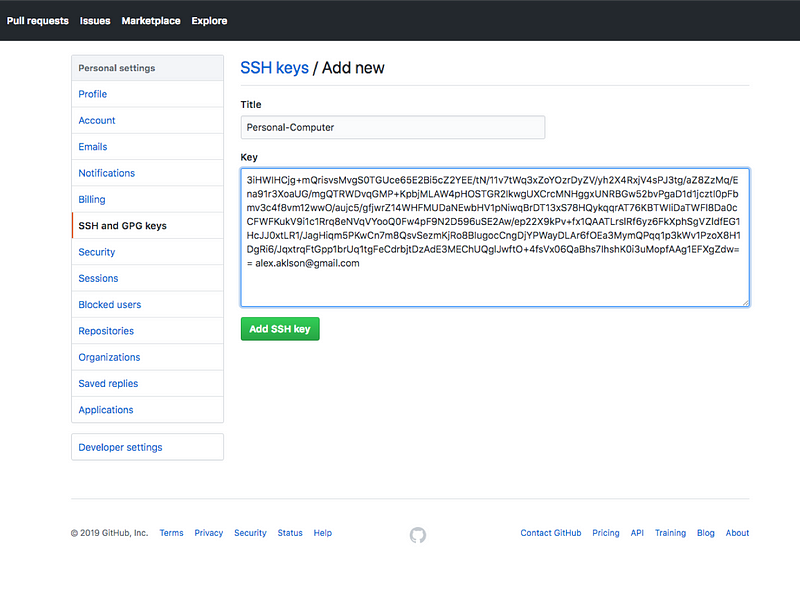
Finally, click the “Add SSH key” to complete the process of adding the SSH key to your Github account.
Step 3: Create a Github Repository
Now that your machine is linked to your Github account, and Github is confident that any manipulation of any of your repositories coming from your machine would be initiated by you, let’s go ahead and create a Github repository.
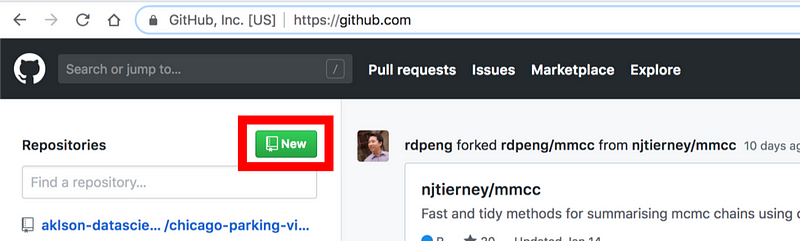
On the homepage of your Github account, you will see all your repositories listed on the left side of the page under Repositories, if you have any repositories. You can simply create a new repository by clicking on the green “New” button, as shown below:
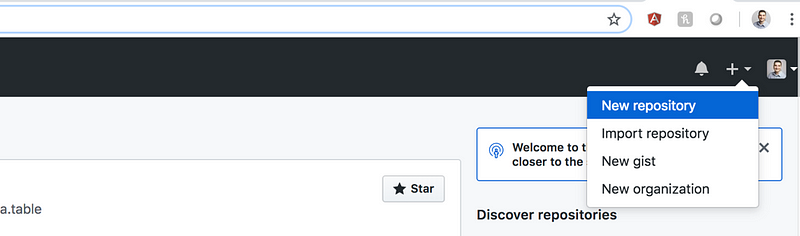
Another option to create a new repository is by clicking the “+” sign next to your profile pic and selecting “New repository” from the drop-down menu, as shown below:
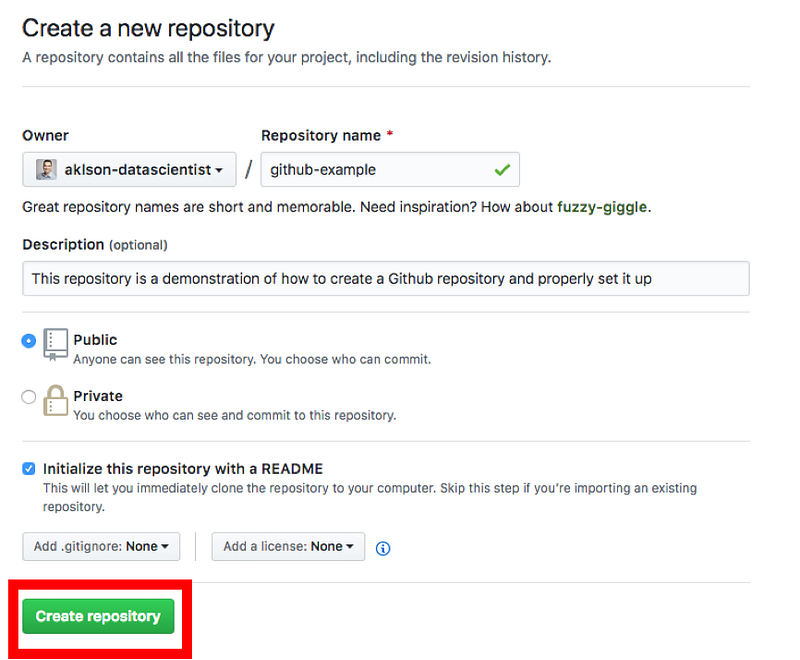
Either option will take you to the following page, where you will have to fill out a form to create the new repository:
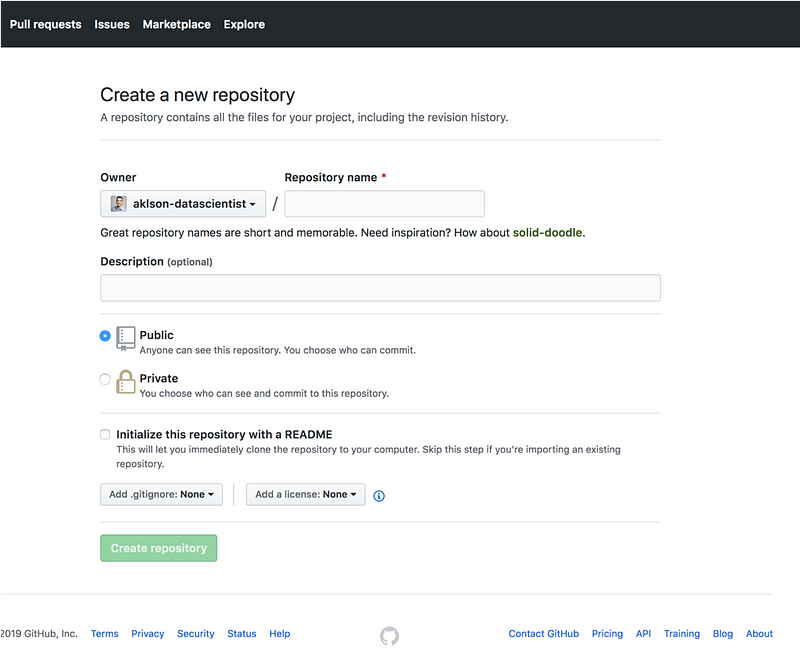
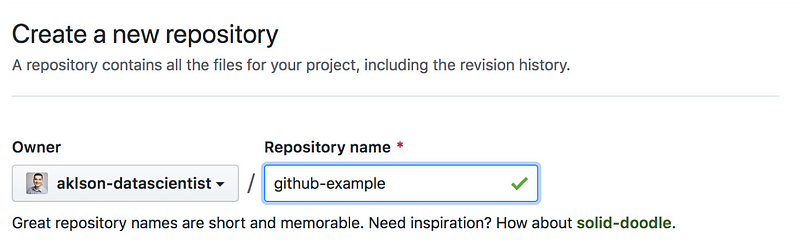
The first field you will need to fill out is the repository name. Here, I am naming the repository “github-example”, as shown below.
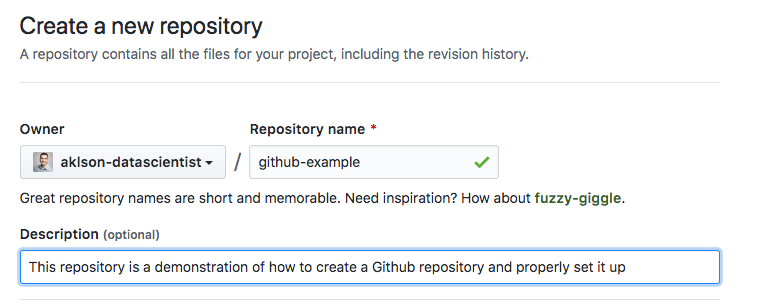
The next field is a description of the repository. Although the field is optional, it is highly recommended in order to give other users an idea of what the repository is about, and it reflects a professional image of you.
Next, you can choose whether you want the repository to be public or private. Private repositories are not free, but let’s say you you are working with a client, and you sign an NDA where you cannot disclose that you are working with them. In this case, you should select the private option if you wish to use Github to share your work with them.
On the other hand, if your goal is to showcase your work to potential employers or to share your work with other data scientists, then you want your repositories to be public.
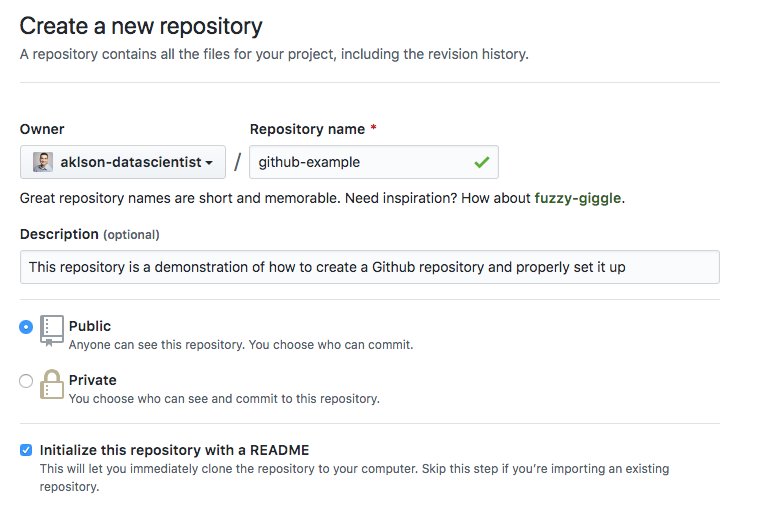
And make sure to check the option of initializing your repository with a README file, as shown above. The description that you added earlier would automatically become part of your README file, as you will see later.
Finally, go ahead and click the button to create the repository, as shown below.
Here is how your repository would look like.
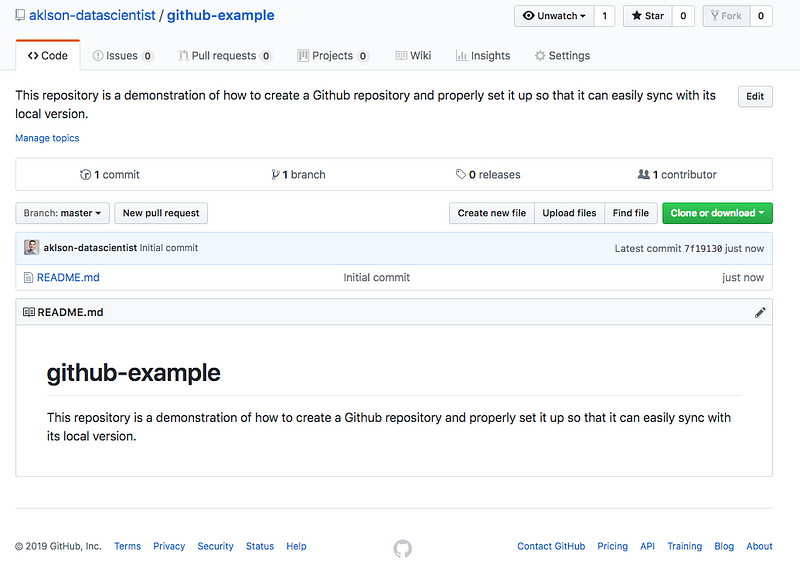
The name and the description of the repository appear at the top. Next, you would see a list of the files and folders that are in the repository. Finally, you would see what is in the README file.
Since the README file is the first thing users see when they land on your repository, it is good practice to populate it with useful information to users. Using the pencil icon on the right, you can edit the README file and include, for example, a detailed description of the repository. You can also add special instructions or prerequisites to use the repository, and perhaps some examples of how to use the repository.
Step 4: Clone Your Repository
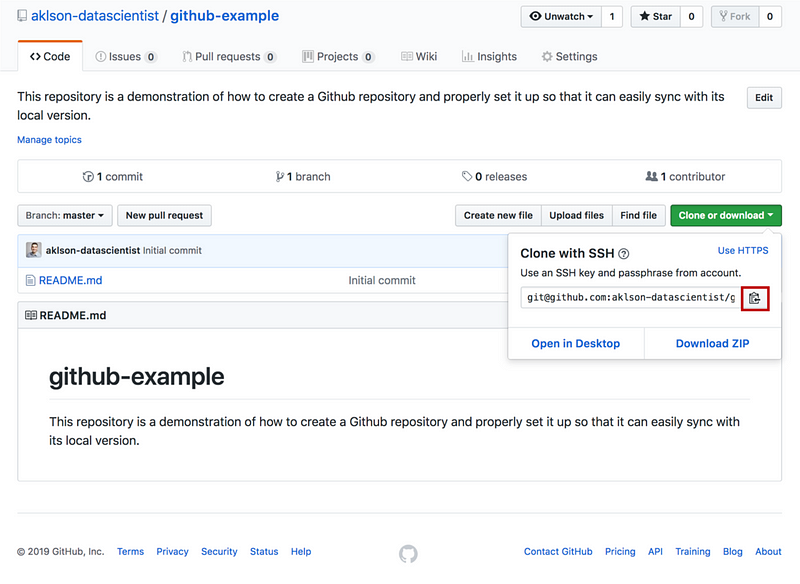
Now that you have your repository created, let’s create a local version of it. This is called cloning. To do that, click the green “Clone or download” button and click the copy icon to copy the repository URL to the clipboard buffer. Make sure that you are cloning with SSH and not with HTTPS.
Then, switch back to Git Bash, and navigate to the directory where you want the local version of the repository to reside. For example, you can create a directory called “projects”, that houses all the projects that you plan to work on. To do that, run the following in the Git Bash terminal:
mkdir ~/Desktop/projectsThis will create a folder called “projects” on your Desktop. Then navigate to this directory by running the following in the Git Bash terminal:
cd ~/Desktop/projectsNow that you are inside the “projects” directory, run the following to clone your repository, replacing <repository_URL> with the repository URL that you copied earlier. You would simply press Ctrl-v to paste the URL:
git clone <repository_URL>For the github-example repository, I would execute:
git clone git@github.com:aklson-datascientist/github-example.gitThen, if you run the following in the Git Bash terminal:
lsyou should see a new folder with the name of your repository appear in the list of contents of the “projects” directory. So, in my case, I should see github-example appear as a folder in my “projects” directory.
Step 5: Push Your First Commit!
Now that you have your repository cloned, let’s go ahead and add a python script to our project. First let’s navigate to the cloned repository. In my case, I would run the following in the Git Bash terminal:
cd ~/Desktop/projects/github-exampleNow that you are inside the cloned repository, let’s create a Python script with a simple print statement:
print("Hello Github!")And let’s name the file, python_code.py. If you selected Vim as the default code editor when installing Git, then you can create this simple Python file using Vim. To do that, you can type the following in the Git Bash terminal:
vim python_code.pyThis will initialize an empty file for your Python script in Vim named python_code.py and then Git Bash would look like this:

Start by pressing i, in order to switch to the Insert mode. You should see the word “INSERT” appear on the bottom of the window.

Now, you can go ahead and add the Python code to print “Hello Github!”, as shown below:

To save the file, press ESC and then type “:wq” and hit Enter to save and return to the Git Bash terminal.
Here, I am just using the Vim editor here because I am creating a file with only one line of code, and it let’s me make changes to the repository quickly. For real projects, you should use an Integrated Development Environment (IDE), such as Sublime or Atom. Just make sure that the files are saved to your repository directory.
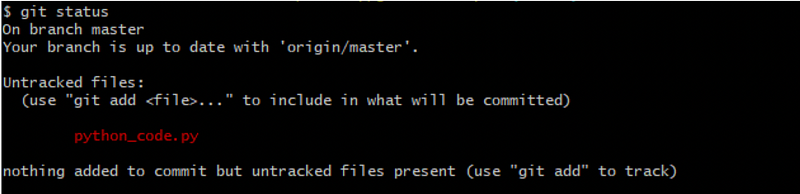
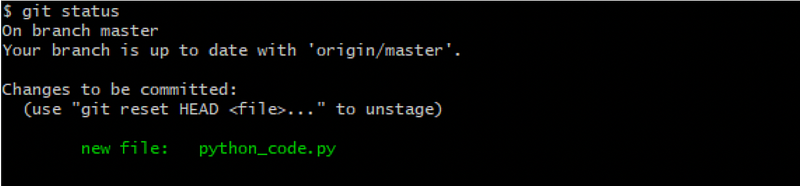
Now our local repository contains a new file, and therefore, it has changed and is not the same as the remote repository on Github. So if you run the following in the Git Bash terminal,
git statusthe changes in the repository should be displayed in red, as shown below:
Updating the remote repository or sync-ing it with the local version consists of three steps:
- Staging the changes.
- Committing them.
- Pushing them to the remote repository.
In order to stage the changes, you use the git add command. So, to stage the python_code.py file, we run the following in the Git Bash terminal:
git add python_code.pyIf we run git status again, the staged changes will be displayed in green, as shown below:
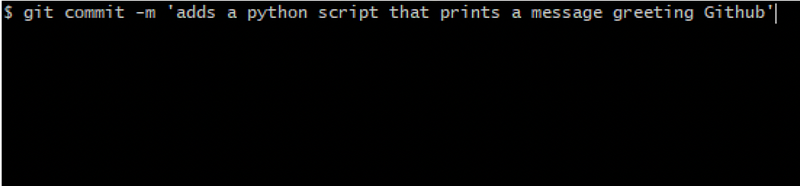
The next step is committing the changes. In order to do that, we use the git commit command. So, to commit the python_code.py file, we run the following in the Git Bash terminal:
git commit -m <message>and you replace <message> with a brief description that explains what the changes are. So, for committing python_code.py, I am using the message ‘adds a python script that prints a message greeting Github’, as shown below:
And once the command is executed, a summary describing the changes committed should appear, as shown below.

In the python_code.py case, the summary shows that it is just one file, with one insertion, where the insertion is the print statement that we added to the file. Had we performed more modifications such as adding or deleting more files or codes, then all of them would appear in the displayed summary as insertions and deletions.
The final step is to push the changes to the remote repository. In order to do that, we run the following in the Gib Bash terminal:
git push origin masteror just
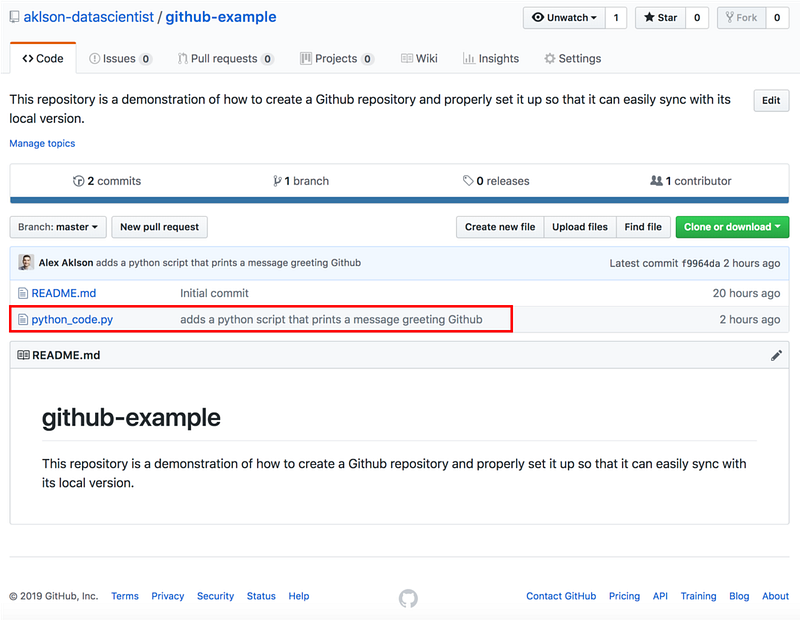
git pushAnd now if I check my github-example repository on Github, I should see the python_code.py file along with the message that I included when I ran the git commit command, as shown below:
Step 6: Congratulations!
Congratulations on successfully creating a Github repository and properly setting it up so that you are able to seamlessly update it as build your code and add more files to your project.
I hope you found this post helpful in at least getting you started with Github and understanding how to create a repository and push changes and commits to your repository in order to save your work and keep it up-to-date!


