
How to Modify Your Image to Fit on Your Social Media Site
Calculating your photo aspect ratio for publications.
The aspect ratio is the mathematic calculation of the difference in the width and height of the image. The first number before the colon is the width and the number following the colon is the height. For instance, a 16:9 aspect ratio for YouTube could describe a picture that is 16 inches wide by 9 inches high. Instagram likes photos to be 4:5 or square at 1:1. For example: a picture that has an aspect ratio of 4:3 might be a picture 4 inches wide by 3 inches high.
But what would an aspect ratio mean for a picture you’ve taken that you want to put up on a website? What are you supposed to do with these numbers and how would you ever change your image from one aspect ratio to another without your head exploding? This seems frightfully abstract. You just want to get your darn picture up with the text you’ve written. You aren’t an Astro physicist specializing in rocket science.
Here’ some help. If you have these software tools, you can change your aspect ratio and it and it won’t split your brain in trying to figure it out.
Two tools will do the job.
1. Adobe Photoshop is the primary key to managing your image re-sizing. For this article, I only have Photoshop CS5. If you use Adobe Cloud software, it will have some more advanced features but these more basic instructions will still help you accomplish your task.
2. Microsoft Excel can do the calculations for you. In Excel, I have created an Aspect Ratio Calculator and you can download it from my webpage here. The Aspect Ratio Calculator takes the math instructions I’ve found here and does the work for you. With this spreadsheet and Photoshop, you’ll be able to change the aspect ratio of most any image to coincide with your publication site requirements. It is designed to modify the calculations for landscape photos but it also can be used if you are trying to make a portrait image into a landscape. But more about that in Part 2.
First, find out what aspect ratio is advised for the website on which you want to place your image. The text you are writing will naturally flow like water on whatever site where you choose to publish. Each site has recommendations for the sizing and proportions of images for their site.
Square pictures are common and are where the aspect ratio is 1:1. The height is the same as the width.
Panoramic often refers to a 16:9 aspect ratio for landscape images.
Rectangular images are 3:2 (used in print or on phones) or 4:3 for a slightly taller rectangle image. These are considered the best for print and social media online.
Right away, you can relax several degrees if you don’t know the aspect ratio of your graphic. Just start out knowing whether your image is landscape where the width is wider than the height or a portrait where the height is taller than the picture is wide. Photoshop, or any other graphic editing program, will show you this.
Part 1 of this article will give you tools and methods for correcting landscape images’ aspect ratio. Separately, then, in Part 2, you will see how to turn portrait photos into landscape aspect ratios if they need to be re-sized.

Part 1 — Refining The Aspect Ratio For A Landscape Image
Here is the method for re-sizing your landscape image into a specific aspect ratio.
1. Find out what aspect ratio is recommended for the online publication. You need that ratio for the spread sheet tool. (For this first example, we’ll say we want a 4:5 aspect ratio.)
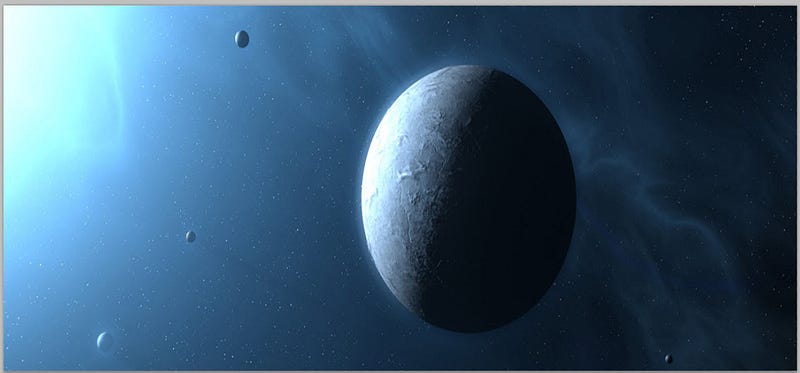
2. Have your chosen image in your working folder and open it in Photoshop. You should see that it is a landscape image. (If it isn’t, skip to Section 2 of this article for dealing with a portrait image. (For this first example, I’ve chosen a moonscape to illustrate a landscape image to go up on Instagram.) This is an image I bought twenty years ago from the Ryan Bliss’ wonderful art site at Digital Blaspemy.
3. In Photoshop, open the picture. See that the image is, in fact, a landscape one.

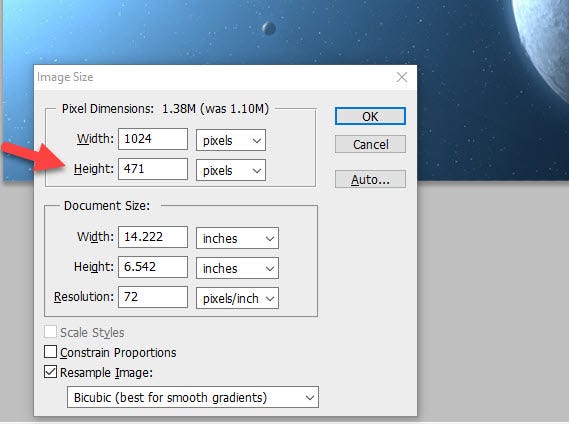
4. Next, in Photoshop, click on File / Image / Image Size so that you can see these settings.
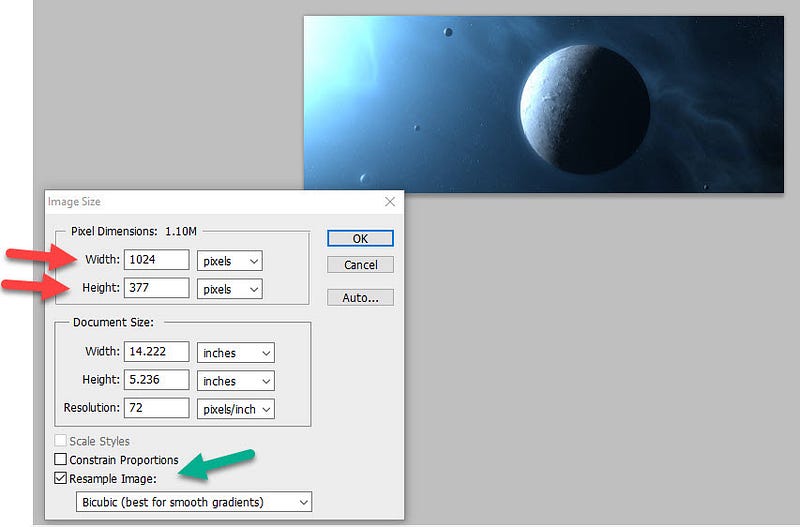
This shows the image is wider than it is high (landscape (see red arrows).
While you are in there, notice the check boxes to which the green arrow points. Make sure that ONLY the “Resample Image” is checked and not either of the two other options: “Sample Size” and “Constrain Proportions.”
5. We want to make sure the image has a 5:4 aspect ratio, not knowing what the current aspect ratio is. This is where we open up the Excel spreadsheet.
Obtain the Excel spreadsheet AspectRatioCalculator.xls here.
When you open it in Microsoft Excel, it looks like this:
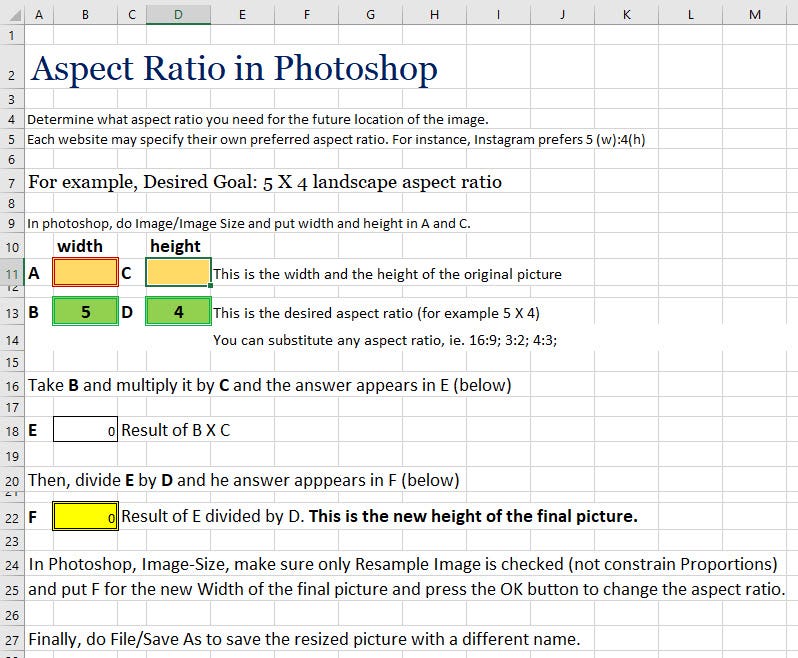
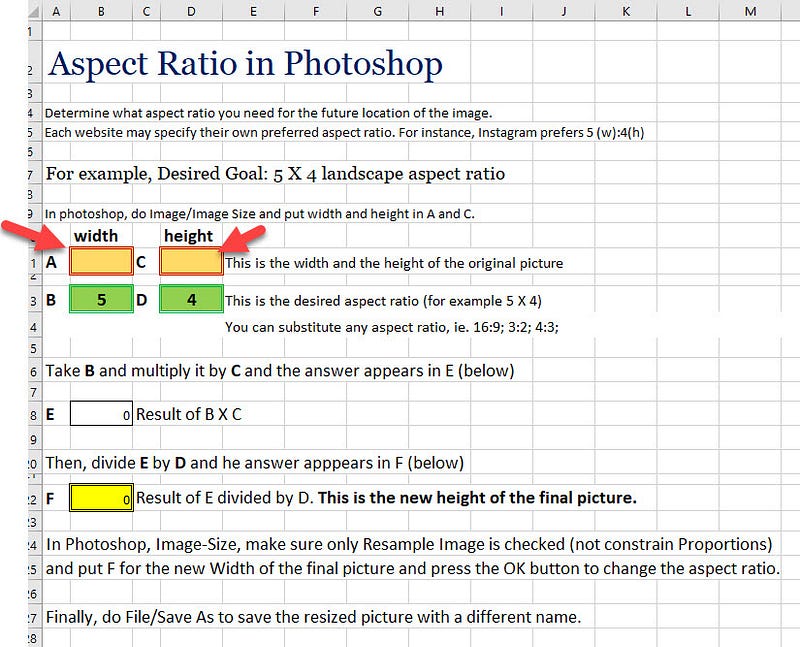
1. Looking at the image in Photoshop, you know that this image is now 1024 (w) by 377 (h) pixels. In this spread sheet, type in the width (1024) and the height (377) in the yellow width and height cells.
2. Set the desired aspect ratio to 5 and 4 (or a 5:4 aspect ratio) in the B and D cells. You can change the aspect ratio to any landscape aspect ratio (such as 16:9). Once you set the green cells at the desired aspect ratio, just put in the image’s current width and height.
The next screen shows the automatic calculation once you put in these measurements. In this case, you see the new automatic calculations are as follows:
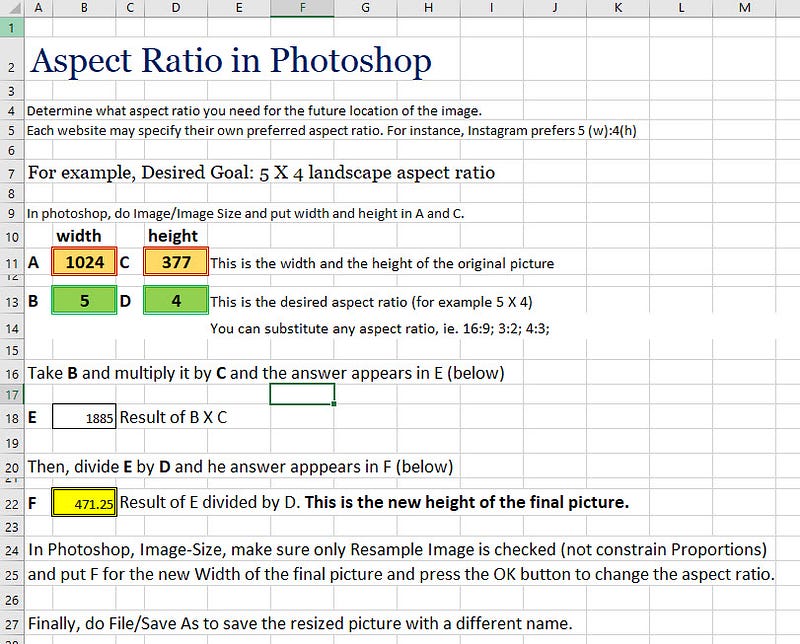
The number you want to change your image height to is in the yellow “F” cell. It is 471 (You don’t have to put in the decimal. Just remember 471.) This is an approximate stretching of the image height to more approximate the desired aspect ratio.)
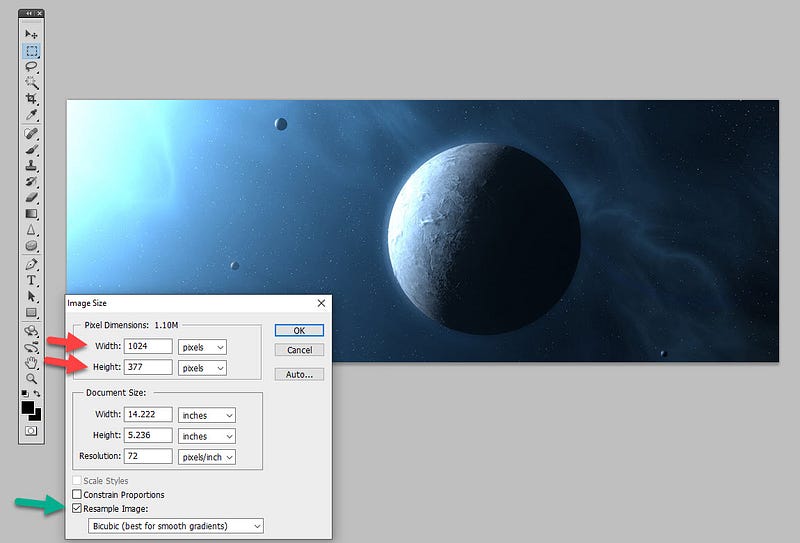
Going back to Photoshop, you see the revealed image size.
Be sure to have ONLY “Resample Image” checked (as indicated by the green arrow).
You only have to change the Height here in Photoshop (bottom red arrow) . Take the answer in the “F” cell (in the spreadsheet) and put it in the Photoshop Height field (replace 377 with 471) and hit your OK button.
The image will re-configure in Photoshop and have a closer approximation to 5:4. It will look like this:
Once you tap the OK button, the image will be redrawn in Photoshop:
Lastly, in Photoshop, click on File / Save As and save the modified graphic with a different name from the original. Remember where you saved it so you can upload it to your favorite image server and account.
This is how you stretch a landscape image to more approximate the aspect ratio you desire.
Part 2 — Refining the Aspect Ratio of A Portrait Image
Changing a portrait image to a landscape image.
This will require a little more work but you can still use Photoshop and the same Excel Calculator.
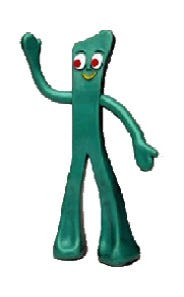
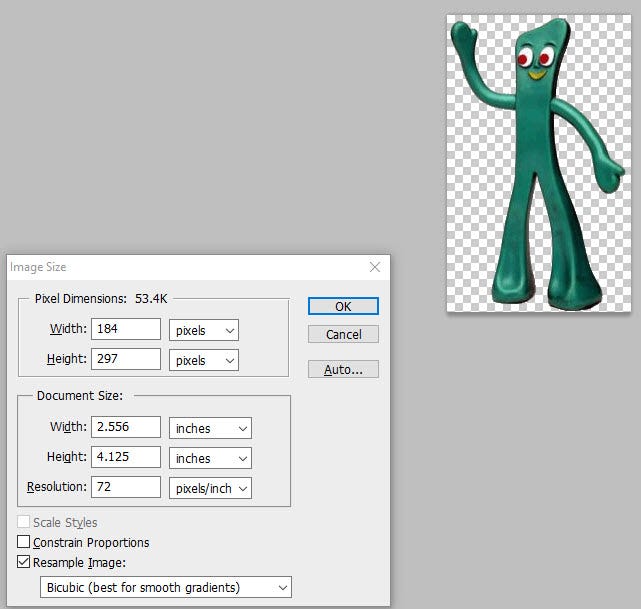
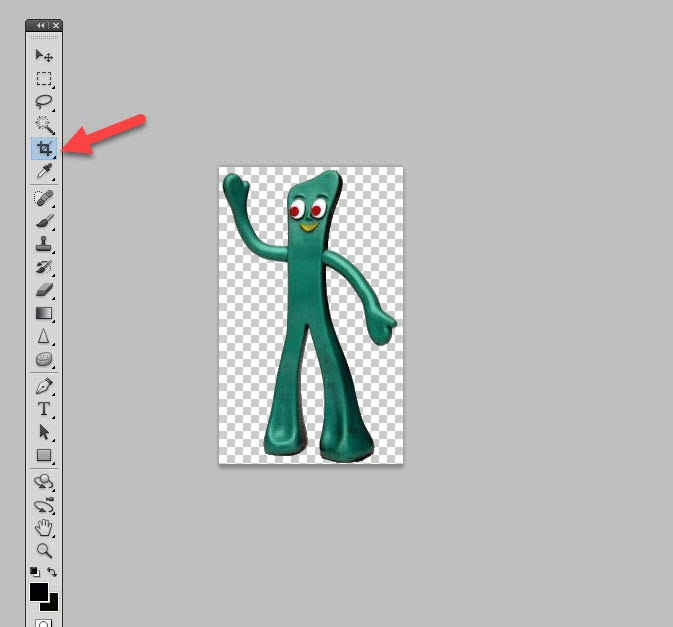
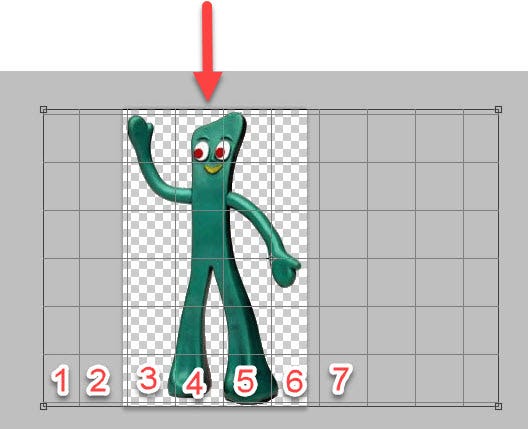
For this example, I’m using a portrait picture of the “Gumby” toy. It is portrait and measures 184 pixels width by 297 pixels height. Obviously, a portrait shape as it is higher than it is wide.
Open the image in Photoshop and click on File/ Image Size.
Now, open your Excel Aspect Ratio calculator file.
Be sure you delete any numbers that are in cells A and C.
For this example, we want the aspect ratio for our publication to be the 5:4 (landscape) even though it is currently a portrait image. But we don’t want to stretch and distort the portrait picture. We are going to use Photoshop’s cropping feature. So hold up on putting any numbers in the Excel sheet and go back to Photoshop for a minute.
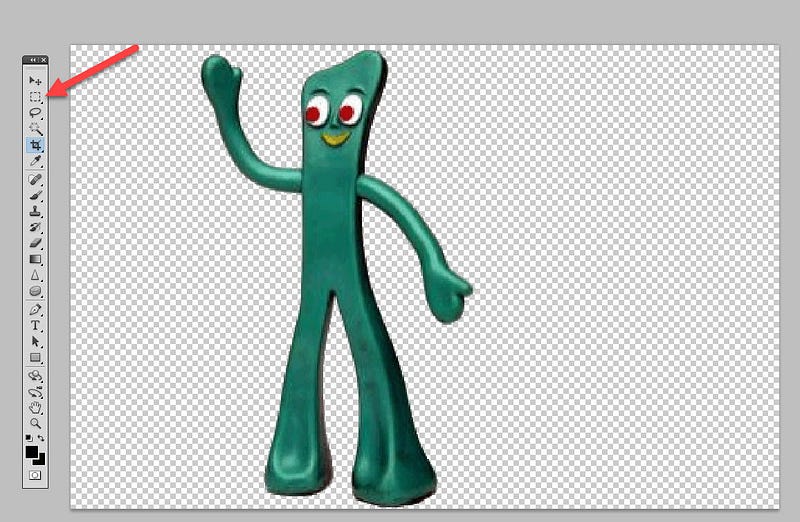
In Photoshop, view the image by itself on the screen. Click on the crop tool (see the red arrow) (or just hit the “C” key on your keyboard) and your cursor will change to a small crop symbol.
Look up to the top toolbar and make sure it is set to “Grid” as shown by the red arrow.

Next, place your cursor in the upper left corner of the image and click and drag down to the lower right mage so you have a grid completely overlaying the image (and extending down and to the right (as you see in this screen shot).
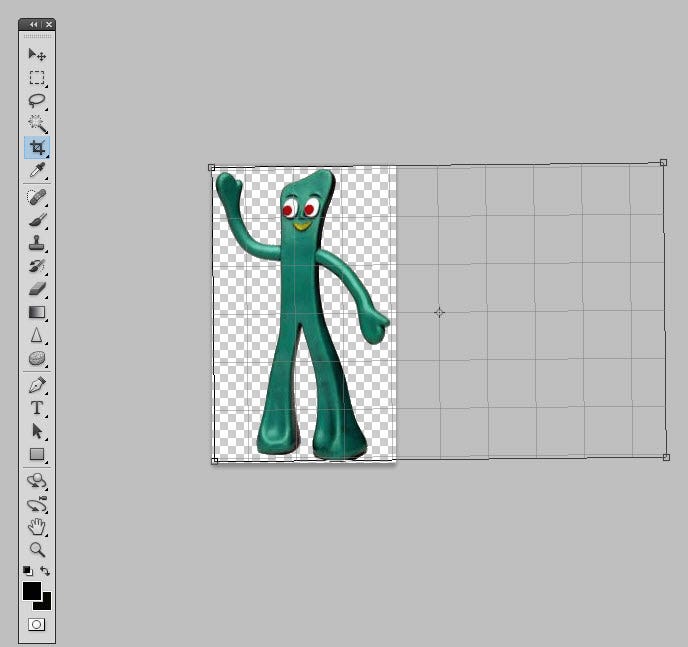
Notice the grid (squares) on top of the image. Count the number of the grid squares from left to right (there are 4 spanning the width of the image itself.
Now count the squares up to the height of the image (there are 6).
So temporarily, consider those squares to be similar to a measurement of the graphic’s width and height. 4 X 6. Pretend those squares are a measurement of the graphic. 4 x 6.
Now remember that and go back over to the spreadsheet.
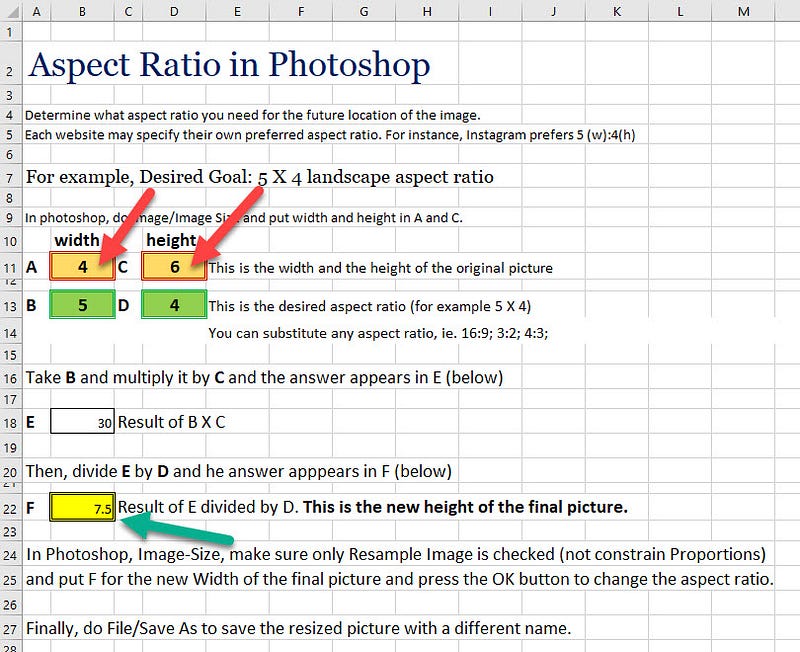
On the spreadsheet calculator, insert the numbers 4 (for the width) and the 6 (for the height) in the spread sheet (see the red arrows below).
In the spreadsheet, notice the yellow F cell. It has a calculation of 7.5 (which you can take as 7 and not worry about the .5). 7 should be the new height of the squares in the Photoshop cropping tools. Remember that number 7 and go back to Photoshop.
In Photoshop, you may have to drag the lower right corner of the grid wider, but make sure there are at least 7 (or more) grid squares going from left to right. You don’t have to had any additional height squares in the grid.
Just so that you know what is happening in this cropping in Photoshop, the larger grid will make a new (and wider) canvas behind the image.

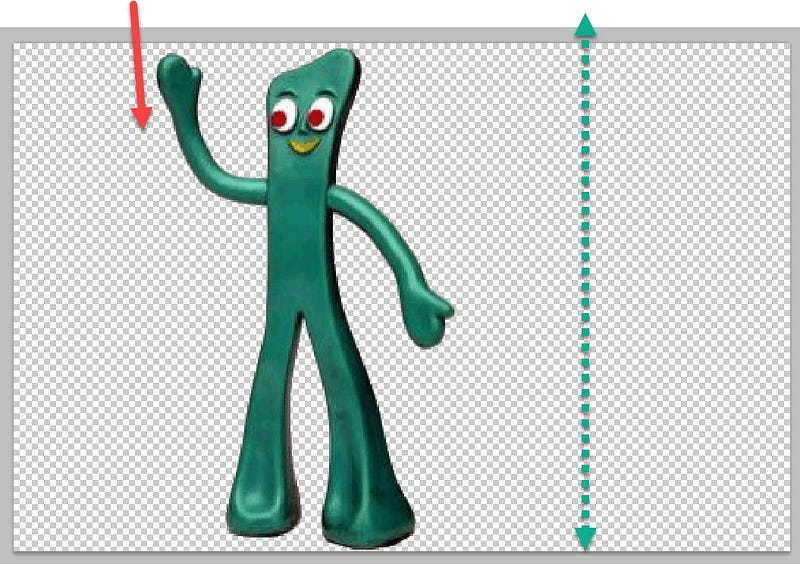
Place your cursor on the grid and hold down your left mouse button and drag the whole grid so that it centers the 7 left-most grid squares on the object. This means that there are about 3.5 grid squares (to the character’s navel) and another 3.5 grid squares from the center to the right of the image. Note: There will be some extra (unused grid squares to the right). That is OK for now.
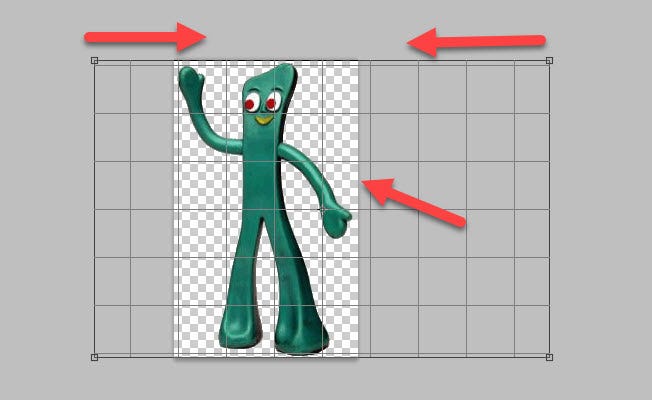
As you have centered the 7 grid squares on the object, you see that there are more than 7 grid squares. That means you will eliminate (or crop out) about 3 of the squares to the right.
For now, double-click with your cursor in the center of the image and the grid will go away.
In this screen shot I’ve put numbers to show a count of grid squares.
As you look at the too-wide (but now landscape) picture, click on the Rectangular Marquee Tool (see red arrow) and then click and drag from the upper left corner and select an evenly balanced rectangular selection of the graphic (so that the same amount of blank space is on the right as the amount of blank space to the left. The green dotted line (in the next screen shot) is where you drag the Rectangular Marquee Tool.
With that area selected by the Marquee tool (as shown by the dotted green line), click on Image / Crop (and that extra space will disappear on the right of the green dotted line shown below).
You now have a canvas where the aspect ratio is landscape (wider than it is high) and the image is centered in the middle of the canvas.

Still in Photoshop, click on Image / Image Size and see what the width and height is. On mine, it is 758 pix by 670. That means the image in now landscape (where the width (758) is wider the height (670).
One last use of the Aspect Calculator.
Open the Excel spread sheet.
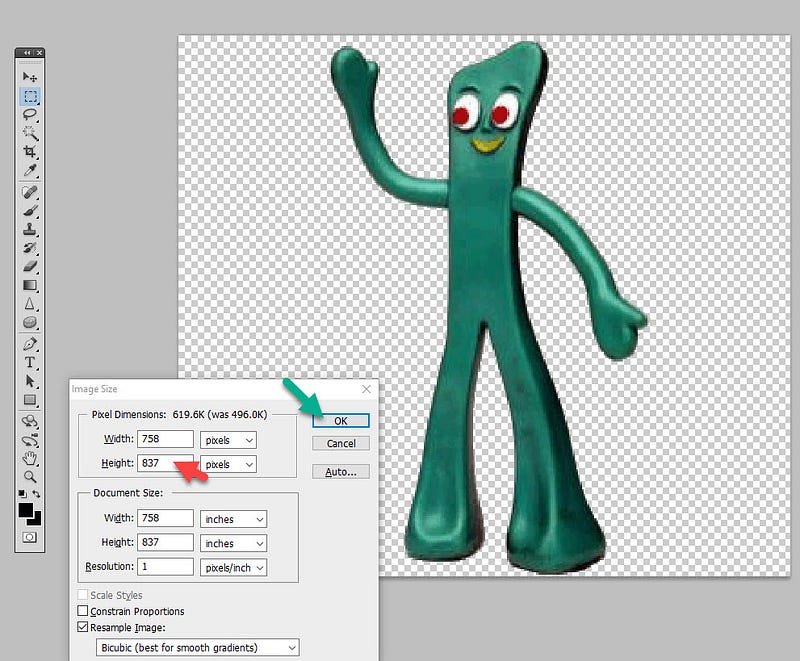
In cells A and C, type in the width and height of the newly modified graphic.
Edit your Excel calculator will now look like this. Remember the calculation in the yellow cell F. It is 837 (again, just take the whole number 837).

Lastly, go back to Photoshop and make the F cell number and place it in the height of the graphic.
In this case, type in 827 for the new height (red arrow) and press the OK button (green arrow).
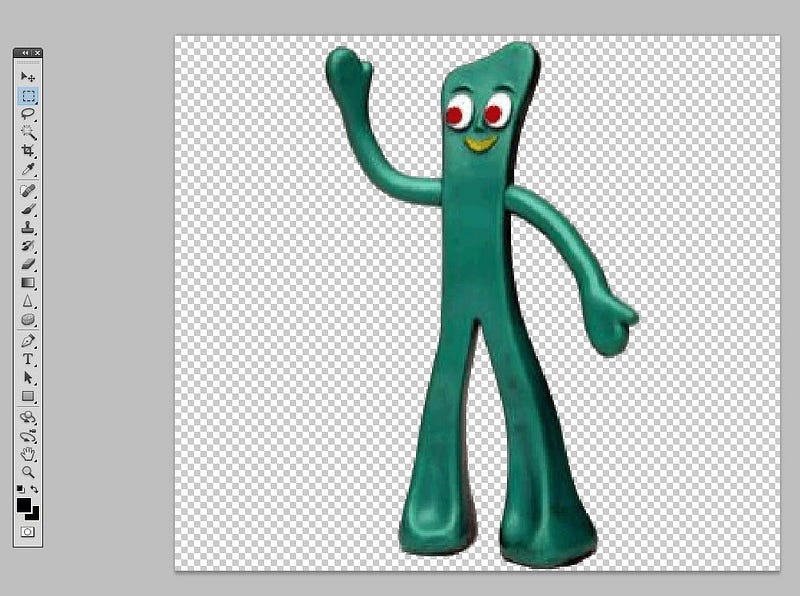
Your portrait graphic will now be a landscape graphic and will have a 5:4 aspect ratio landscape.
Conclusion
Modifying an already landscape image to a desired aspect ratio is fairly easy with Photoshop and this aspect ratio calculator. It is more work when trying to migrate a portrait image to a landscape one. But I hope this article has enabled you to accomplish these changes in your images. Thanks for reading this.

Downloading the Excel Aspect Ratio Calculator.
See the YouTube instructions on Changing the Aspect Ratio.
This article was copied over on the FlyByNight.links website: here


