
How to Migrate From Pages Router to App Router in NextJS [Part 1].

The app router on NextJS was first introduced in NextJS13, which was in beta back then. At the moment of writing this article, the current major version of NextJs is 14, and the app router has become stable, with more and more neat features coming along. While the old page router is still active and maintainable I’d strongly encourage you to consider app router migration because the pages router most likely won’t get any features soon.
I’ve recently done the app router migration for several projects and I’d like to share my thoughts, best practices and ideas. The guide will be split into 2 parts.
The first part (the current one) will consider:
- app router structure;
- updates for useRouter hook;
- metadata updates;
- data fetching;
The second chapter will consist of:
- error handling;
- loading UI and streaming;
- styling (Material UI);
- 3rd party libraries;
- lazy loading;
- sitemap;
Interested? Let’s then jump straight into action!
From Where to Start The Actual Migration?
Split the migration into smaller steps. The app directory is intentionally designed to work simultaneously with the pages directory to allow for incremental page-by-page migration.
So I’d suggest the following migration guide:
- create the
/appfolder with thelayout.tsx— it’s going to be the root layout that replaces_appand_document; - migrate the React context providers (if any);
- migrate the router hook from
next/routertonext/navigation(and use additional routing hooks which come as separate modules); - update metadata;
- start migrating page-by-page, split down server/client components, and update the data fetching;
Step 1: The /app Folder and its structure
The App Router works in a new directory named app.
By default, components inside
appare React Server Components. This is a performance optimization and allows you to easily adopt them, and you can also use Client Components.
You can choose between creating a new
appdirectory at the root of your project or insidesrc/directory based on your preferences.
Folders are used to define routes. A route is a single path of nested folders, following the file-system hierarchy from the root folder down to a child page (leaf) folder that includes a page.js file.

So, what we are doing first is creating the app folder and defining the root layout. Since the app directory must include a root layout.
- The root layout must define
<html>, and<body>tags since Next.js does not automatically create them; - The root layout replaces the
pages/_app.tsxandpages/_document.tsxfiles;

Great, we’ve just defined the root layout. Now, if you have an existing _app or _document file, you can copy the contents (e.g. global styles, context providers) to the root layout (app/layout.tsx). Styles in app/layout.tsx will not apply to pages/*. You should keep _app/_document while migrating to prevent your pages/* routes from breaking. Once fully migrated, you can then safely delete them.
⚠️ If you are using React context prodivers in your old application you will face errors when trying just copy and paste them. It’s because components inside the app directory are server components by default, and React Context is the client API.
So you’d need to do the following:
1. Define the new file (for example /app/context.tsx
2. Make it client component by writing use client; at the very top;
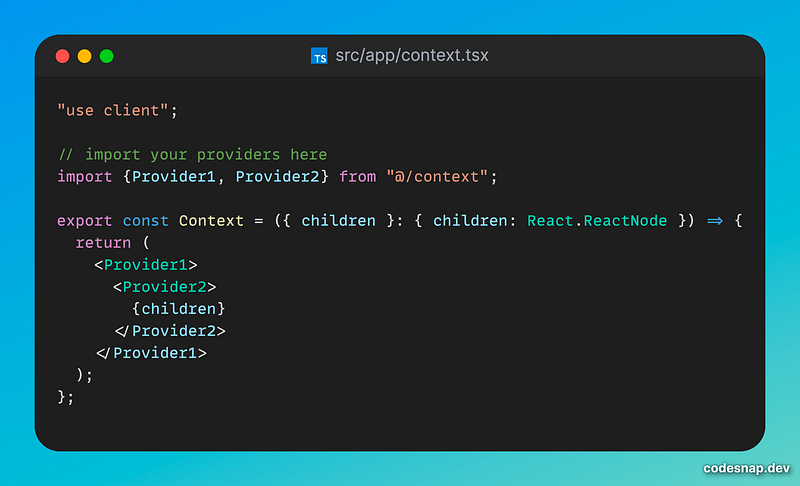
And then wrap your root layout:
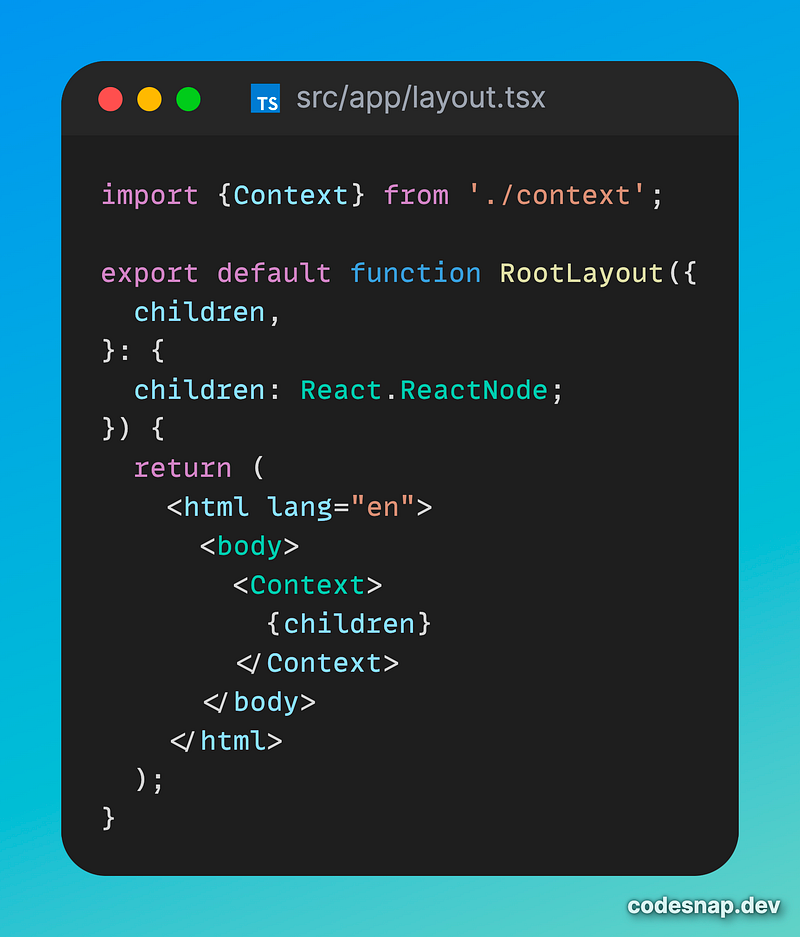
Done!
The next step is to update the router hook usage.
Step 2: updates for useRouter hook
- The
useRouterhook should be imported fromnext/navigationand notnext/routerwhen using the App Router - The
pathnamestring has been removed and is replaced byusePathname() - The
queryobject has been removed and is replaced byuseSearchParams() router.eventshas been replaced.
Step 3: Migrating Pages
Before making the pages migration here; 's the important note:
Pages in the
app directory are Server Components by default. This is different from thepagesdirectory where pages are Client Components. Also, data fetching for pages defined in app router has changed:getServerSideProps,getStaticPropsandgetInitialPropshave been replaced with a simpler API.
So there are 2 ways of doing the pages migration:
1. Move the page to the app router and make it server component from the very beginning (more complex approach for smaller projects);
2. Move the default exported Page Component into a new Client Component and then import that into a new page.js file inside the app directory. (the easiest approach is suitable for large projects, which will also allow you to optimize each page separately by making it Server component).
Here’s the example of the second approach (assuming you have /about page in the old pages router):
Creating a new separate file inside the app directory. It receives data as props just like Page components.
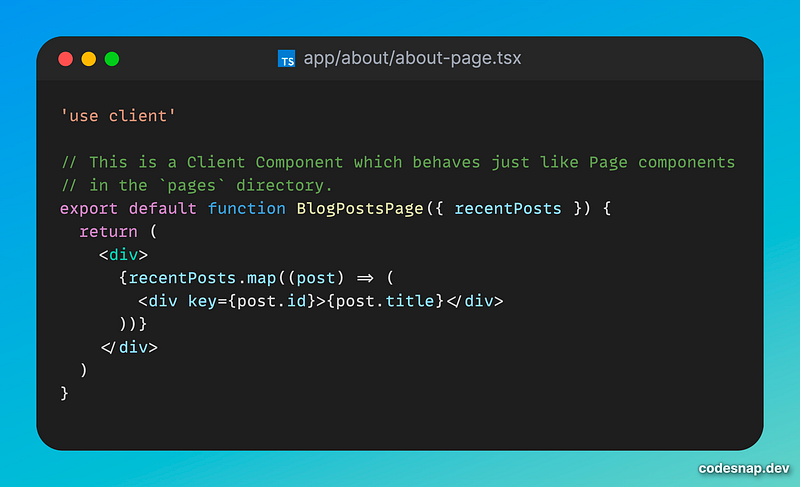
Create a new app/about/page.tsx file inside the app directory. This is a Server Component by default. Then import your client component into that page. If you were fetching data in the old page, move the data fetching logic directly into the Server Component with the new API.

Step 4: Metadata Updates
The old <Head /> component has been replaced with Metadata API.
So the new way of defining metadata is by exporting the Metadata object like this:
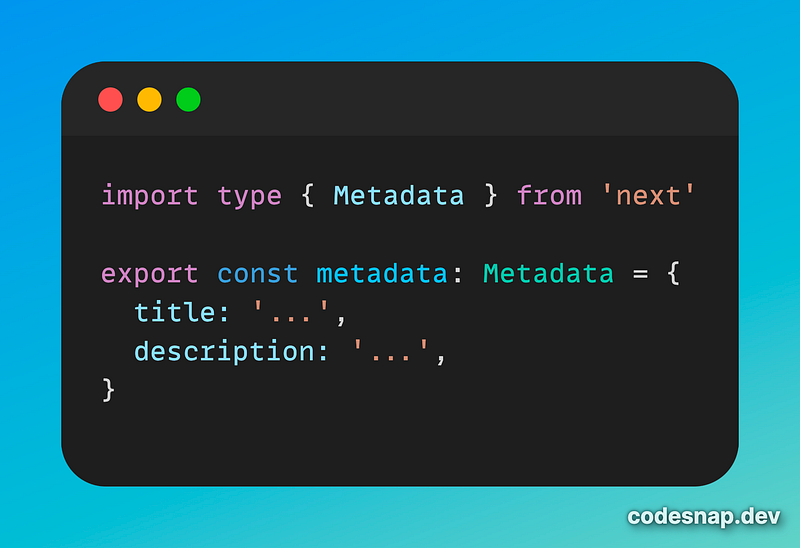
You can find all the available metadata fields here. Also, there is the file-based metadata, which allows you to generate special metadata files (like favicon, robots.txt, etc.)
Please note that there is an option to generate dynamic metadata if needed
Data Fetching options and caching
To start with, there are 4 ways of fetching the data:
- On the server, with
fetch - On the server, with third-party libraries
- On the client, via a Route Handler
- On the client, with third-party libraries.
Whenever possible, it’s recommended fetching data on the server with Server Components. This will allow you to have direct access to backend data resources, keep your application more secure by preventing sensitive information, fetch data and render in the same environment. This reduces both the back-and-forth communication between client and server, as well as the work on the main thread on the client.
Caching
Next.js extends the native fetch Web API to allow you to configure the caching and revalidating behavior for each fetch request on the server. React extends fetch to automatically memoize fetch requests while rendering a React component tree.
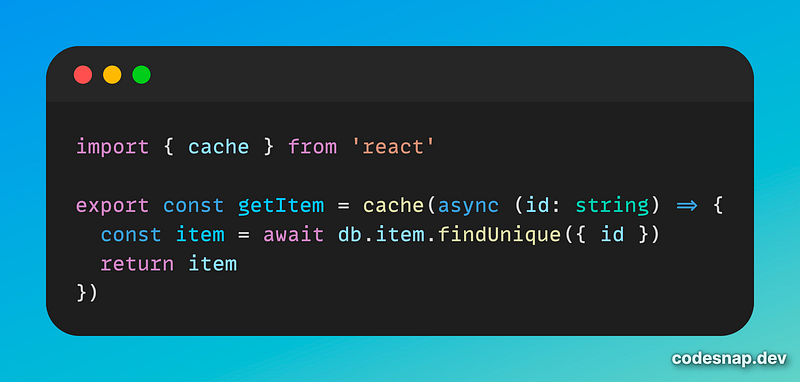
In case you are using any 3rd party libraries for the data fetching it’s recommended to use React cache util.
Conclusion
In conclusion, migrating from the Pages Router to the App Router in Next.js can significantly improve the performance and maintainability of your projects. As the App Router has become stable and continues to receive updates, it is a wise choice to consider this migration for your Next.js applications. This article has provided an overview of the steps involved in the migration process, including creating the app folder, updating the router hook, migrating pages, and making metadata updates. The second part of this guide will cover additional aspects such as error handling, styling, and lazy loading. By following these best practices and ideas, you can ensure a smooth transition to the App Router and take advantage of its benefits in your Next.js projects. Stay tuned for Part 2 to explore further details and optimizations for your application. Happy coding!


