
How to Manage Traffic Using Istio on Kubernetes
Insights into request routing, traffic splitting, and user identity-based routing using Istio on Kubernetes

Traffic management is one of the core features of Istio. If you are using Istio to manage your microservices on Kubernetes, you can have fine-grained control over how they interact with each other. That will also help you define how the traffic flows through your service mesh.
This story is a follow-up to Getting Started With Istio on Kubernetes. Today, let’s discuss traffic management.
In the last article, we installed Istio on our Kubernetes cluster and deployed a sample Book Info application on it. We’ve seen traffic flow through our mesh in a round-robin fashion, but with a service mesh like Istio, we can do a lot more. Some of the traffic management features you can use are the following:
- Request routing
- Fault injection
- Traffic shifting
- TCP traffic shifting
- Request timeouts
- Circuit breaking
- Mirroring
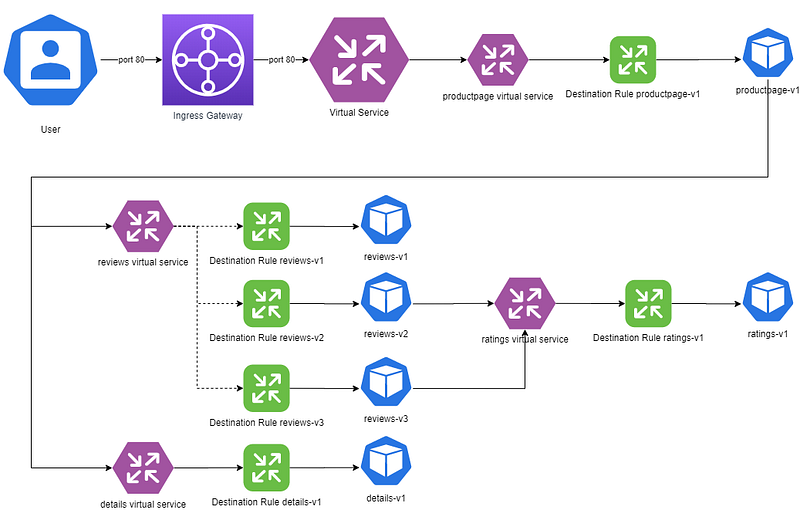
As we discussed in the previous article, we can use an ingress gateway to let traffic in our mesh and then a virtual service to route traffic on a round-robin fashion.
In this article, we will learn about destination rules that will give us fine-grained control over the mesh behavior.
Prerequisites
Ensure that you have a running Kubernetes cluster. Follow the Getting Started With Istio on Kubernetes guide to install Istio and deploy the sample Book Info application in your cluster.
What Are Destination Rules?
Destination rules form a crucial part of traffic routing within Istio. They are rules applied to traffic after they have been routed to a destination by a virtual service.
While a virtual service matches on a rule and evaluates a destination to route the traffic to, destination rules define available subsets of the service to send the traffic.
For example, if you have a service that has multiple versions running at a time, you can create destination rules to define routes to those versions. Then use virtual services to map to a specific subset defined by the destination rules or split a percentage of the traffic to particular versions.
Applying Destination Rules
Let us continue from where we left off in the last article and define some destination rules for the microservice.
For this demonstration, we will define three subsets (v1, v2, and v3) for each version of the reviews microservice and one subset (v1) for the other three microservices.
Below is the destination rule YAML file that we are going to use:
As you can see, there are four different destination rules in the YAML file. The reviews microservice defines three destination subsets (v1, v2, and v3), each selecting a label version pointing to v1, v2, or v3.
That implies that based on the destination subset selected by the virtual service, Istio would route requests to all microservices pods labeled with the version specified by the selected subset.
Define the destination rules by running the following:
$ kubectl apply -f samples/bookinfo/networking/destination-rule-all.yaml
destinationrule.networking.istio.io/productpage created
destinationrule.networking.istio.io/reviews created
destinationrule.networking.istio.io/ratings created
destinationrule.networking.istio.io/details created
Routing to a Specific Version
In the previous article, we saw traffic flow through our mesh in a round-robin fashion.
Let us now try to create a simple routing rule and select version 1 for the reviews microservice.
Instead of seeing three different pages for the reviews, we should see a single page with no stars come up every time we hit the endpoint.
Let us have a look at the virtual service manifest we need to use for this routing:
Please be aware that this virtual service is in addition to the virtual service we used in the previous article. The virtual service there was listening to requests on all hosts on port 80 and routing to the product page based on matching URL paths.
In this case, we match on the hostname of the microservices and select a particular destination subset (v1 here) of each microservice.
Apply the virtual service manifest:
$ kubectl apply -f samples/bookinfo/networking/virtual-service-all-v1.yaml
virtualservice.networking.istio.io/productpage created
virtualservice.networking.istio.io/reviews created
virtualservice.networking.istio.io/ratings created
virtualservice.networking.istio.io/details created
Now try to access the site and you will see that you get the page with no stars every time you refresh:

That means we have successfully configured Istio to route to version v1 of the reviews microservice.
Now, let’s change the version in the virtual service to route all requests to the reviews microservice on v3:
Apply the manifest:
$ kubectl apply -f samples/bookinfo/networking/virtual-service-reviews-v3.yaml
virtualservice.networking.istio.io/reviews configured
Try to re-access the Book Info application:
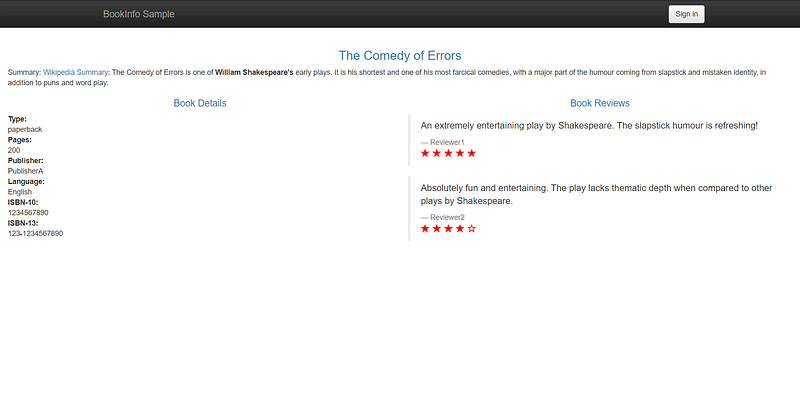
And this time, you see red stars every time you refresh. You have successfully configured your mesh to point to a specific version.
Traffic Splitting
Now, for example, you have a new version of your microservice that you want to introduce to your users. Still, you don’t want to risk impacting the entire service. So you are cautious to only test the functionality with a small number of customers before rolling out the new release completely.
This strategy of deployment is called a Blue-Green deployment, where we slowly move traffic from the old version (Blue) to the new version (Green).
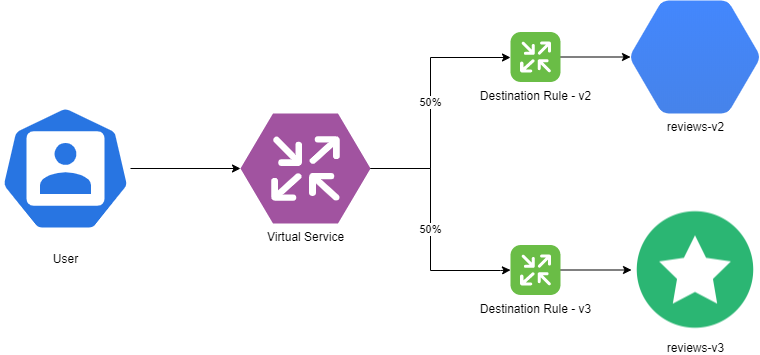
Let us try to split traffic equally between the blue version v2 and the green version v3 of the reviews microservice.
Let us have a look at the manifest first:
As you see, there is a weight attribute added to each subset of the destination with a 50-50 value. That means that half of the traffic would route to the blue version (v2) and the other half to the green version (v3).
Apply the manifest to see what happens:
$ kubectl apply -f samples/bookinfo/networking/virtual-service-reviews-v2-v3.yaml
virtualservice.networking.istio.io/reviews configured
Refresh the page multiple times and you will see that the traffic is bouncing equally between two versions (one with black stars and the other with red stars):
That shows that traffic splitting is working correctly between the two versions.
User Identity-Based Routing
Let us take the routing to the next level. Suppose you are unsure that your new microservice would work correctly on production. Therefore, you first want to roll out the new service to a business tester. Once the business tester is satisfied, you would then roll it out to all users.
Let us look at the virtual service manifest to do that:
As you see, this virtual service is matching on a particular header called end-user. If the name of the end-user is jason, it routes it to version v2 of the reviews microservice. For everything else, it routes the request to version v1 of the reviews microservice.
Apply the virtual service manifest:
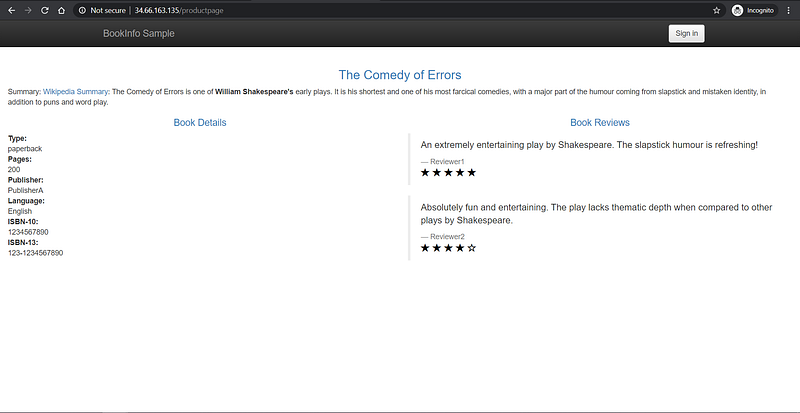
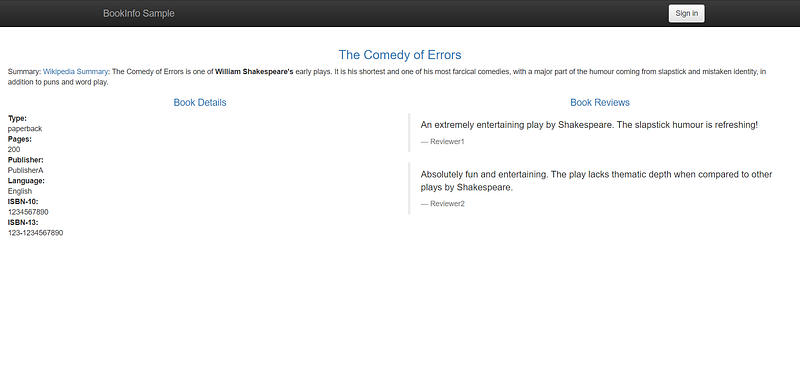
$ kubectl apply -f samples/bookinfo/networking/virtual-service-reviews-test-v2.yamlRefresh the page and you should see all requests routed to the v1 microservice, as you have not logged in:
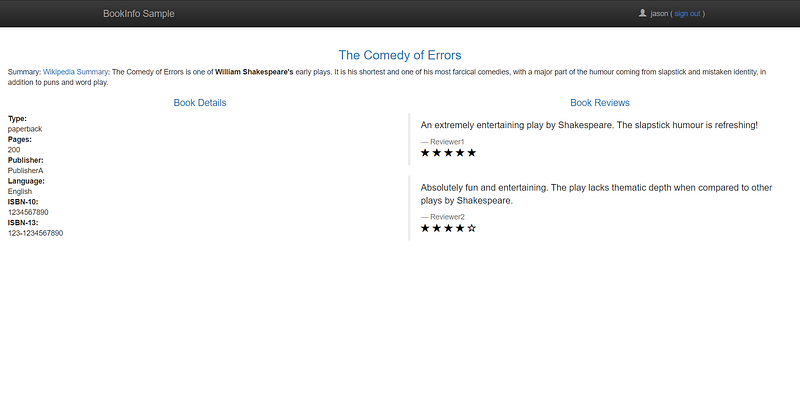
Now, click on “Sign In” and log in to the site as jason. You do not need to provide a password.
What do you see now? Is it the page with the black stars? If so, then you have successfully configured user identity-based routing on Istio.
Conclusion
Thanks for reading through! I hope you enjoyed the article. In the next part, I will discuss “Kubernetes Services over HTTPS With Istio’s Secure Gateways” with a hands-on demonstration, so see you in the next part!


