
How to Integrate JWT Into Your Node.js App: A Step-by-Step Tutorial
In this step-by-step tutorial, we’ll explore how to integrate JWT authentication into a Node.js application, even if you’re just starting out with Node.js

Security is a paramount concern in the digital world, and when it comes to authentication, the JSON Web Token (JWT) has become the industry standard.
In this step-by-step tutorial, we’ll explore how to integrate JWT authentication into a Node.js application, even if you’re just starting out with Node.js.
Let’s dive in and uncover the secrets of secure, scalable authentication!
Part 1: Understanding JWT
What is JWT?
JSON Web Token (JWT) is an open standard that defines a compact and self-contained way of securely transmitting information between parties as a JSON object.
This information can be verified and trusted because it is digitally signed.
Structure of a JWT
A JWT typically looks like xxxxx.yyyyy.zzzzz and is divided into three parts:
- Header: Encodes the token type and the algorithm used.
- Payload: Contains the claims, which are statements about an entity (e.g., user details).
- Signature: Validates the token.
Part 2: Setting Up the Project
Step 1: Create a New Node.js Project
mkdir my-jwt-app
cd my-jwt-app
npm init -y
Step 2: Install the Required Dependencies
npm install express jsonwebtoken
Part 3: Implementing JWT Authentication
Step 1: Creating a Simple Express Server
const express = require('express');
const app = express();

app.use(express.json());

app.get('/', (req, res) => {
  res.send('Welcome to the JWT Tutorial');
});

app.listen(3000, () => {
  console.log('Server running on port 3000');
});
Step 2: Generating a JWT Token
We’ll simulate a simple login endpoint to generate a JWT.
const jwt = require('jsonwebtoken');

app.post('/login', (req, res) => {
  const user = { id: 3 }; // Example user
  const token = jwt.sign({ user }, 'secret_key', { expiresIn: '1h' });
  res.json({ token });
});
Step 3: Verifying a JWT Token
Now we’ll create a middleware to validate the token on protected routes.
function verifyToken(req, res, next) {
  const bearerHeader = req.headers['authorization'];
  if (typeof bearerHeader !== 'undefined') {
    const token = bearerHeader.split(' ')[1];
    jwt.verify(token, 'secret_key', (err, authData) => {
      if (err) {
        res.sendStatus(403);
      } else {
        req.user = authData;
        next();
      }
    });
  } else {
    res.sendStatus(403);
  }
}

// Protected route
app.get('/protected', verifyToken, (req, res) => {
  res.json({ message: 'Protected route accessed!', user: req.user });
});
Part 4: Testing JWT-Protected Endpoints
After implementing JWT authentication, it’s vital to ensure that our endpoints are working as expected.
Testing can be done through a web browser for open routes or using tools like Postman for the secured endpoints.
Here’s how you can test the authentication flow:
Step 1: Testing the Unprotected Route in a Browser
You can simply open your web browser and navigate to http://localhost:3000/. You should see the welcome message: "Welcome to the JWT Tutorial."
Step 2: Testing the Login and Protected Endpoints Using Postman
Postman is a popular tool for testing APIs. Follow these steps to test the login and protected routes:
- Testing the Login Endpoint
- Open Postman.
- Set the request method to
POST. - Enter the URL
http://localhost:3000/login. - Click “Send” to make the request.
- You should receive a JSON response containing the token.
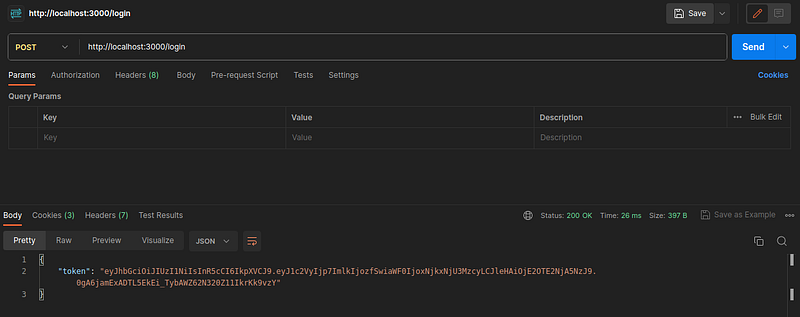
2. Testing the Protected Endpoint with the Token
- Copy the token from the login response.
- Create a new request in Postman.
- Set the request method to
GET. - Enter the URL
http://localhost:3000/protected. - Under the “Headers” tab, or directly under the “Authorization” tab, add a key
Authorizationwith the valueBearer YOUR_TOKEN(replaceYOUR_TOKENwith the copied token). - Click “Send” to make the request.
- You should receive a JSON response with the message “Protected route accessed!” and the user details.
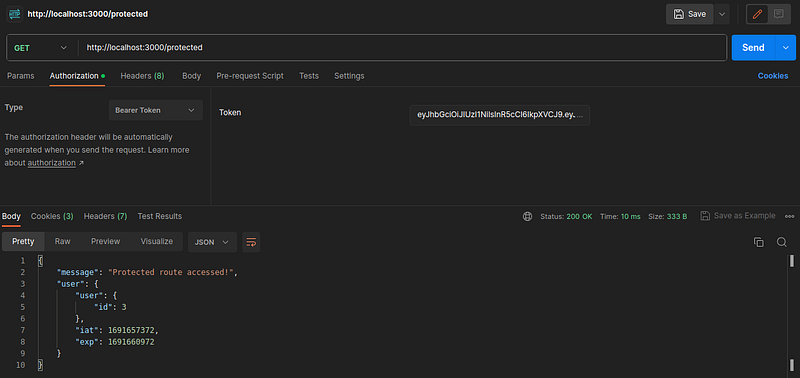
3. Testing the Protected Endpoint without the Token or with an Invalid Token
- Repeat the steps for the protected endpoint but omit the token or use an invalid one.
- You should receive a 403 status code, indicating that access is forbidden.
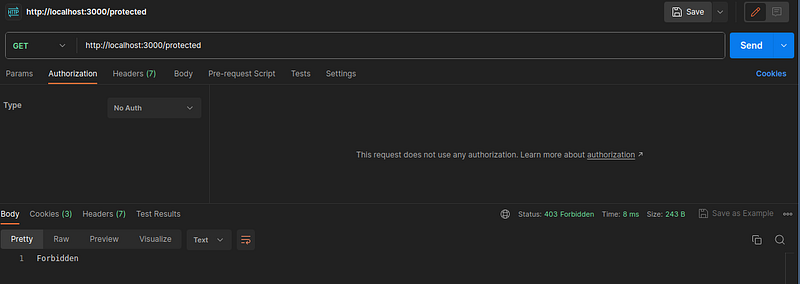
By following these steps, you’ve ensured that the JWT authentication is correctly implemented in your Node.js application.
It verifies that unprotected routes are accessible without a token, while protected routes require a valid token.
⚠️ Important Warning: Security Best Practices ⚠️
In the code examples provided in this tutorial, we’ve used a hardcoded string 'secret_key' as the secret to sign the JWT.
While this approach simplifies the tutorial, it should be noted that this is not secure for a production environment.
Why is it a problem?
Hardcoding a secret key directly in your codebase can lead to several security risks:
- Exposure: If your codebase is ever leaked or becomes public (for example, through a public GitHub repository), the hardcoded secret key will be visible to everyone.
- Lack of Flexibility: Hardcoding the key means it’s the same across all environments (development, staging, production). A breach in one environment could compromise all others.
- Difficulty in Rotating Keys: If you ever need to change the secret key, hardcoded values can make it a cumbersome process, especially if used in multiple places.
What should you do instead?
- Use Environment Variables: Store the secret key in an environment variable on the server where your application runs. This keeps the key out of your codebase and allows different keys for different environments.
- Implement Key Rotation: Consider implementing a strategy for rotating keys, ensuring that if a key is compromised, it can be quickly replaced without affecting users.
- Leverage Secret Management Tools: Tools like AWS Secrets Manager or HashiCorp Vault can manage, store, and control access to secret data, ensuring that sensitive information like secret keys is handled with the utmost security.
Conclusion
JWT authentication is a powerful and straightforward way to secure your Node.js applications.
By following this guide, you have learned how JWT works, and how to generate, verify, and use JWT tokens in a Node.js application. The above example can be the foundation for more complex systems that require robust authentication and authorization mechanisms.
Remember that security is a multifaceted subject, and keeping up with best practices is crucial. Always consider additional security layers like HTTPS, OAuth2, etc., and stay updated with the latest industry standards.
JWT and Authentication
- JWT Official Website: Learn more about JSON Web Tokens, including libraries, tools, and best practices.
- Auth0’s Introduction to JWT: A comprehensive guide by Auth0 that covers JWT’s structure, use cases, and more.
Node.js and Express
- Node.js Official Documentation: Explore in-depth documentation on Node.js, from getting started to advanced topics.
- Express.js Documentation: Detailed information on how to use Express.js, a widely-used framework for Node.js.
API Testing Tools
- Postman’s Learning Center: Comprehensive guides and tutorials on using Postman for API testing.
- Insomnia: An alternative to Postman, Insomnia offers a user-friendly interface for testing APIs.
Additional Security Considerations
- OWASP Top Ten: Familiarize yourself with the top ten security concerns for web applications, as outlined by the Open Web Application Security Project (OWASP).
- OAuth 2.0 and OpenID Connect: For more advanced authentication and authorization mechanisms, learn about OAuth 2.0 and OpenID Connect.
Tutorials and Courses
- FreeCodeCamp’s APIs and Microservices Certification: FreeCodeCamp offers a free, in-depth curriculum for those wanting to understand APIs and microservices using Node.js.
Enjoyed the read? For more on Web Development, JavaScript, Next.js, Cybersecurity, and Blockchain, check out my other articles here:
If you have questions or feedback, don’t hesitate to reach out at [email protected] or in the comments section.
[Disclosure: Every article I pen is a fusion of my ideas and the supportive capabilities of artificial intelligence. While AI assists in refining and elaborating, the core thoughts and concepts stem from my perspective and knowledge. To know more about my creative process, read this article.]
In Plain English 🚀
Thank you for being a part of the In Plain English community! Before you go:
- Be sure to clap and follow the writer ️👏️️
- Follow us: X | LinkedIn | YouTube | Discord | Newsletter
- Visit our other platforms: Stackademic | CoFeed | Venture | Cubed
- More content at PlainEnglish.io