
The Founder’s Guide
How to Install the NVIDIA CUDA Driver, Toolkit, cuDNN, and TensorRT in WSL2
The expanded tutorial with explanations and screenshots
The condensed version of this article contains copy and paste code that can get the outcome in minutes.
Join the NVIDIA Developer Program:
The NVIDIA Developer Program is a free program that gives members access to the NVIDIA software development kits, tools, resources, and trainings. It lets members submit issues and feature requests to the NVIDIA engineering team. It also notifies members about events and activities for programmers.
- Visit the official website.
- Click “Join Now”
- Enter email address
- Click “Next”
- Click “Create Account”
- Enter user information
- Click “Create Account”
- Verify email address
- Click “Submit”
- Enter user information
- Click “Submit”

Download the NVIDIA CUDA Driver:
Compute Unified Device Architecture (CUDA) is a computation platform that includes a driver, toolkit, software development kit, and application programming interface. It lets developers create programs that perform computations significantly faster on NVIDIA graphics cards using parallel processing. This is because it can run computations using thousands of graphics card cores compared to only tens of central processing units cores.
- Visit the official website
- Click “Get CUDA Driver”
- Click “Download Now”

Install the NVIDIA CUDA Driver:
The NVIDIA CUDA Driver is used to allow programs to interact with NVIDIA hardware. It provides multiple layers of application programming interfaces that enable the CUDA and cuDNN libraries to interact with the hardware. It also provides WSL2 with full access to the hardware like a native program.
- Open “460.15_gameready_win10-dch_64bit_international.exe”
- Click “OK”
- Select “NVIDIA Graphics Driver”
- Click “Agree and Continue”
- Click “Next”
- Click “Close”

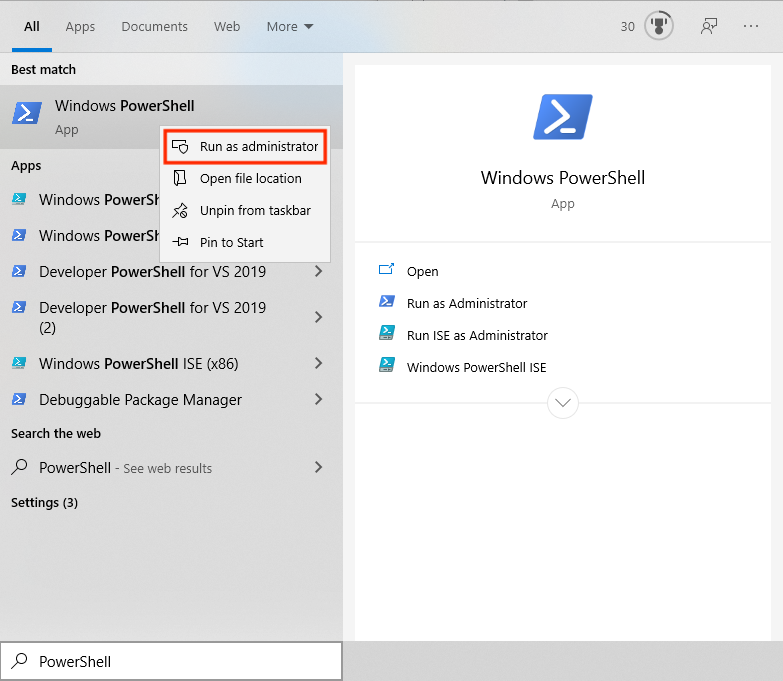
Open PowerShell:
PowerShell is a command-line shell and object-oriented scripting language that’s used to automate administrative tasks and configure system settings It can be used to automate practically anything in the operating system. It also replaced Command Prompt as the default system shell for Windows 10.
- Press “⊞ Windows”
- Enter “PowerShell” into the search bar
- Right-click “Windows PowerShell”
- Click “Run as Administrator”
Update WSL2:
The Update command is used in WSL2 to install the latest Linux kernel. It installs the new Linux kernel and stores the previous kernel as a rollback kernel. It can also be used with the “Rollback” option which restores the previous Linux kernel but it can’t be changed until the next kernel update.
- Copy the command from below these instructions
- Paste the command into PowerShell
- Press “Enter”
The WSL2 version number must be 4.19.121 or higher.
wsl --update
Shut Down WSL2:
The Shut Down command is used to terminate the WSL2 distribution that’s currently running in the background. It can be used to restart WSL2 after installing an update which allows the changes to take effect. This is needed because closing the window doesn’t actually shut down the distribution.
- Copy the command from below these instructions
- Paste the command into PowerShell
- Press “Enter”
wsl --shutdown
Open WSL2:
Windows Subsystem for Linux 2 (WSL2) is a Windows 10 feature that allows users run Linux on Windows without using dual-boot or a virtual machine. It has full access to both filesystems, GPU support, and network application support. It also provides access to thousands of Linux command-line tools.
- Copy the command from below these instructions
- Paste the command into PowerShell
- Press “Enter”
wsl
Get the NVIDIA Public Key:
Apt-key is a program that uses key pairs to prevent users from downloading packages that contain malicious data. It stores the private key on the server that stores the packages and distributes the public key to users. It also uses the public key to verify the private key before packages can be downloaded.
- Copy the command from below these instructions
- Paste the command into PowerShell
- Press “Enter”
sudo apt-key adv --fetch-keys http://developer.download.nvidia.com/compute/cuda/repos/ubuntu1804/x86_64/7fa2af80.pub
Add NVIDIA to the Source List Directory:
The Source List Directory is a directory that contains separate source list files for individual repositories. It stores information that’s used to download and update packages from a repository. It also supplements the main source list file that stores information about existing repositories on the computer.
- Copy the command from below these instructions
- Paste the command into PowerShell
- Press “Enter”
sudo sh -c 'echo "deb http://developer.download.nvidia.com/compute/cuda/repos/ubuntu1804/x86_64 /" > /etc/apt/sources.list.d/cuda.list'
Update the Source List and Source List Directory:
The Update command is used to ensure the list of available packages is up to date. It downloads a package list from the repositories on the system which contains information about new and upgradable packages. It only updates information about the packages and doesn’t actually upgrade the packages.
- Copy the command from below these instructions
- Paste the command into PowerShell
- Press “Enter”
sudo apt-get update
Install NVIDIA CUDA Toolkit 11:
The NVIDIA CUDA Toolkit 11 is a collection of tools that are used to create, build, and run CUDA-accelerated programs. It includes CUDA-accelerated libraries, compilers, tools, samples, and documentation. It can also need to be combined with previous toolkits to use programs that aren’t compatible.
- Copy the command from below these instructions
- Paste the command into PowerShell
- Press “Enter”
There are libraries in the older NVIDIA CUDA Toolkits that are also needed.
sudo apt-get --yes install cuda-toolkit-11-0 cuda-toolkit-10-2
Add NVIDIA to the Source List Directory:
The Source List Directory is a directory that contains separate source list files for individual repositories. It stores information that’s used to download and update packages from a repository. It also supplements the main source list file that stores information about existing repositories on the computer.
- Copy the command from below these instructions
- Paste the command into PowerShell
- Press “Enter”
sudo sh -c 'echo "deb http://developer.download.nvidia.com/compute/machine-learning/repos/ubuntu1804/x86_64 /" > /etc/apt/sources.list.d/nvidia-machine-learning.list'
Update the Source List and Source List Directory:
The Update command is used to ensure the list of available packages is up to date. It downloads a package list from the repositories on the system which contains information about new and upgradable packages. It only updates information about the packages and doesn’t actually upgrade the packages.
- Copy the command from below these instructions
- Paste the command into PowerShell
- Press “Enter”
sudo apt-get update
Install the CUDA and cuDDN Libraries:
The CUDA Deep Neural Network (cuDNN) is a GPU-accelerated library that contains the operations that are used to create deep neural networks. It includes implementations of convolutions, activation, normalization, and pooling layers. It also accelerates many popular deep learning frameworks.
- Copy the command from below these instructions
- Paste the command into PowerShell
- Press “Enter”
sudo apt-get install --yes --no-install-recommends cuda-10-2 libcudnn7=7.6.5.32-1+cuda10.2 libcudnn7-dev=7.6.5.32-1+cuda10.2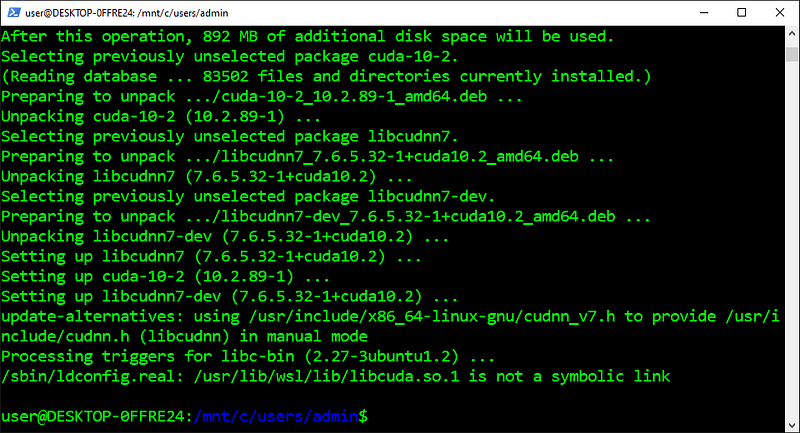
Install the TensorRT Library:
TensorRT is a software development kit that’s used to optimize pre-trained models for high-performance inferences on certain NVIDIA graphics cards. It can improve throughput, response time, power efficiency, and memory consumption by combining layers and optimizing kernel selection. It can also import the pre-trained models from most deep learning frameworks.
- Copy the command from below these instructions
- Paste the command into PowerShell
- Press “Enter”
sudo apt-get install --yes --no-install-recommends libnvinfer6=6.0.1-1+cuda10.2 libnvinfer-dev=6.0.1-1+cuda10.2 libnvinfer-plugin6=6.0.1-1+cuda10.2
Open the BlackScholes Directory:
The Change Directory (cd) command is used to change the current working directory to the specified directory. It can navigate to absolute and relative paths that start from the root and current working directory, respectively. It can also navigate to paths stored in variables and environment variables.
- Find the Python version from below these instructions
- Copy the provided command
- Paste the command into PowerShell
- Press “Enter”
cd /usr/local/cuda-11.0/samples/4_Finance/BlackScholes
Run the MakeFile:
The Make command is used to build an executable program from source code by following the instructions in the makefile. It loads the makefile from the current working directory. It then executes the commands in the makefile to build a program that’s customized for the computer it runs on.
- Copy the command from below these instructions
- Paste the command into PowerShell
- Press “Enter”
sudo make
Run the Sample:
The BlackScholes sample is a program that demonstrates certain features in the CUDA Toolkit. It evaluates the fair call and put prices for a given set of options using the Black-Scholes formula. It also performs the computations in parallel on the GPU and sequentially on the CPU to compare the results.
- Copy the command from below these instructions
- Paste the command into PowerShell
- Press “Enter”
./BlackScholes
Next Steps:
This article is part of a mini-series that helps readers set up everything they need to start using WSL2 for artificial intelligence, machine learning, deep learning, and or data science. It includes articles that contain instructions with copy and paste code and screenshots that help readers get the outcome as soon as possible. It also includes articles that contain instructions with explanations and screenshots that help readers process what’s happening.
01. Install Windows Subsystem for Linux 2 (WSL2)
02. Install the NVIDIA CUDA Driver and Toolkit in WSL2
03. Install Software From Source Code in WSL2
04. Install the Jupyter Notebook Home and Public Server in WSL2
05. Install Virtual Environments in Jupyter Notebook in WSL2
06. Install Programs With a Graphical User Interface in WSL2
07. Install Ubuntu Desktop With a Graphical User Interface in WSL2
“Hopefully, this article helped you get the 👯♀️🏆👯♀️, remember to subscribe to get more content 🏅”
Glossary:
GPU Paravirtualization (GPU-PV) is a virtualization technology that exposes the physical GPU in the operating system before it’s installed in the virtual machine. It allows the operating system in the virtual machine to share the physical hardware on the computer instead of trying to emulate it virtually. [Return]
The Shell is an interpreter that presents the command-line interface to users and allows them to interact with the kernel. It lets them control the system using commands entered from a keyboard. It also translates the commands from the programming language into the machine language for the kernel.[Return]
The Interpreter is a program that reads through instructions that are written in human-readable programming languages and executes the instructions from top to bottom. It translates each instruction to a machine language the hardware can understand, executes it, and proceeds to the next instruction. [Return]
The Command-Line Interface (CLI) is a program that accepts text input from the user to run commands on the operating system. It lets them configure the system, install software, and access features that aren’t available in the graphical user interface. It also gets referred to as the terminal or console. [Return]
The Kernel is the program at the heart of the operating system that controls everything in the computer. It facilitates the memory management, process management, disk management, and task management. It also facilitates communication between the programs and hardware in machine language. [Return]
The Repository is a storage location for binary packages that are located on remote servers. It needs to be present in the source list for the computer to install or update its containing packages. This helps provide a high level of security while making it easy to install programs in Linux distributions.[Return]
The Binary Package is the archive file that contains the files and directories needed to make the containing program work as expected. It’s stored in the repository that contains all the programs for a specific Linux distribution. It also requires the Linux package manager to access, extract, and install it. [Return]
The Inference is the process of using the trained model to make predictions about unseen data. It can make a prediction by performing the forward pass without including the backward pass to compute the error and update the weights. It can also be optimized to improve the throughput, response time, and power and memory consumption before being used in the real world.[Return]
The Variable is the container that’s used to store different types of values. It can assign or update a value by placing an equals sign between the specified variable name and value without a space around it. It can also reference the stored value by placing a dollar sign in front of the existing variable name.[Return]
The Environment Variable is a variable that’s automatically created and maintained by the computer. It helps the system know where to install files, find programs, and check for user and system settings. It can also be used by graphical and command-line programs from anywhere on the computer.[Return]
The MakeFile is a text file that’s made up of shell commands unless specified otherwise. It contains all the instructions that are used to build a program for a specific computer from source code. It also gets created by running the configure script on the same computer that the program is going to run on.[Return]


