
How to install Miniconda x86_64 & Apple M1 side by side on Mac Book M1
Miniconda x86_64 & Miniconda Apple M1 side by side on Mac Book M1

If you are a Python Developer/ ML Engineer/ Data Scientist who uses Apple’s Mac M1 for your work, you might know the pain 🥲 of not having arm64 distribution of your project dependencies. One workaround is using a package manager like Anaconda3/Miniconda3 through rosetta2 enabled terminal.
But luckily now Apple M1 is officially supported by Anaconda, you can download and install Anaconda3/Miniconda3 for your Mac with apple’s silicon chip. But as an ML Engineer, I wanted to keep both flavors (x86_64 & Apple M1) of Miniconda3 since I am working on product development for both of the architectures.
How to have Miniconda3 x86_64 & Miniconda3 Apple M1 side by side, is it even possible?
The answer is “YES”, it took me some time ⏰ to figure out how to do it in a convenient way. So I decided to blog it here so that it would be useful to many others like me.
Prerequisites: Rosetta2 enabled terminal.
Install Miniconda3 x86_64
Open your rosetta2 enabled terminal and,
- To check whether your terminal is rosetta2 enabled
$ uname -m
x86_64
if you get x86_64 then you are on a rosetta2 enabled terminal
2. Download Miniconda3 x86_64 bash installer
$ wget https://repo.anaconda.com/miniconda/Miniconda3-latest-MacOSX-x86_64.sh3. Run Installer
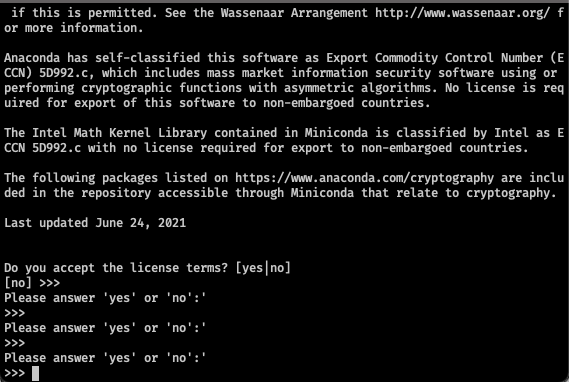
$ sh ./Miniconda3-latest-MacOSX-x86_64.sh4. It will prompt a review license agreement, press enter to continue

5. Then keep pressing enter until you get the below prompt. Once you get it type yes and press enter to continue
6. Next it will prompt you for the installation path

Here type /Users/[your user name]/miniconda3-intel` (Let us refer to this path as the Miniconda x86_64 path) or whatever you prefer, the main idea is you should preserve the default installation path for Miniconda Apple M1 (just to distinguish both installations)
7. It will download basic packages and install Miniconda x86_64 at the specified path. Once it is done, it will prompt whether to run conda init.
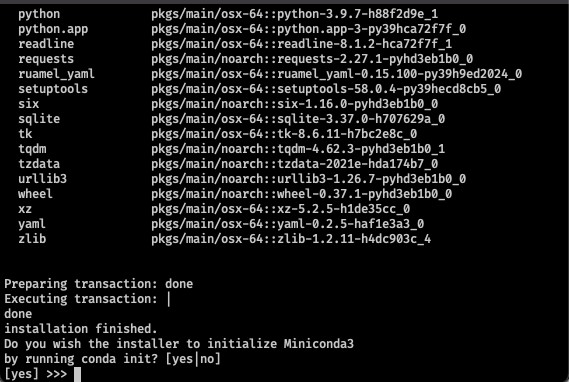
When you get this prompt type no and press enter. We do not want to add conda initializers to your terminal startup scripts (i.e .bashrc or .zshrcor others)
Now we have successfully installed Miniconda3 x86_64. Next, we need to install Miniconda Apple M1 in the same fashion except for a few changes.
Install Miniconda3 Apple M1
Open a terminal (the one without rosetta2) and
- To check whether your terminal is not rosetta2 enabled (default M1 terminal)
$ uname -m
arm64
if you get arm64 then you are on a default terminal
2. Download Miniconda3 x86_64 bash installer
$ wget https://repo.anaconda.com/miniconda/Miniconda3-latest-MacOSX-arm64.sh3. Then do similar to the previous installation process (from step 3 to step 5).
4. When it prompts for the installation path, I would recommend installing it at the default path Users/[your user name]/miniconda3/ . If not use a different path. (Let us refer to this path as the Miniconda Apple M1 path).
5. Once the installation is over, it will prompt whether to run conda init, type no and press enter.
Configure conda init for both installations
Normally when we run conda init it will add some shell commands to our terminal startup file depending on the shell type we are using.
But here we cannot simply add both x86_64’s & Apple M1’s init on the same file. It needs to be a bit more intelligent to activate the correct conda installtion based on the architecture of the terminal session.
You can simply do everything on the .zshrc or whatever shell startup script you are using. But let me tell you how I do it in a clean way.
- Create a custom startup script for conda init
$ mkdir ~/.custrc/ && touch ~/.custrc/.condarc2. Open & add this conda init functions to the script
init_conda() {
# >>> conda initialize >>> conda_path_m1="/Users/mathanraj/miniconda3"
__conda_setup="$('${conda_path_m1}/bin/conda' 'shell.zsh' 'hook' 2> /dev/null)"
if [ $? -eq 0 ]; then
eval "$__conda_setup"
else
if [ -f "${conda_path_m1}/etc/profile.d/conda.sh" ]; then
. "${conda_path_m1}/etc/profile.d/conda.sh"
else
export PATH="${conda_path_m1}/bin:$PATH"
fi
fi
unset __conda_setup# <<< conda initialize <<<
}init_conda_intel() {
# >>> conda initialize >>> conda_path_intel="/Users/mathanraj/miniconda3-intel"
__conda_setup="$('${conda_path_intel}/bin/conda' 'shell.zsh' 'hook' 2> /dev/null)"
if [ $? -eq 0 ]; then
eval "$__conda_setup"
else
if [ -f "${conda_path_intel}/etc/profile.d/conda.sh" ]; then
. "${conda_path_intel}/etc/profile.d/conda.sh"
else
export PATH="${conda_path_intel}/bin:$PATH"
fi
fi
unset __conda_setup
# <<< conda initialize <<<
}Here,
conda_path_m1is where I installed Miniconda for Apple M1conda_path_intelis where I installed Miniconda for x86_64
replace the paths accordingly, based on where you have installed Miniconda Apple M1 & x86_64.
3. Open & add the below lines to your shell startup script, in my case it is .zshrc
$ open ~/.zshrcAdd
# init conda based on arch
source ~/.custrc/.condarc
if [[ $(uname -m) == 'x86_64' ]]; then
    init_conda_intel
    echo "conda x86_64 is activated"
else
    init_conda
    echo "conda m1 is activated"
fi
This will add small intelligence to your terminal behavior. Basically, it simply configures suitable conda installation based on the terminal session’s architecture.
That’s it all set, now close all running terminal sessions and try
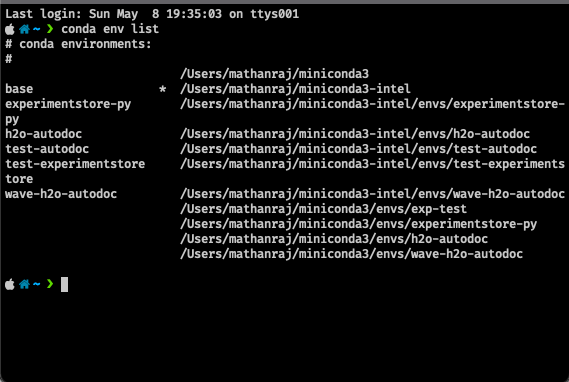
- opening the rosetta2 enabled terminal, you will get “conda x86_64 is activated”. And if you print
conda env list
- opening the default terminal (without rosetta2), you will get “conda m1 is activated”. And if you print
conda env list
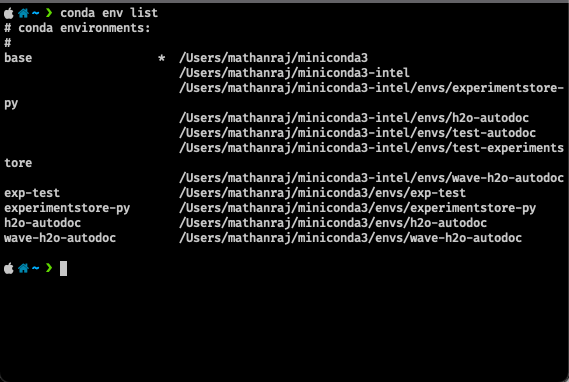
Note: If you closely look, it prints all available conda environments in both cases. But when it is from rosetta2 enabled terminal note that, names will be printed only for environments under miniconda3-intel and the base path under miniconda3-intel will have (*) symbol. Similarly for miniconda3-m1.
Hope you find it super helpful.
Nothing is impossible, let’s do it … 🎉


