
How to install and run Pyspark locally integrated with VSCode via Jupyter Notebook (on Windows).

If you ever wonder, how can I pratice or just do some coding using PySpark on windows, besides using Databricks (because it is not cheap ̶,n̶o̶t̶ ̶e̶v̶e̶n̶ ̶c̶l̶o̶s̶e̶, or just because you’re not everybody and you just don’t want to use it), you must have faced several issues during the process of installation and/or configuration and (like me) just (rage)quit after a few frustrated tryes.
Well, this is going to be a sum up of a several contents that I’ve gather during this search that I followed and that finally worked for me!
Step 1.
Many installations required, the easiest part.
First of all, you need to be sure that you have Java Developer Kit installed. I always recommend to keep the newest version if you’re not a hard user or a programmer that needs some exacly version.
JAVA INSTALLATION
- For me, the most recent Java version was jdk 22 that is available on: <https://www.oracle.com/java/technologies/downloads/#jdk22-windows>
- The JAVA installation is pretty much straight-forward by clicking next, next, agree, continue buttons and choosing a right path to install. By default the installer recommends the path like “C:\Program Files\Java\jdk-22". It is important to know exactly where it was installed to make sure that we configure the JAVA_HOME environment variable correctly later on.
PYTHON INSTALLATION
- This is pretty much the same as for java, and probably everyone had it done, but is no harm to describe here. So, download Python version at <https://www.python.org/downloads/windows/> (I usually use a version before the most recent, but it will depend on what are you going to do, if it is for work or study, maybe your work needs such specific version ’cause of some lib dependency, lib deprecated, or other particularity.
- The installation process is pretty much the same, but note that on installation screen has an option to add Python to a PATH, make sure you’re keeping this option marked, just to enshort our effort.
- If everything happens accordingly as expected, you can run this command on a cmd python — version and you should be able to see the version you’ve just installed.

APACHE SPARK INSTALLATION
- Here we want to download Spark from Apache (who maintains it) from here <https://spark.apache.org/downloads.html>
- By the time of this writing, this are the most recent version available.

So you’ll just choose the version, i recommend the most recent, for Spark release and for package type. Then click on the link at bullet list #3.
- You should see a screen like this:

Just click on the first link and it will download a zip file that contains Apache Spark.
- Extract its content to a folder under C: folder. On my installation I extract on the C: folder itself. Like this:

Step 2.
Now that all installations are done. we’re going to make some configurations.
- Create a new folder named hadoop, i recommend it to be besides spark folder, just to be more easier on this first time, later you can refactor and follow some folder pattern that you have. Inside this hadoop folder, create a bin folder, like this:
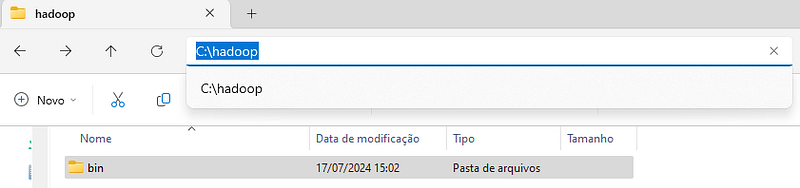
- Inside the bin folder, we will put the winutils.exe that is necessary to perform some spark changes and allows using resources such as HDFS. To download this, you need to check the version of Hadoop that your Spark makes use (see image of Apache Spark Instalation, on option of package type that you’ve just downloaded and go to <https://github.com/cdarlint/winutils/tree/master> and navigate through the version that matches with yours. On my case, it is Hadoop 3.3, so I can go on hadoop-3.3.5 and search for the winutils.exe, download this file and put it on C:\hadoop\bin folder.
Step 3.
Messy part, Environment Variables configuration.
The last and definitely not the least part, we need to configure all the Environment Variables so the system can locate all the installations that we did, for python, java, spark and hadoop.
- On windows search bar, just type Environment Variables and you should see the System Properties and on this screen, it has the Enviroment Variables.
- On the User variables for <user> click on New buttom and create the following: - JAVA_HOME -> C:\Program Files\Java\jdk-22 (or the path you choose during the JAVA installation process). - HADOOP_HOME -> C:\hadoop - SPARK_HOME -> C:\spark - SPARK_LOCAL_HOST_NAME -> localhost
- Then, the final step is to set up those variables into the Path one, so on the same User variables for <user> session, you should see th Path variable, select it and edit it. Click on New to create one by one of these: - %JAVA_HOME%\bin - %SPARK_HOME%\bin - %HADOOP_HOME%\bin
- It should be like this:

STEP 4
Lets test the whole thing!
On a new cmd, run the commands:
- java --version to see if java is properly set.

- pip install pyspark to install PySpark lib that allows us to use Spark on our codes. (In my case it was already installed, but for you it must take a while untill it gets installed).

- pyspark --version to see if everything is installed and configurated okay. If it did, you should see something like this:

STEP 5
Now that all steps are done, you can work locally using PySpark, also can see the UI just typing pyspark on a cmd, it should give you a link to the UI, like this:

You can past it on a web browser to acces de UI for Spark. It is going to be like this:

Also, you can work on PySpark using VSCode integrated with Jupyter Notebook. To do this you just need to download Python extension for VSCode and Jupyter (i don’t remember if it comes along with Python extension, just in case, search on the extensions tab and install if it not already).
Then, just create a file with the extension .ipynb that is the one for Jupyter.
And the final step, lets test this using some code:

What this code actually does, it confirms the Paths to the SPARK_HOME and HADOOP_HOME, takes the path to JAVA_HOME that you have configured and throws a message if any of this configs are not properly set. Then it try to start a new Spark Session, if everything proceed the way it is supposed to, you shoul get the confirmation message:

Hope you find it usefull and enjoy your journey on the PySpark world!
See ya!


