
How to Handle a Write-Heavy Workload Effectively with Spring Reactive Redis
Reactive Architecture Using the Write-behind caching strategy

In this article, I will talk about designing a reactive architecture for an application with a high volume of writes while maximizing performance. I will use Spring reactive-redis and write-behind caching for this approach.
Overview of the Reactive Redis
I have already discussed a detailed article about how to integrate Reactive Redis with Spring WebFlux. You can refer to it below.
You can refer to my other articles related to reactive architecture using reactive Redis down below.
Write-heavy workloads
Workloads that demand frequent and quick insertion, deletion, or change of data but infrequent or sluggish reads are known as write-heavy workloads. For example, a logging system that records events, a streaming service that processes data in real-time, or an order management system that updates the order status in real-time.
If our application immediately updates the database for changes in the data, as the demand increases, so does the response time for these updates. Databases are not excellent at handling several concurrent transactions with a few records per transaction. Databases are significantly better at processing batch transactions.
We need a way of flattening these heavy writes, allowing us to write data rapidly and then persist it in the database asynchronously. The design we are looking for is called thewrite-behind pattern.
Write Behind Pattern
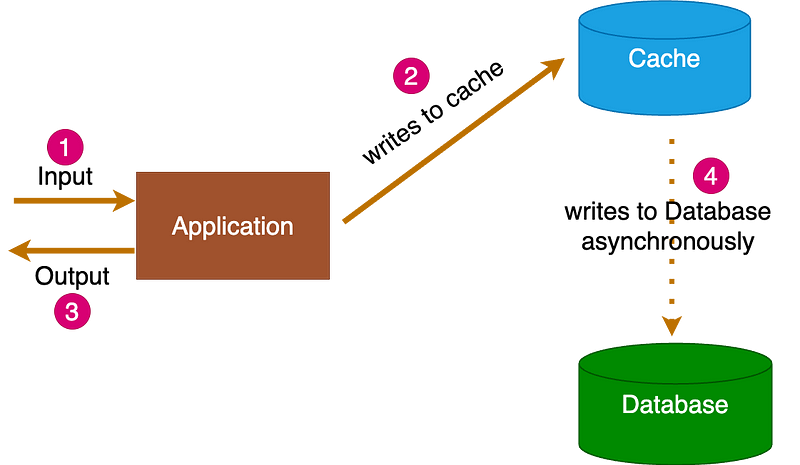
The write-behind pattern is a caching strategy in which the cache is updated first and then writes back to the main database at a later time (when demand is down) This asynchronous operation will reduce the latency of the write operation.
There are different ways to implement asynchronous updates from the database to the cache:
- Employ a time-based delay, in which the cache updates the database after waiting for a predetermined amount of time.
- Using an entry-based delay, where the cache holds off on updating the database until a certain amount of new data entries are gathered.
We will use Redisson to implement the write-behind strategy in our application.
Application Setup with Spring Boot and Reactive Redis
Project Technical Stack
- Spring Boot 3.2.0
- Java 21
- Redis
- Redisson
- Couchbase
- Docker
Starting Up Redis Server and Redis Insight
We will use Docker to start Redis with Redis Insight. The port of our Redis server is 6379, and the port of Redis Insight is 8001.
docker run -d --name redis-stack -p 6379:6379 -p 8001:8001 redis/redis-stack:latestStarting Up Couchbase Server
Couchbase Server can be installed using official Couchbase images from Docker Hub. Execute the following command:
docker run -d --name couchbase-db -p 8091-8096:8091-8096 -p 11210-11211:11210-11211 couchbaseYou can refer to my detailed Couchbase Guide with Spring Boot WebFlux in the below link.
We will then set up the application with Spring Initializer with the following dependencies in the pom.xml file.
<dependency>
   <groupId>org.springframework.boot</groupId>
   <artifactId>spring-boot-starter-data-couchbase-reactive</artifactId>
</dependency>

<dependency>
   <groupId>org.springframework.boot</groupId>
   <artifactId>spring-boot-starter-data-redis-reactive</artifactId>
</dependency>

<dependency>
   <groupId>org.redisson</groupId>
   <artifactId>redisson-spring-boot-starter</artifactId>
   <version>3.25.0</version>
</dependency>

<dependency>
   <groupId>org.springframework.boot</groupId>
   <artifactId>spring-boot-starter-webflux</artifactId>
</dependency>

<dependency>
   <groupId>io.projectreactor</groupId>
   <artifactId>reactor-test</artifactId>
   <scope>test</scope>
</dependency>

<dependency>
   <groupId>org.springdoc</groupId>
   <artifactId>springdoc-openapi-starter-webflux-ui</artifactId>
   <version>2.1.0</version>
</dependency>
Setting Up Configurations
Configure the application.yml for SpringBoot Application as follows. We will define the configurations related to Redis and Couchbase in it.
spring:
  couchbase:
    connection-string: couchbase://localhost
    user-name: USERNAME
    password: PASSWORD
  data:
    couchbase:
      bucket-name: redis-service
      autoIndex: true

redis:
  host: localhost
  port: 6379
Reactive Redis Configuration
Create a @Configuration class RedisConfig to enable reactive support for Redis.
@Configuration
public class RedisConfig {

    @Value("${redis.host}")
    private String host;

    @Value("${redis.port}")
    private int port;

    @Bean
    @Primary
    public ReactiveRedisConnectionFactory reactiveRedisConnectionFactory() {
        return new LettuceConnectionFactory(host, port);
    }

    @Bean
    public ReactiveRedisOperations<String, Object> reactiveRedisOperations(ReactiveRedisConnectionFactory reactiveRedisConnectionFactory) {
        final Jackson2JsonRedisSerializer<Object> serializer = new Jackson2JsonRedisSerializer<>(Object.class);

        final RedisSerializationContext.RedisSerializationContextBuilder<String, Object> builder =
                RedisSerializationContext.newSerializationContext(new StringRedisSerializer());

        final RedisSerializationContext<String, Object> context = builder.value(serializer).hashValue(serializer)
                .hashKey(serializer).build();

        return new ReactiveRedisTemplate<>(reactiveRedisConnectionFactory, context);
    }
}
LettuceConnectionFactory implements both the RedisConnectionFactory and ReactiveRedisConnectionFactory interfaces. When we declare a bean of LettuceConnectionFactory, we will be registering both RedisConnectionFactory and ReactiveRedisConnectionFactory as Spring beans.
ReactiveRedisOperations is an interface that specifies a basic set of Redis operations, implemented by the ReactiveRedisTemplate.
Jackson2JsonRedisSerializer is a RedisSerializer which is used to bind typed beans or untyped HashMap instances.
Configuring Write-Behind Caching with Redisson
We will use Redisson, a third-party Redis Java client, for implementing write-behind caching. Redisson implements many different Java objects, collections, and constructs. Redisson includes functionality for write-through and write-behind caching in Redis by using the RMap interface.
RMap is a Redis-based implementation of ConcurrentMap and Map. This map uses a serialized state of the key instead of hashCode or equals methods. This map doesn’t allow you to store null as a key or value.
Configure MapWriterAsync
We will configure an asynchronous map writer instance used for write-behind caching operations.
@Component
@RequiredArgsConstructor
@Slf4j
public class ProductWriter implements MapWriterAsync<String, Product> {

    private final ProductRepository productRepository;

    @Override
    public CompletionStage<Void> write(Map<String, Product> map) {
        return productRepository.saveAll(map.values()).collectList().then().toFuture();
    }

    @Override
    public CompletionStage<Void> delete(Collection<String> keys) {
        return Flux.fromIterable(keys).flatMap(productRepository::deleteById).collectList().then().toFuture();
    }
}
Configure MapLoaderAsync
We will configure an asynchronous map loader instance used for read-through operations or during RMap.loadAll execution.
@Component
@RequiredArgsConstructor
@Slf4j
public class ProductLoader implements MapLoaderAsync<String, Product> {

    private final ProductRepository productRepository;

    @Override
    public CompletionStage<Product> load(String key) {
        return productRepository.findById(key).toFuture();

    }

    @Override
    public AsyncIterator<String> loadAllKeys() {
        return null;
    }

}
Configure MapOptions for Write-Behind Caching
    private final ProductWriter productWriter;
    private MapOptions<String, Product> cacheWriteOptions;

    @PostConstruct
    private void init() {
        cacheWriteOptions = MapOptions.<String, Product>defaults()
                .writerAsync(productWriter)
                .writeBehindDelay(10 * 1000)
                .writeBehindBatchSize(10)
                .writeMode(MapOptions.WriteMode.WRITE_BEHIND);
}writerAsync- Defines the
MapWriterAsyncobject which is invoked during write operation. We will be using theProductWriterinstance we defined in previous step.
writeBehindDelay - Delay of batched write or delete operation. The default value is 1000 milliseconds.
writeBehindBatchSize - The size of the batch. Each batch contains Map Entry write or delete commands. The default value is 50.
Configure MapOptions for Read-through Caching
    private final ProductLoader productLoader;
    private MapOptions<String, Product> cacheReadOptions;

    @PostConstruct
    private void init() {
        cacheReadOptions = MapOptions.<String, Product>defaults()
              .loaderAsync(productLoader);
}loaderAsync- Sets the
MapLoaderAsyncobject. object which is invoked during reader operation. We will be using theProductLoaderinstance we defined in previous step.
Product Cache
This is the Caching Layer that implements the write-behind caching operations and read-through caching operations.
@Component
@RequiredArgsConstructor
public class ProductCache {

    private static final String PRODUCT_REDIS_KEY = "PRODUCT:REDIS";
    private final RedissonReactiveClient redissonClient;
    private final ProductLoader productLoader;
    private final ProductWriter productWriter;
    private MapOptions<String, Product> cacheWriteOptions;
    private MapOptions<String, Product> cacheReadOptions;

    @PostConstruct
    private void init() {
        cacheReadOptions = MapOptions.<String, Product>defaults().loaderAsync(productLoader);
        cacheWriteOptions = MapOptions.<String, Product>defaults()
                .writerAsync(productWriter)
                .writeBehindDelay(10 * 1000)
                .writeBehindBatchSize(10)
                .writeMode(MapOptions.WriteMode.WRITE_BEHIND);
    }

    public Mono<Product> updateProduct(final Product product) {
        return getRedisMap(cacheWriteOptions).put(product.getId(), product);
    }

    private RMapReactive<String, Product> getRedisMap() {
        return redissonClient.getMap(toRedisKey());
    }

    private RMapReactive<String, Product> getRedisMap(MapOptions<String, Product> options) {
        return redissonClient.getMap(toRedisKey(), options);
    }

    public Mono<Product> getById(String id) {
        return getRedisMap(cacheReadOptions).get(id);
    }


    private String toRedisKey() {
        return PRODUCT_REDIS_KEY;
    }

    public Mono<Void> clearMap() {
        return getRedisMap().expire(Instant.now()).then();
    }

}
Product Service
We have implemented the design in the following steps:
Case 1: Saving a New Product
- The product is saved to the primary database.
- The product cache is updated.
Case 2: Updating an Existing Product
- The product cache is updated.
- The product cache updates the primary database asynchronously.
Case 2: Fetch a product based on product ID
- The product can be fetched from either the primary database or from the cache based on user preference.
@Service
@RequiredArgsConstructor
public class ProductService {

    private final ProductCache productCache;
    private final ProductRepository productRepository;

    public Mono<Product> createNewProduct(final Product product) {
        return productRepository.save(product).flatMap(savedProduct->
                productCache.updateProduct(savedProduct).map(result-> savedProduct)
        );
    }

    public Mono<Product> updateProduct(final Product product) {
        return productCache.updateProduct(product);
    }

    public Flux<Product> getProducts() {
        return productRepository.findAll();
    }

    public Mono<Product> findById(final String id, final boolean isFromCache) {
        if (isFromCache) {
            productCache.getById(id);
        }
        return productRepository.findById(id);
    }
}
Product Repository
@Repository
@EnableReactiveCouchbaseRepositories
public interface ProductRepository extends ReactiveCouchbaseRepository<Product, String> {
}
Product Controller
@RestController
@RequestMapping("/product")
@RequiredArgsConstructor
public class ProductController {

    private final ProductService productService;

    @PostMapping
    public Mono<Product> createNewProduct(@RequestBody final Product product) {
        return productService.createNewProduct(product);
    }

    @PutMapping
    public Mono<Product> updateProduct(@RequestBody final Product product) {
        return productService.updateProduct(product);
    }

    @GetMapping
    public Flux<Product> getAllProducts() {
        return productService.getProducts();
    }

    @GetMapping(path = "/{id}/{fromCache}")
    public Mono<Product> getAllProducts(@PathVariable final String id, @PathVariable final Boolean fromCache) {
        return productService.findById(id, fromCache);
    }

}
Testing the Application
We will use the Spring Doc Open API to test the Rest Endpoints.

Get All Products
curl -X 'GET' \
  'http://localhost:8080/product' \
  -H 'accept: */*'
Add New Product
curl -X 'POST' \
  'http://localhost:8080/product' \
  -H 'accept: */*' \
  -H 'Content-Type: application/json' \
  -d '{
  "price": 0
}'
Update existing Product
curl -X 'PUT' \
  'http://localhost:8080/product' \
  -H 'accept: */*' \
  -H 'Content-Type: application/json' \
  -d '{
  "id": "11065c09-332e-468e-b977-006c5e63d8ab",
  "price": 100
}'
Get Product By Product ID
curl -X 'GET' \
'http://localhost:8080/product/11065c09-332e-468e-b977-006c5e63d8ab/true' \
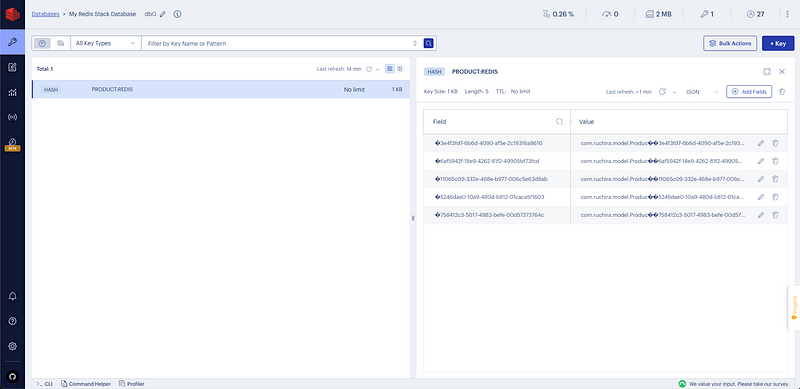
-H 'accept: */*'Redis Insight Dashboard
Couchbase Dashboard

Summary
In this article, we have covered:
- Overview of Reactive Redis
- Write heavy workloads
- The write-behind pattern in caching
- How to start a Redis Server and Redis Insight with docker
- How to start a Couchbase server with docker
- Configuring write-behind caching with Redission.
- Testing the Rest Endpoints using Spring Doc Open API
Please feel free to share your feedback.
Visit to find more of my articles on Medium.
Thanks for reading.
Stackademic
Thank you for reading until the end. Before you go:
- Please consider clapping and following the writer! 👏
- Follow us on Twitter(X), LinkedIn, and YouTube.
- Visit Stackademic.com to find out more about how we are democratizing free programming education around the world.


