
How to Fine-tune Stable Diffusion using Dreambooth
Personalized generated images with custom styles or objects
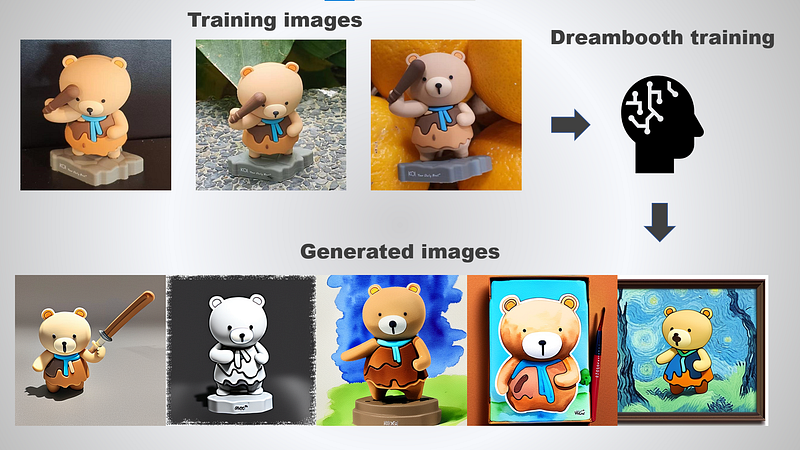
Previously, I have covered an article on fine-tuning Stable Diffusion using textual inversion. This tutorial focuses on how to fine-tune Stable Diffusion using another method called Dreambooth. Unlike textual inversion method which train just the embedding without modification to the base model, Dreambooth fine-tune the whole text-to-image model such that it learns to bind a unique identifier with a specific concept (object or style). As a result, the generated images is more personalized to the object or style compared to textual inversion.
This tutorial is based on a forked version of Dreambooth implementation by HuggingFace. The original implementation requires about 16GB to 24GB in order to fine-tune the model. The maintainer ShivamShrirao optimized the code to reduce VRAM usage to under 16GB. Depending on your needs and settings, you can fine-tune the model with 10GB to 16GB GPU. I have personally tested the training to be feasible on Tesla T4 GPU.
Please note that all the existing implementation is not by the original author of Dreambooth. As a result, there might be slight difference in terms of reproducibility.
Let’s proceed to the next section to setup all the necessary modules.
Setup
It is recommended to create a new virtual environment before you continue with the installation.
Python packages
In your working directory, create a new file called requirements.txt with the following code:
accelerate==0.12.0
torchvision
transformers>=4.21.0
ftfy
tensorboard
modelcards
Activate your virtual environment and run the following command one by one to install all the necessary modules:
pip install git+https://github.com/ShivamShrirao/diffusers.git
pip install -r requirements.txt
NOTE: You need to install
diffusersusing the url above instead of installing it directly frompypi.
bitsandbytes package
There is an optional package called bitsandbytes, which can reduce the VRAM usage further. However, it only supports CUDA versions 10.2–11.7 and your machine must fulfill the following requirements:
LLM.int8(): NVIDIA Turing (RTX 20xx; T4) or Ampere GPU (RTX 30xx; A4-A100); (a GPU from 2018 or older).8-bit optimizers and quantization: NVIDIA Maxwell GPU or newer (>=GTX 9XX).
You can install it as follows:
pip install bitsandbytes
xformers package
For those with GPU that is less than 24GB, you need to install the xformers package in order to reduce the VRAM usage further. At the time of this writing, installing xformers is not that straightforward due to lack of wheel support from the developers.
You can install the package as follows:
pip install xformers
If you encounter an error with the command above, run the following command to build the package directly from the repository:
pip install git+https://github.com/facebookresearch/xformers.git@main#egg=xformersIf you are having issue with CUDA version, make sure you install the latest version of CUDA that is compatible with your machine. Follow the instructions from the following link.
Accelerate setup
The next step is to initialize an Accelerate environment. Run the following command:
accelerate config
There will be multiple prompts in the terminal. Answer it based on your own use cases. Have a look at the following example as reference:
In which compute environment are you running? ([0] This machine, [1] AWS (Amazon SageMaker)): 0
Which type of machine are you using? ([0] No distributed training, [1] multi-CPU, [2] multi-GPU, [3] TPU [4] MPS): 0
Do you want to run your training on CPU only (even if a GPU is available)? [yes/NO]:no
Do you want to use DeepSpeed? [yes/NO]: no
Do you wish to use FP16 or BF16 (mixed precision)? [NO/fp16/bf16]: fp16
HuggingFace’s models
You can skip this section if you already have the diffusers model for Stable Diffusion (v1.4/v1.5). For those that
You have to use the
diffusersmodel instead ofckptfile for fine-tuning. You can use the following script to convert yourckptfile todiffusersmodel.
Register a new account in HuggingFace and accept the model license before downloading or using the weights.
Once you are done with it, refer to this section of the documentation to enable the access token.
Run the following command and pass in your token for authentication:
huggingface-cli login
It will download the weights to the cache folder during the initial run.
Datasets
You need to collect high quality datasets to get consistent and good results. The training images should match the expected output and resized to 512 x 512 in resolution.
Please note that artifacts such as motion blur or low resolution will affect the generated images. This is applicable to any unwanted text, watermarks or icons in your training datasets. Make sure to pay attention to the datasets that you used for training.
Depending on your use cases, you can use the following guidelines:
Object
Use images of your object with a normal background. Transparent background may leave a fringe or border around the object. All training images should focus on just the object with variations on:
- camera angle
- pose
- props (clothing, haircut, etc.)
- background (taken at different locations)
The number of training images should be around 5 to 20. You may need to crop the images to focus on just the object.
Style
Use images of the style that you like. It can be from your own art collections or public movies/animations/tvshows that share a consistent style. All training images should focus on the style and not a particular object.
To generalize it well, you should make sure that the same object does not appear more than once in the training images (one of each character). If your goal is to generate different characters of the same style. Include only training images with characters. Otherwise, include landscape, objects and other relevant images in your training datasets.
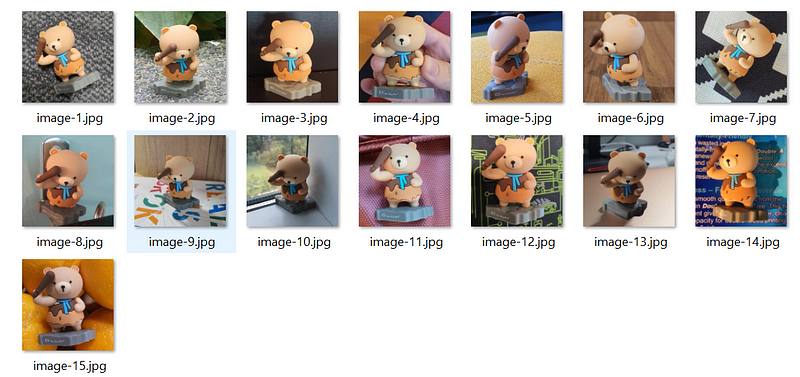
Training images
In this tutorial, I will be using the following training images:
This tutorial uses the following terms for the training datasets.
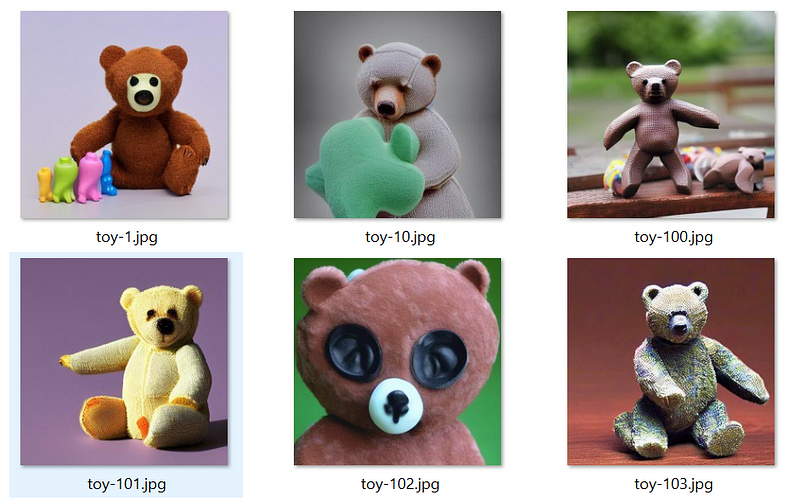
Instance images— Custom images that represents the specific concept for dreambooth training. You should collect high quality images based on your use cases.Class images— Regularization images for prior-preservation loss to prevent overfitting. You should generate these images directly from the base pre-trained model. You can choose to generate them on your own or generate them on the fly when running the training script.
Training
Head over to the following Github repository and download the train_dreambooth.py file to your working directory.
Training commands
The following is a list of the common parameters that should be modified based on your use cases:
pretrained_model_name_or_path— Path to pretrained model or model identifier from huggingface.co/modelspretrained_vae_name_or_path— Path to pretrained vae or vae identifier from huggingface.co/models. You can fine-tune the model with or without vaeinstance_data_dir— A folder containing the training data of instance imagesclass_data_dir— A folder containing the training data of class imagesinstance_prompt— The prompt with identifier specifying the instanceclass_prompt— The prompt to specify images in the same class as provided instance imagesnum_class_images— Minimal class images for prior preservation lossoutput_dir— The output directory where the model predictions and checkpoints will be writtenmax_train_steps— Total number of training steps to perform. Recommend to set it toN * 100whereNrepresents the number of instance images.learning_rate— Initial learning rate (after the potential warmup period) to uselr_scheduler— The scheduler type to use. Choose between [linear,cosine,cosine_with_restarts,polynomial,constant,constant_with_warmup]lr_warmup_steps— Number of steps for the warmup in the lr scheduler. Usemax_train_steps / 10when usingpolynomialor0when usingconstant.save_interval— Save weights every N steps. Make sure you have sufficient storage space for it. Each weight is about 4GB.
You can set custom vae using the following flag:
--pretrained_vae_name_or_path="stabilityai/sd-vae-ft-mse"Training with prior-preservation loss helps to prevent overfitting. Enable it as follows:
--with_prior_preservation --prior_loss_weight=1.0
Moreover, you can fine-tune the text_encoder along with unet. However, this will increase the VRAM usage drastically. Set it with the following flag:
--train_text_encoder
For object training, you can use the following example as reference for instance_prompt and class_prompt. Feel free to experiment different strings based on your use cases.
# Woman
--instance_prompt="photo of zwx woman" \
--class_prompt="photo of a woman" \

# Black man
--instance_prompt="photo of zwx black man" \
--class_prompt="photo of a black man" \

# Dog
--instance_prompt="photo of zwx dog" \
--class_prompt="photo of a dog" \
You can use your own custom string as the unique identifier. In the early implementation, most of the examples use
sksas the unique identifier. However,sksis a known token for a semi-automatic rifle. It is highly recommended to use a different unique identifier that is not part of the token used in the original Stable Diffusion’s datasets.
Also, the unique identifier is not limited to a single string. Some users reported good performance with the following prompts for style training:
# Style 1
--instance_prompt="modern disney style" \
--class_prompt="artwork style" \

# Style 2
--instance_prompt="classic animation style" \
--class_prompt="illustration style" \
As for learning rate and scheduler, kindly refer to the following blog by HuggingFace.
Training examples
Have a look at the following example training command for the training images above (tested on Tesla T4 with 16GB memory):
accelerate launch train_dreambooth.py \
  --pretrained_model_name_or_path="runwayml/stable-diffusion-v1-5" \
  --pretrained_vae_name_or_path="stabilityai/sd-vae-ft-mse" \
  --instance_data_dir="./instance-images/" \
  --class_data_dir="./class-images/" \
  --output_dir="./output-models/" \
  --with_prior_preservation --prior_loss_weight=1.0 \
  --instance_prompt="photo of zwx bear toy" \
  --class_prompt="photo of bear toy" \
  --resolution=512 \
  --train_batch_size=1 \
  --train_text_encoder \
  --mixed_precision="fp16" \
  --use_8bit_adam \
  --gradient_accumulation_steps=1 \
  --gradient_checkpointing \
  --learning_rate=1e-6 \
  --lr_scheduler="constant" \
  --lr_warmup_steps=200 \
  --num_class_images=300 \
  --max_train_steps=2000 \
  --save_interval=500
Modify the data directory accordingly based on your working directory.
If you have insufficient memory, kindly toggle off the text_encoder training:
accelerate launch train_dreambooth.py \
  --pretrained_model_name_or_path="runwayml/stable-diffusion-v1-5" \
  --instance_data_dir="./instance-images/" \
  --class_data_dir="./class-images/" \
  --output_dir="./output-models/" \
  --with_prior_preservation --prior_loss_weight=1.0 \
  --instance_prompt="photo of zwx bear toy" \
  --class_prompt="photo of bear toy" \
  --resolution=512 \
  --train_batch_size=1 \
  --mixed_precision="fp16" \
  --use_8bit_adam \
  --gradient_accumulation_steps=1 \
  --gradient_checkpointing \
  --learning_rate=1e-6 \
  --lr_scheduler="constant" \
  --lr_warmup_steps=0 \
  --num_class_images=300 \
  --max_train_steps=2000 \
  --save_interval=500
Make sure not to over-train your model as the Dreambooth method tends to over-fit quickly. If your model does not generalize well to your prompts or has artifacts on it, most likely it means that you have over-trained your model. Kindly reduce the training steps or train with higher steps using lower learning rate.
Moreover, the latest training script accepts a new parameter called concept_list. It represent the path to a JSON file containing a list of dictionaries. It will overwrite parameters like instance_prompt, class_prompt, etc. You can use this to train multiple concepts at the same time to a single model. For example, given the following concept_list.json file:
[
    {
        "instance_prompt":      "photo of zwx dog",
        "class_prompt":         "photo of a dog",
        "instance_data_dir":    "./instance-images/",
        "class_data_dir":       "./class-images/"
    }
]
You can use the following parameter in the training command:
--concepts_list ./concepts_list.json
Simply append a new dictionary to the list for training another concept at the same time.
When you run it for the first time, it will generate the class images. You can re-use the same class images for the subsequent training as long as your are referring to the same concept. Simply set the class_data_dir to the same directory as your previous training. Hence, you can re-use most of the generated class images when training for a particular style.
Here are some class images generated for this tutorial:
Training output
The script will save a new weight on each interval based on the value of save_interval. You should have the following files and folders inside each of the newly generated weight folders:
|- feature_extractor
|  |- preprocessor_config.json
|- scheduler
|  |- scheduler_config.json
|- text_encoder
|  |- config.json
|  |- pytorch_model.bin
|- tokenizer
|  |- merges.txt
|  |- special_tokens_map.json
|  |- tokenizer_config.json
|  |- vocab.json
|- unet
|  |- config.json
|  |- diffusion_pytorch_model.bin
|- vae
|  |- config.json
|  |- diffusion_pytorch_model.bin
|- args.json
|- model_index.json
Inference
Now, create a new Python file called inference.py in your working directory. Append the following code inside it:
from diffusers import StableDiffusionPipeline, DDIMScheduler
import torch

device = "cuda"
# use DDIM scheduler, you can modify it to use other scheduler
scheduler = DDIMScheduler(beta_start=0.00085, beta_end=0.012, beta_schedule="scaled_linear", clip_sample=False, set_alpha_to_one=True)

# modify the model path
pipe = StableDiffusionPipeline.from_pretrained(
    f"./output-models/1500/",
    scheduler=scheduler,
    safety_checker=None,
    torch_dtype=torch.float16,
).to(device)

# enable xformers memory attention
pipe.enable_xformers_memory_efficient_attention()

prompt = "photo of zwx bear toy"
negative_prompt = ""
num_samples = 4
guidance_scale = 7.5
num_inference_steps = 50
height = 512
width = 512

images = pipe(
    prompt,
    height=height,
    width=width,
    negative_prompt=negative_prompt,
    num_images_per_prompt=num_samples,
    num_inference_steps=num_inference_steps,
    guidance_scale=guidance_scale
).images

count = 1
for image in images:
    # save image to local directory
    image.save(f"img-{count}.png")
    count += 1
Some users reported that using
xformersfor image generation will result in non-deterministic results. This means that you can’t reproduce the same image with the same settings (seed, image size, etc.). Kindly experiment it yourselves and modify the code accordingly based on your use cases.
Once you are done with it, run the following command to generate images using the newly fine-tuned model.
python inference.py
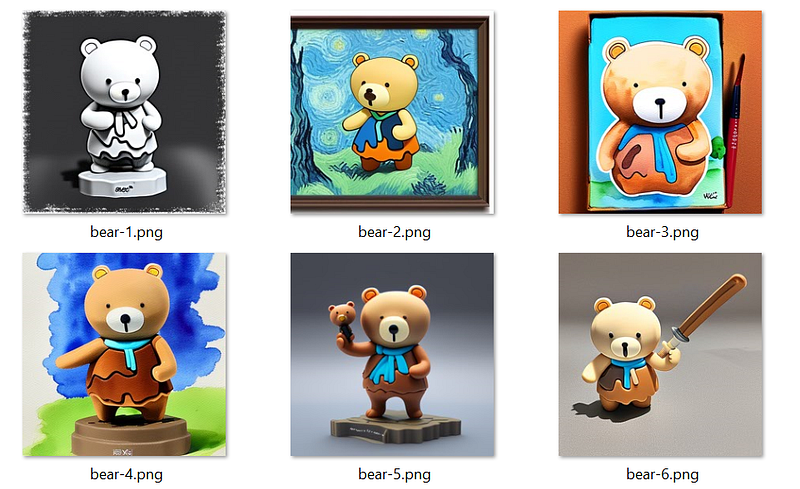
Here are some of the example outputs (prompts are not included as I made a mistake of not keeping track of them initially):
Consider checking out my other articles on training conditional/unconditional image generation models:
- How to Fine-tune Stable Diffusion using Textual Inversion
- The Beginner’s Guide to Unconditional Image Generation Using Diffusers
- How to Fine-tune Stable Diffusion using LoRA
Conclusion
Dreambooth is a good technique to fine-tune the Stable Diffusion model with a particular concept (object or style).
With the advancement of research and development in AI, it is now possible for the average Joe to fine-tune their own custom models. However, it may be a double-edge sword with both opportunies and challenges for the art industries.
If you are part of the artist industries, it is recommended to embrace and use this technology to streamline your workflow. Also, it would be great if everyone can use this technology wisely for the betterment of mankind.
Unfortunately, I do not have sufficient memory at the moment to fine-tune the whole model using images and captions pairs.
Thanks for reading this piece. Have a great day ahead!


