
How to Fine-tune SDXL using LoRA
Personalized text-to-image generation with custom datasets

Previously, I have covered an article on How to Fine-tune SDXL 0.9 using Dreambooth LoRA. For your information, Dreambooth is a specialized method which requires only a few images to create personalized subject or style. It works really well for single subject or style image generation.
Note that some of the frameworks do support Dreambooth training with image-captions pairs datasets. Kindly refer to the corresponding repositories for more information.
This tutorial covers vanilla text-to-image fine-tuning using LoRA. The training is based on image-caption pairs datasets using SDXL 1.0 as the base model. This method should be preferred for training models with multiple subjects and styles.
This tutorial is based on the
diffuserspackage, which does not support image-caption datasets for Dreambooth training. Training has been tested on version 0.19.3. Note that the output LoRA can only be used via the thediffuserspackage and not compatible with the original implementation (most open-source webui in the market use the original implementation).
Based on local experiments, the VRAM consumptions are as follows:
GeForce RTX 3060 GPU (12GB)—consumes about 12.3 GB for training. Training takes about 7 hours 20 minutes for 24 images (100 epochs) and 63 hours for 209 images (100 epochs).GeForce RTX 4090 GPU (24GB)— consumes about 16.8 GB for training. Training takes about 12 hours 30 minutes for 252 images (100 epochs).
Let’s proceed to the next section for the installation process.
Setup
It is highly recommended to create a new virtual environment before you continue with the installation.
Pytorch
Activate the virtual environment and run the following command to install Pytorch 2:
pip install torch torchvision --index-url https://download.pytorch.org/whl/cu118Diffusers
Next, install the latest stable version of the diffusers package as follows:
pip install diffusers
You can install the latest development version using the git+ command for the latest features:
pip install git+https://github.com/huggingface/diffusers
Others Python packages
Continue by installing the rest of the Python packages as follows:
pip install transformers accelerate safetensors invisible-watermarkConfigure accelerate
Before that, configure accelerate by running the following command:
accelerate configHave a look at the following example for training on a single GPU with mixed precision:
----------------------------------------------------------------------------------------------------------------------------
In which compute environment are you running?
This machine
----------------------------------------------------------------------------------------------------------------------------
Which type of machine are you using?
No distributed training

Do you want to run your training on CPU only (even if a GPU is available)? [yes/NO]:
no

Do you wish to optimize your script with torch dynamo?[yes/NO]:
no

Do you want to use DeepSpeed? [yes/NO]:
no

What GPU(s) (by id) should be used for training on this machine as a comma-seperated list? [all]:
all
----------------------------------------------------------------------------------------------------------------------------
Do you wish to use FP16 or BF16 (mixed precision)?
fp16
Alternatively, use the following command for the default values:
accelerate config defaultDatasets
Vanilla text-to-image fine-tuning requires image-caption pairs datasets. You can prepare the training datasets via one of the following methods:
- upload or use datasets on HuggingFace Hub that comes with the
imageandtextkeys - a folder containing the
metadata.jsonland all the relevant training images
Highly recommended to prepare all the datasets in 1024 x 1024 resolution for SDXL training.
Datasets on HuggingFace Hub
Head over to HuggingFace Hub and locate any image datasets that comes with captions. Take note of the datasets name as the input argument for dataset_name parameter. During the initial run, the training script will download all the files to the .cache folder automatically. Subsequently, the training script will reuse the cache datasets for training.
Have a look at the following command which uses the lambdalabs/pokemon-blip-captions datasets for training:
accelerate launch train_text_to_image_lora_sdxl.py \
  --dataset_name="lambdalabs/pokemon-blip-captions" \
  ...
Note that the datasets above has the Attribution-NonCommercial-ShareAlike 4.0 International (CC BY-NC-SA 4.0) license.
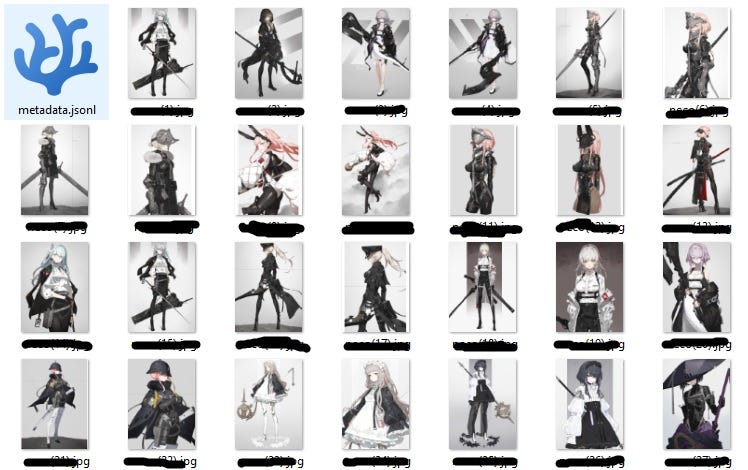
Custom images in a folder
Place all the training images in a folder and create a new file called metadata.jsonl in the same directory. Fill the file with the following content:
{"file_name": "images/xxx.png", "text": "a drawing of a dog with red eyes"}
{"file_name": "images/xxy.png", "text": "a drawing of a cat sleeping"}
{"file_name": "images/train/xxz.png", "text": "a drawing of a pink rabbit"}
Each line consists of a dictionary that represents the metadata for a single image:
file_name: the corresponding file path of the imagetext: the caption for the image
Make sure that all the file paths match the file_name value in the metadata.jsonl file.
Have a look at the following folder structure as reference:
data/metadata.jsonl
data/images/xxx.png
data/images/xxy.png
...
data/images/train/xxz.png
data/images/val/yyz.png
Behind the scene, the script will find the metadata.jsonl file and load the all the training images based on the file_name parameters. For custom training data, use the train_data_dir argument instead. Set it to the base folder which contains the metadata.jsonl file. For example:
accelerate launch train_text_to_image_lora_sdxl.py \
    --train_data_dir="data" \
    ...
Training
Head over to the official repository and download the train_text_to_image_sdxl.py training script locally in the current working directory. As usual, locate the check_min_version function in the training script and comment it out to prevent non-matching version error (only applicable if you are not using the latest development version of diffusers):
...
# check_min_version("0.20.0.dev0")
Once you are all set, run the following command to start SDXL fine-tuning. Use train_data_dir for custom datasets and replace it with dataset_name for datasets from HuggingFace Hub:
accelerate launch train_text_to_image_lora_sdxl.py \
  --pretrained_model_name_or_path="stabilityai/stable-diffusion-xl-base-1.0" \
  --train_data_dir="data" --caption_column="text" \
  --resolution=1024 --random_flip \
  --train_batch_size=1 \
  --learning_rate=1e-04 --lr_scheduler="constant" --lr_warmup_steps=0 \
  --seed=42 \
  --output_dir="sd-lora-sdxl" \
  --gradient_checkpointing \
  --mixed_precision="fp16" \
  --num_train_epochs=100
For Windows user, you should replace all the \ symbols with the ^ symbols. Replace the
pretrained_model_name_or_pathargument with the desired SDXL model.
resolution— The resolution for input images, all the images in the train/validation datasets will be resized to this. The default value is 1024 for SDXL.train_batch_size— Batch size (per device) for the training data loader. Reduce the batch size to prevent Out-of-Memory error during training.num_train_epochs— The number of training epochs. Default to 100.checkpointing_steps— Save a checkpoint of the training state every X updates. Default to 500. Set it to a higher value to reduce the number of checkpoints being saved.checkpoints_total_limit— Limit the number of saved checkpoints. Will remove/delete older checkpoints.rank— The dimension of the LoRA update matrices. Default to 4 which will generate a 23MB LoRA file as output. The higher the rank, the bigger the LoRA file size.
Initially, the script will download all the required SDXL files from HuggingFace Hub and save it locally. You can find these files in the default
cachefolder. Subsequently, it will reuse the same cache for training.
Have a look at the following folder structure as reference:
|- output
|  |- checkpoint-500
|  |- checkpoint-1000
|  |- checkpoint-1500
|  |- checkpoint-2000
|- data
|- train_text_to_image_lora_sdxl.py
By default, each checkpoint folder consists of the following files:
- optimizer.bin
- pytorch_lora_weights.bin
- random_states_0.pkl
- scaler.pt
- scheduler.bin
The pytorch_lora_weights.bin file can be used directly for inference.
Inference
The following section will showcase the code snippet to perform image generation using the base SDXL model and the newly trained LoRA file. To keep it short and simple, the inference code will not include the refiner model. Kindly check the Introduction to Stable Diffusion XL 0.9 article for more information on using both the base and refiner model for inference.
Create a new Python file called inference.py and add the following import statements to the top of the file:
from diffusers import DiffusionPipeline
import torch
Initialize the base SDXL pipeline and call the unet.load_attn_procs function to load the newly generated LoRA weight:
pipe = DiffusionPipeline.from_pretrained(
    "stabilityai/stable-diffusion-xl-base-1.0",
    torch_dtype=torch.float16,
    variant="fp16",
    use_safetensors=True
)
# load LoRA weight
pipe.unet.load_attn_procs("data/checkpoint-2000/pytorch_lora_weights.bin", use_safetensors=False)
pipe.enable_model_cpu_offload()
Next, initialize the following variables:
seed = 12345
n_steps = 50
prompt = "1girl, solo, pink hair, animal ears, mechanical ears, long hair"
Continue by adding the following code snippet to perform image generation and save the output image locally:
generator = torch.Generator(device="cuda").manual_seed(seed)
image = pipe(prompt=prompt, generator=generator).images[0]
image.save("image.jpg")
In addition, you can modify the LoRA scale to limit its influence to the base model. Simply pass in a dictionary with the scale value to the cross_attention_kwargs parameter:
image = pipe(
    prompt=prompt,
    generator=generator,
+   cross_attention_kwargs={"scale": 1.0}
).images[0]
The scale should be a floating point value range from 0 to 1.
A value of 0 means that the LoRA weights will not be used. On the other hand, a value of 1 means that only the LoRA fine-tuned weights will be used. Values between 0 and 1 will interpolate between the two weights.
Have a look at the following complete code for reference:
from diffusers import DiffusionPipeline
import torch

pipe = DiffusionPipeline.from_pretrained(
    "stabilityai/stable-diffusion-xl-base-1.0",
    torch_dtype=torch.float16,
    variant="fp16",
    use_safetensors=True
)
# load LoRA weight
pipe.unet.load_attn_procs("data/checkpoint-2000/pytorch_lora_weights.bin", use_safetensors=False)
pipe.enable_model_cpu_offload()

seed = 12345
n_steps = 50
prompt = "1girl, solo, pink hair, animal ears, mechanical ears, long hair"

generator = torch.Generator(device="cuda").manual_seed(seed)
image = pipe(
    prompt=prompt,
    generator=generator,
   cross_attention_kwargs={"scale": 1.0}
).images[0]
image.save("image.jpg")
Save the inference script and run the following command on the terminal:
python inference.py
Results
I personally did a quick test using 60 images of a style with different characters as the training datasets.
Here are some of the example output using the final LoRA weight (100 epochs):
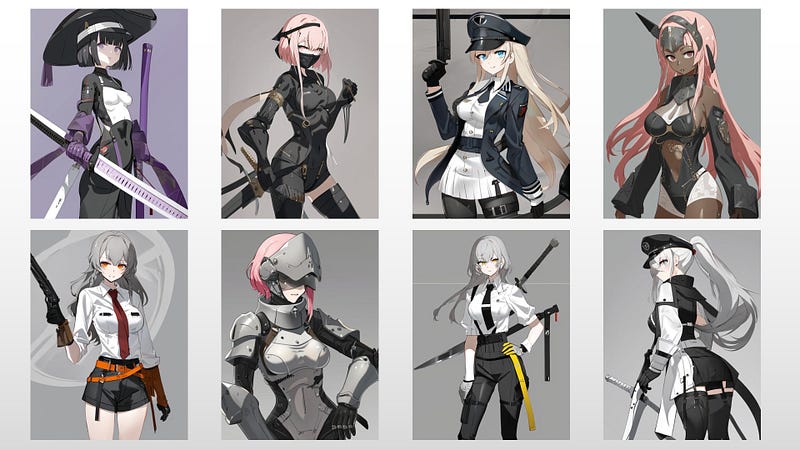
Feel free to experiment with different datasets and training configuration for the optimal output.
Conclusion
Let’s recap the learning points for today.
This article started off with a quick overview of the Dreambooth method and the vanilla text-to-image fine-tuning.
Then, it moved on to the setup and installation steps via pip install.
Subsequently, it covered on data preparation and the differences between using datasets from HuggingFace Hub and local image-caption pairs datasets.
It also provided the training commands with detailed explanation on some of the useful input parameters.
Besides that, it provided a simple code snippet to perform inference using the newly trained LoRA weight.
Thanks for reading this piece. Have a great day ahead!


