
How to Fine-tune LLMs without Coding?
Low/no-code platform to train Large Language models & more

The field of artificial intelligence is continuously evolving, with a focus on creating simpler and more efficient models. This pursuit has given rise to Ludwig, a low-code framework for easily building custom AI models like language models and deep neural networks. Ludwig enables declarative machine learning, constructing models by stating what should be done rather than how to do it. This approach sets Ludwig apart in its quest to simplify and streamline the creation of models.
Declarative Machine Learning Unveiled
Declarative Machine Learning (ML) draws inspiration from declarative programming, providing a straightforward solution to model training. Ludwig’s key innovation lies in utilizing a tabular file containing data and a YAML configuration file specifying input/output features and model characteristics. This declarative approach enables rapid prototyping, potentially reducing development time to mere minutes.

Ludwig's paradigm treats many machine and deep learning problems as encoder-decoder problems, accommodating different types of inputs, outputs, and combinations. This design grants users access to combinations that can merge various encoders and decoders, paving the way for versatile model creation.
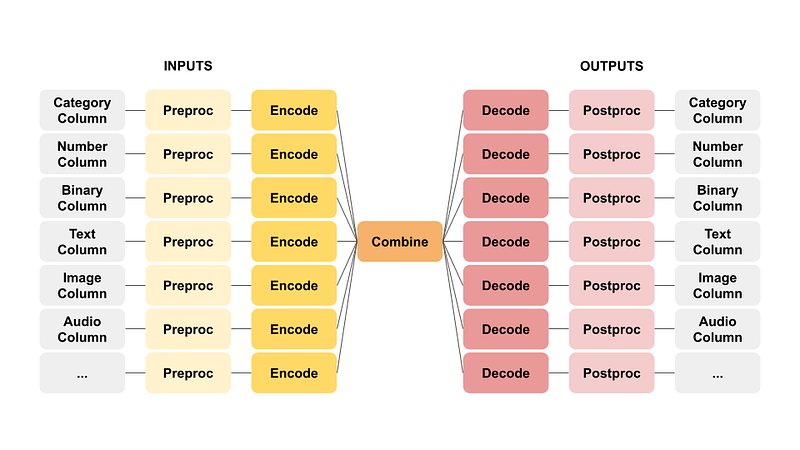
For instance, combining a text encoder with a category decoder results in a text classifier, while an image encoder paired with a text decoder yields an image captioning template. This flexibility empowers the full spectrum of professionals, ranging from non-developers to experienced users, to harness Ludwig’s capabilities for diverse use cases.
Features that Set Ludwig Apart
Ludwig boasts an array of features that contribute to its appeal:
- No Coding Required: Ludwig enables model training and predictions without coding skills, mainly through the Command Line Interface (CLI). The Python API offers a Low Code alternative for those seeking more control.
- Generality and Flexibility: Ludwig’s data type-based design caters to diverse use cases. It provides experienced users and newcomers with extensive control over model building and training.
- Extensibility: Ludwig facilitates the addition of new model architectures and feature data types, promoting a highly adaptable environment.
- Understandability: Ludwig addresses the opacity often associated with model internals by providing standard visualizations, aiding users in comprehending model performance and comparing predictions.
- Efficiency and Control: Built for large-scale efficiency, Ludwig supports automatic batch size selection, distributed training options, parameter-efficient fine-tuning, 4-bit quantization, and handling of large datasets. It offers expert-level control over models, including hyperparameter optimization, explainability, and detailed metric visualizations.
- Modularity and Production-Readiness: Ludwig allows experimentation with various model architectures, tasks, and features with minimal configuration changes. It is designed for production use. It features prebuilt Docker containers, compatibility with Ray on Kubernetes, model exporting options, and easy integration with HuggingFace.
Ludwig in Action: A Tutorial
This tutorial explores the installation process and the steps to fine-tune a base Large Language Model (LLM) on your data, using Ludwig. Running the steps mentioned below, have prerequisites such as the need for a HuggingFace API Token, access approval to Llama2–7b-hf, and a GPU with a minimum of 12 GiB of VRAM.
The installation process involves creating a virtual environment, installing CUDA, and configuring the environment for compatibility with Ludwig. The installation steps could be tricky on Windows. Following is the order that has worked for me!!
conda create -n ludwig python=3.10
conda activate ludwig
conda install cuda -c nvidia
conda install cudatoolkit
pip install torch torchvision torchaudio --index-url https://download.pytorch.org/whl/cu118

# Check `import torch; print(torch.cuda.is_available())` Must be True
# LD_LIBRARY_PATH has paths to <cuda version>/lib x64 and Win32
# pip install bitsandbyes==0.40.2 gives error 'CUDA Setup failed despite GPU being available' need windows version
# pip install bitsandbytes-windows gives error 'no attribute 'cuDeviceGetCount''
# pip install git+https://github.com/Keith-Hon/bitsandbytes-windows gives same error

pip install bitsandbytes==0.40.2 --prefer-binary --extra-index-url=https://jllllll.github.io/bitsandbytes-windows-webui
pip install ludwig
Please note that after installing CUDA, one can find its version like below:
C:\Program Files\NVIDIA GPU Computing Toolkit\CUDA\v11.8You need to install torch torchvision torchaudio for this CUDA version before installing ludwig.
The `pip install ludwig` installs only the basic requirements. However, different features require additional dependencies. They are divided into several categories so that you can install only the ones you need.
Examples: `pip install ludwig[text]`, `pip install ludwig[llm]`, `pip install ludwig[audio]`, etc. The objective is to have an isolated and minimalist virtual environment in order to be able to maintain and deploy your environment easily and efficiently. To install everything, use `pip install ludwig[full]`.
Dataset and Implementation
Data used in this tutorial is taken from Frequently Asked Questions of GST (Goods and Services Tax) site https://cbic-gst.gov.in/faq.html. From the site webpage, data has been copied into a CSV (Comma Separated Values) file and cleaned up. It has got two columns, “Question” and “Answer”. Simple.
The configuration file plays a pivotal role in expressing the user’s intent, specifying input features, output features, training parameters, and more.
Mentioning two fine-tuning approaches:
- Instruction Fine-Tuning: LoRA adapter way.
- Task based: freezing the base model + Question-Answering task. This is called ECD (encoder-combiner-decoder) way.
You can specify each of these in yml files and then use them in the command line way.
ludwig train --config my_config.yaml --dataset my_dataset.csvYou can also read the requisite yml (or specify the same content as a dict) in Python program and train the models programmatically.
from ludwig.api import LudwigModel
import pandas

df = pandas.read_csv('my_dataset.csv')
model = LudwigModel(config='my_config.yaml')
results = model.train(dataset=df)
Based on the model needed (Fine-Tuning or ECD) you can pick the respective configuration. The training code remains as is.
First make sure that CUDA is available. I did it right at the program's start, even before the other imports. That seems to help, else the program exists abruptly (superstition, you may call it, but did not debug further).
import torch
print(torch.cuda.is_available())
Import necessary libraries
from ludwig.api import LudwigModel
import pandas as pd
import yaml
Define Instruction Tuning Configuration
instruction_tuning_config_yaml= yaml.safe_load("""
model_type: llm
base_model: meta-llama/Llama-2-7b-hf

quantization:
 bits: 4

adapter:
 type: lora

prompt:
  template: |
    ### Instruction:
    You are a taxation expert on Goods and Services Tax used in India.
    Take the Input given below which is a Question. Give Answer for it as a Response.

    ### Input:
    {Question}

    ### Response:

input_features:
 - name: Question
   type: text

output_features:
 - name: Answer
   type: text

trainer:
 type: finetune
 learning_rate: 0.0003
 batch_size: 1
 gradient_accumulation_steps: 8
 epochs: 3

backend:
 type: local
""")
or define Q&A Tuning Configuration
qna_tuning_config_yaml= yaml.safe_load("""
input_features:
 - name: Question
   type: text
   encoder:
     type: auto_transformer
     pretrained_model_name_or_path: meta-llama/Llama-2-7b-hf
     trainable: false
   preprocessing:
     cache_encoder_embeddings: true

output_features:
 - name: Answer
   type: text
""")
Python dictionary way of doing the same (above) config is as:
qna_tuning_config_dict = {
    "input_features": [
        {
            "name": "Question",
            "type": "text",
            "encoder": {
                "type": "auto_transformer",
                "pretrained_model_name_or_path": "meta-llama/Llama-2-7b-hf",
                "trainable": False
            },
            "preprocessing": {
                "cache_encoder_embeddings": True
            }
        }
    ],
    "output_features": [
        {
            "name": "Answer",
            "type": "text"
        }
    ]
}
Training model is as below:
df = pd.read_csv('./data/cbic-gst_gov_in_fgaq.csv')
model = LudwigModel(config=instruction_tuning_config_yaml,logging_level=logging.DEBUG)
results = model.train(dataset=df, output_directory="results")
model_dir = "./models/gst_qna"
model.save(model_dir)
Ludwig equips the model to make predictions on fresh data after successful training.
test_df = pd.DataFrame([
    {
        "Question": "What is GST?"
    },
    {
        "Question": "Does aggregate turnover include value of inward supplies received on which RCM is payable?"
    },
])
model = LudwigModel.load(model_dir)
predictions_df, output_directory = model.predict(dataset=test_df)
print(predictions_df["Answer_response"].tolist())
The framework goes beyond prediction by calculating a range of evaluation metrics tailored to the output feature type. The ‘ludwig visualize’ command allows for a visual representation of metrics, facilitating comparisons of performance and predictions between various models.
Code has been open-sourced here. Running this code locally may have memory issues. But the same code in Google Colab notebook with T4 GPU runs successfully.
Embracing Declarative ML
In conclusion, Ludwig’s declarative approach to machine learning stands as a game-changer, significantly reducing the time, effort, and expertise required to bring machine learning models into production. While concepts may seem akin to AutoML tools, Ludwig maintains full transparency and control, ensuring that users are not left in the dark about the inner workings of their models.
Whether you’re a seasoned data scientist or a non-developer seeking AI solutions, Ludwig’s user-friendly design and powerful capabilities make it a valuable asset in the rapidly evolving landscape of artificial intelligence.
References and Further Exploration
The official website provides comprehensive documentation for those eager to delve deeper into Ludwig. Additional resources, including tutorials, examples, and webinars, offer a wealth of knowledge for beginners and advanced users. Explore the provided references for a more in-depth understanding of Ludwig’s capabilities and applications in real-world scenarios.
The above mentioned example is loosely based on the following tutorial
If you are interested in trying your own ML/LLM workflows, why not participate in a contest and demonstrate the prowess to others?
Here are some more useful resources:
Click on the picture below for more information about the author.


