
How To Execute Successful Coastal Drone Surveys
And how to enhance images using Python
Camera and GPS-equipped consumer drones have revolutionized coastal monitoring and marine science. The availability of Structure from Motion (SFM) software like Agisoft Metashape and Pix4D, as well as services like Geonadir, enables high-resolution mapping of coastal areas. Pre-programmed flight routes allow the same drone surveys to be repeated, giving scientists and resource managers the ability to detect even the smallest changes.
However, the same features must be clearly visible in multiple overlapping images for SFM matching algorithms to work correctly. Despite increasingly advanced drones and camera systems, acquiring high quality imagery of coastal areas remains a challenge.
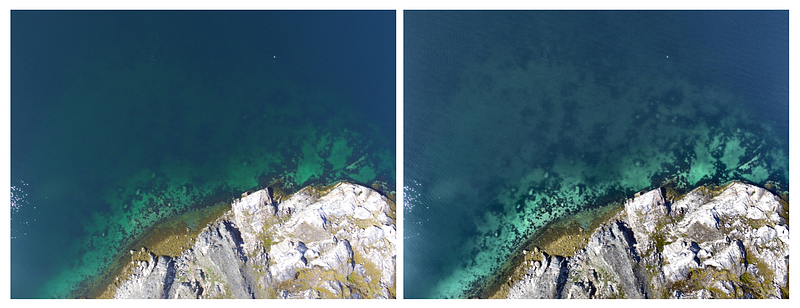
The image above illustrates this challenge. In the original image (on the left), submerged features are underexposed while some of the exposed rocks are overexposed. The enhanced image (on the right) reveals more submerged features as well as more details in the rocks.
This image was enhanced using contrast enhanced adaptive histogram equalization (CLAHE). Enhancing images using CLAHE is relatively easy to do in Python, but simply saving enhanced images as JPEGs might cause headaches when you attempt to process them with SFM software. SFM software uses the data stored in the EXIF header to set the interior and exterior camera parameters. Simply applying CLAHE and saving the result will strip out the EXIF data.
In this post you will learn about the challenges encountered when photographing coastal areas and methods to enhance your images while preserving the EXIF data from the original image.
Bright Land, Dark Water
Photographing coastal areas is tricky, especially if you want to capture land and features submerged in shallow water. Submerged features could include shallow navigational hazards, like rocks, and/or habitats, like seagrass and macroalgae. The dry part of your image is probably going to be brighter than the wet part. Keep a sharp eye on your drone’s shutter speed and aperture settings during the survey. If necessary, manually set/change the area of the image that’s analyzed to determine exposure settings.
Wind, Waves, and Sun
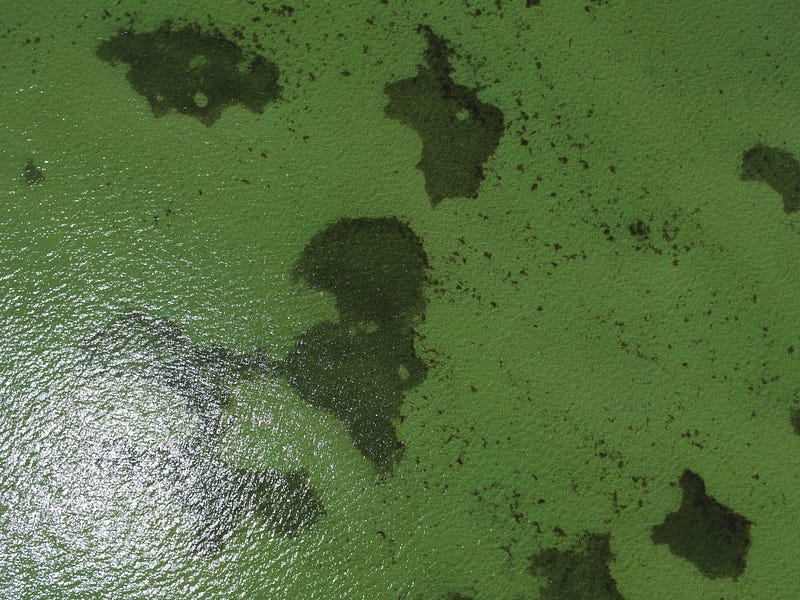
While this sounds like the perfect day at the beach, wind, waves, and sun can cause problems for drone surveys. Weak to moderate winds generate ripples (capillary waves) that can cause images to appear blurred (as shown below). Larger waves can resuspend sediment on the bottom, leading to murky water.
Sun glint, or sun glitter, can also cause problems for coastal drone surveyors. In the image below, most of the lower left quadrant is obscured by sun glint. Sun glint is most visible when the angle of the reflected sunlight is the same as the viewing angle of the camera on the drone. Waves “roughen” the water’s surface, enhancing sun glint. In theory, sun glint can be avoided by flying during calm conditions in the early morning and in the late evening, when the sun is lower. However, the weak light and lower sun angle create problems of their own. The early morning light might be ideal for yoga and meditation, but it might not penetrate deep enough into the water. The low sun angle may also result in unwanted shadows from trees and other terrestrial features.
Plan Ahead
Successfully executing a coastal drone survey requires more planning than, say, an agricultural survey. Don’t expect perfect results on your first try. Check the weather and marine forecasts to find a window with weak winds and no waves. If you’re interested in mapping shallow, submerged areas find a tide chart for your area and
If you’re using a survey app like Pix4D Capture, pay attention to camera settings (exposure, shutter speed, ISO, and white balance) as well as survey speed. While you might be able to fly quickly over land, speed might blur submerged areas, which are darker. A bit of trial and error might be necessary to find the right balance between flight speed and shutter speed. You might have to resort to manual flights is you can find this balance in the app.
Sun glint can be minimized by changing the viewing angle of the camera. Instead of shooting at nadir, shoot 5–10 degrees off-nadir. Most drone survey apps allow you to set the camera angle so use something like 80–85 degrees instead of 90 degrees if you fly in the middle of the day.
Sun glint in the brighter hours of the day can be minimized further with a bit of simple math. Find the solar azimuth angle for the location and time of your survey. The solar azimuth angle is horizontal angle formed between the sun’s position and due north (not to be confused with the solar elevation angle, which is the vertical angle between the horizon and the position of the sun in the sky). Sun glint will be minimal when flying along (towards and away from) the solar azimuth angle. If your drone survey planning software allows you to set the heading or yaw of the drone during flight, set it to equal the solar azimuth angle (there’s a great paper by Joyce et al. 2019 that explains this, and other issues, in detail).
Image Enhancement in Python
Before proceeding, check to make sure you have the necessary packages. This code requires OpenCV and piexif. If not already installed, use pip or Anaconda.
This code does the following:
- Reads the original image
- Applies CLAHE using OpenCV
- Reads the EXIF data from the original image using piexif
- Writes the CLAHE image with the EXIF data
To run this code, copy it to your python/text editor and save it as ‘clahe_exif.py’
Make sure to change ‘orig_jpg’ and ‘img_out’ !
Open a terminal window in the directory containing the python script and run it by entering the command ‘python clahe_exif.py’
Right click on the enhanced image and verify that the EXIF data has been copied to the output image. If you use SFM software, add the enhanced image and verify that your software can read the GPS and camera/lens information from the EXIF header.
#!/usr/bin/env python3
# -*- coding: utf-8 -*-

import cv2
import numpy as np
import matplotlib.pyplot as plt
import piexif

def clahe_exif(image_path, output_path, clip_limit=2.0, grid_size=(8, 8)):
    # Step 1: Load the image
    rgb_image = cv2.imread(image_path)

    # Step 2: Apply CLAHE to the original RGB image
    # Convert the image to LAB color space
    lab_image = cv2.cvtColor(rgb_image, cv2.COLOR_BGR2LAB)

    # Split the LAB image into channels
    l_channel, a_channel, b_channel = cv2.split(lab_image)

    # Apply CLAHE to the L channel
    clahe = cv2.createCLAHE(clipLimit=clip_limit, tileGridSize=grid_size)
    clahe_l_channel = clahe.apply(l_channel)

    # Merge the processed L channel back with the other channels
    processed_lab_image = cv2.merge((clahe_l_channel, a_channel, b_channel))

    # Convert the processed LAB image back to BGR color space
    processed_rgb_image = cv2.cvtColor(processed_lab_image, cv2.COLOR_LAB2BGR)

    # Step 3: Write the result to JPG while preserving the original EXIF data
    # Load EXIF data using piexif
    exif_dict = piexif.load(image_path)

    # Remove thumbnail data (optional)
    if 'thumbnail' in exif_dict:
        del exif_dict['thumbnail']

    # Convert the EXIF data dictionary to bytes
    exif_bytes = piexif.dump(exif_dict)

    # Save the processed image as a JPEG file with preserved EXIF data
    cv2.imwrite(output_path, processed_rgb_image, [cv2.IMWRITE_JPEG_QUALITY, 95])
    piexif.insert(exif_bytes, output_path)

    print(f"Processed image saved to '{output_path}'")

orig_jpg = '/Users/dfc/Documents/other/clahe/DJI_0116.JPG'
img_out = '/Users/dfc/Documents/other/clahe/DJI_0116_clahe.JPG'
clahe_exif(orig_jpg,img_out)
This example uses a single image and can be extended to an entire directory with a few extra lines of code using glob and os.
import os
from glob import glob
# specify image directory
img_path = '/path/to/images/'
# get a list of all JPGs in an image directory
orig_jpgs = sorted(glob(img_path+'*.JPG'))
# specify output directory
out_dir = 'out/put/direc/tory/'
# loop through the list of original jpgs
for oj in orig_jpgs:
  # make output image name
  file_name = os.path.basename(oj)
  base_name, extension = os.path.splitext(file_name)
  img_out = out_dir + base_name + "_clahe.jpg"
  clahe_exif(oj,img_out)
Wrapping Up
Hopefully this post helps you avoid common pitfalls experienced when conducting drone surveys of coastal areas. These tips only apply to relatively clear water. There’s no getting around turbidity, at least with passive optics.
Don’t be discouraged if you still end up with bad images. Instead, look carefully at the images, keep track of conditions, and find out why your drone survey failed.
This post focused on the practicalities and steered clear of legal issues. Make sure to follow all drone laws in your area and note that many coastal areas are protected.
If you found this post helpful please:
- Give me all 50 of your claps!
- Leave a comment
- Highlight important text
- Subscribe to get more helpful Metashape, Python, and Drone tips!
In Plain English
Thank you for being a part of our community! Before you go:
- Be sure to clap and follow the writer! 👏
- You can find even more content at PlainEnglish.io 🚀
- Sign up for our free weekly newsletter. 🗞️
- Follow us on Twitter(X), LinkedIn, YouTube, and Discord.


