
Fine-Tune Your Own Open-Source LLM Using the Latest Techniques
In this article, I tune a base LLama2 LLM to output SQL code. I use Parameter Efficient Fine-Tuning techniques to optimise the process.

In a previous article, I began to make a case for why you would consider training your own LLM. I also provided a brief introduction to the hardware requirements, as well as methods for optimising the training and inference. In this article, I will cover exactly how to fine-tune an open-source LLM and provide code snippets for you to follow along and reproduce the results. We will tune a Llama2–7B model to provide us with SQL output based on natural language input — in other words, the model will convert a question we ask in natural language:
“How many customers decided to buy eggs in the month of November?”
To a SQL query that fetches the corresponding result:
SELECT COUNT(DISTINCT customer_id) AS num_customers
FROM purchases
WHERE product_name = 'eggs'
AND EXTRACT(MONTH FROM purchase_date) = 11;
In each case, the schema of the database (DB) will be provided as the context for the LLM to work with:
CREATE TABLE purchases (
    purchase_id INT PRIMARY KEY,
    customer_id INT,
    product_name VARCHAR(255),
    purchase_date DATE
);
We will be using this dataset in the tuning process. Whilst this article is focussed primarily on achieving the above task, the methodology will be provided in such a way that you can adapt the tuning process to suit your requirements.
In this article I will be using Google Colab to fine-tune the LLM. We will be using the know_sql dataset (OpenRAIL license) that I mentioned previously. We will also be using the axolotl framework to handle the fine-tuning process. They have some great documentation on their GitHub page. Rather than writing the ~100 lines of code to manually handle the fine-tuning process, axolotl allows us to simply edit a YAML config file for the respective model we are looking to fine-tune. I will be running through the exact process in this article but I would suggest reading through the axolotl documentation if anything is unclear.
The process of fine-tuning an LLM is more computationally expensive than simply running inference on an existing LLM (again here is the link to my previous article going over the various stages of running inference and optimising an existing LLM). As such, we are unable to use the free tier of Google Colab as the task requires NVIDIA’s Ampere GPU architecture (or later). This architecture is available via the “A100 GPU” runtime type on Google Colab. For further info on interacting with runtime types, I would suggest checking out my previous article.
At this stage, I should mention that Google offers the A100 GPU on a first come, first served basis or “subject to availability”. I have at times found it tedious to get access to the A100 GPU’s as they do not often become available. If unavailable, you will be automatically switched to an older architecture that is not sufficient for completing this task. Your mileage may vary. If you do not wish to wait for the correct GPUs to become available, I would suggest exploring some of the hardware suggestions I made in my previous article.
The workflow will run as follows:
· Set up Google Colab and mount GDrive (we need to mount the GDrive as we need to access certain files from within the Colab notebook).
· Install dependencies
· Authenticate via HuggingFace CLI (if you have never received authorisation from Meta to use the Llama-2 LLMs, I again suggest reviewing my previous article that covers the process of gaining access).
· Load dataset
· Clone axolotl repo into Gdrive
· Update axolotl config file
· Fine-tune Llama-7B model (this took about 2hrs. Again your mileage may vary).
· Run inference on fine-tuned model
Before jumping into the code, I wish to clarify exactly what fine-tuning is and when you may want to consider fine-tuning your LLM.
Fine-tuning can be carried out in a variety of ways. The method you choose comes down to your available resources and the task you want to achieve. It could be that a ‘base’ model yields satisfactory results, in which case you can skip the process entirely.
Again, my previous article goes over why you may want to use an open-source LLM rather than offerings such as OpenAI’s ChatGPT. A general rule of thumb I use when considering if I should fine-tune an LLM for my task is as follows:
· Does my task require domain specific knowledge/expertise?
· Will I be feeding proprietary data to my LLM?
· Do I have a significant amount of domain specific data to train/tune my model?
· Do I have the time and compute resources available to complete the task?
If you answered yes to one or more of the above questions, you should consider fine-tuning an LLM. If you answered yes to all of the above questions, it may be worth training an LLM from scratch. It may be worth using a step-by-step approach: initially use a ‘base’ LLM, then try a fine-tuned LLM, then try an LLM that you have trained from scratch. Each step becomes increasingly expensive (in terms of time and compute requirements), where you would only move to the next step if your current LLM does not yield satisfactory results. The process of training an LLM from scratch is outside the scope of this article but I’m happy to answer any questions you have on the topic.
Now that we have decided whether to fine-tune our LLM, I’ll cover what the process actually entails.
Our ‘base’ LLM is a pre-trained model that has an existing set of weights and biases from its initial training. These weights and biases allow the model to have ‘learned’ a broad range of basic language patterns and general knowledge. In the fine-tuning process we are updating these weights and biases using our labelled dataset.
Previously, a typical fine-tuning process looked like this:
Forward Pass · The model tries to make predictions based on input data
Loss calculation · The model calculates how far off the predictions were.
Backward Pass (backpropagation) · The model is essentially figuring out how much each of the model’s parameters contributed to the loss.
Update Parameters · In this step, the parameters will be updated and adjusted to reduce the loss. The size of the update (learning rate) is a hyperparameter that can be adjusted.
Repeat · The above steps are repeated for a given number of iterations (epochs). Often this is very low. Common LLM’s such as BERT perform best after a fine-tuning of 2 epochs. In this article we will only be using 1 epoch to fine-tune a Llama2–7B model.
With the advent of very large LLMs, new strategies have been identified to make this process much more efficient. Introducing LoRA (Low Rank Adaptation) and QLoRA (Quantised LoRA). We’ll be using LoRA in our SQL example later on so I’ll concentrate on that. Both strategies can be grouped under the umbrella of Parameter-Efficient Fine-Tuning (PEFT). The techniques allow us to successfully fine-tune very large language models but also minimise the computational requirements to do so. It does this by reducing the number of trainable parameters during the tuning process.
Whilst reduced memory usage, storage cost and inference latency are benefits of using a PEFT approach, it is important to note the training time may be increased during this process and performance can be more sensitive to hyperparameter choices.
There are various PEFT techniques available to us. For further reading on these techniques, I highly recommend this blog post.
In using LoRA, an assumption is made that existing model’s weights are close to the optimum solution. These weights are then frozen so they can no longer be updated in the fine-tuning process. Instead, low-rank matrices are introduced into each layer of our LLM. These matrices act as adapters that replace the trainable parameters we froze. The computational requirements for updating these low-rank matrices are significantly lower than if we were still using the original parameters. In other words, the original parameters can be approximated well by the low-rank matrices due to redundancy in the original parameters and correlation between the original parameters and low-rank matrices. This is identified in what is called ‘Rank-Deficiency’ — the paper to which can be found here.
All this results in reduced parameter overhead which leads to the advantages I listed earlier. A big one to note is the reduced inference latency. We are essentially creating a linear design by introducing these low-rank matrices into our model. The inference latency is significantly reduced when compared to a fully fine-tuned model. This makes the approach suitable for real-time applications.
We can further optimise inference times by introducing quantisation — a topic I covered extensively in my previous article.
Axolotl provides a very easy to use tool that allows us to implement all the above features.
Let’s get to it.
First we’ll set up our colab notebook. You now want to select the A100 GPU runtime type. If you are running the free version, you will need to upgrade to a paid tier. Please note, the A100 GPUs may be unavailable. I’d advise running a cell with a “hello world” example to ensure you don’t get moved to an older V100 GPU. If the A100 GPU is unavailable, you can either wait for one to become available (I unfortunately could not establish peak and off-peak times for when GPU availability was high). Or you can explore the other hardware options listed in my previous article.
Next let’s mount our Gdrive. You can do so by entering the following code:
from google.colab import drive
drive.mount('/content/drive')
You will then receive a pop-up where you have to authenticate via your google account. We are mounting the drive as we need to work with files that we’ll be storing within our Gdrive.
Next, we’ll authenticate our access to the Llama2–7B via the HuggingFace CLI. This will be our base model that we will fine-tune. Again, if you have never before requested access to the model via Meta’s official page, please follow instructions in my previous article.
To authenticate, enter the following code in a new cell:
!huggingface-cli login
You will then be asked to enter your access key (I explain how to access this key in my previous article).
Next, we’ll handle our installs. I have found this to often be the biggest hurdle in running experiments with LLMs. Certain packages are built to run on specific hardware, if you do not have that specific hardware, it can be tedious to unpick your installs and update as required. Thankfully the axolotl error outputs are very descriptive so you should be able to track down any compatibility issues fairly easily. If you follow the instructions on the axolotl readme you should be good to go. Let me know if you get stuck.
Lets run the installs, we’ll be installing the correct version of the cuda drivers as well as dependencies for the axolotl library. We’ll also be installing HuggingFace’s datasets library to gain access to our SQL training set:
!pip install torch torchvision torchaudio
!pip install "axolotl[flash-attn,deepspeed] @ git+https://github.com/OpenAccess-AI-Collective/axolotl"
!pip install accelerate
!pip install datasets
!pip install torch==2.0.1+cu118 -f https://download.pytorch.org/whl/torch_stable.html
!pip uninstall xformers
!pip install xformers
!pip uninstall flash_attn -y
!pip install flash_attn
Next we’ll clone the axolotl repo into our Gdrive. If you get errors stating the directories do not exist, simply create them using the Gdrive UI:
!git clone https://github.com/OpenAccess-AI-Collective/axolotl /content/drive/MyDrive/fine_tune_llm/axolotlRun some further installs:
!cd /content/drive/MyDrive/fine_tune_llm/axolotl && pip install packaging && pip install -e '.[flash-attn,deepspeed]'Next we’ll grab our dataset and check it is loaded correctly:
ds = datasets.load_dataset('knowrohit07/know_sql')
ds
trn = ds['validation']
trn[4500]

###output###
# {'answer': 'SELECT MAX(field_goals) FROM table_19722233_5 WHERE assists = 27',
# 'question': 'what is the highest number of goals did the player with 27 asists score',
# 'context': 'CREATE TABLE table_19722233_5 (field_goals INTEGER, assists VARCHAR)'}
Great, at this point we have installed all dependencies, we’ve cloned the axolotl repo, and are authorised to access the Llama-2 7B model. At this stage we need to do some further configuration in the form of updating our YAML file. Axolotl uses this YAML file as a set of instructions for how we wish to fine-tune our model. I’d suggest looking through some of the examples provided by axolotl within the axolotl directory that was created when you cloned the repo. It will give you a feel for what settings we can change and what hyperparameters we can work with. Again, the readme of the repo is very helpful here.
Below is a copy of my final YAML config file:
base_model: meta-llama/Llama-2-7b-hf
base_model_config: meta-llama/Llama-2-7b-hf
model_type: LlamaForCausalLM
tokenizer_type: LlamaTokenizer
is_llama_derived_model: true

load_in_8bit: false
load_in_4bit: true
strict: false

datasets:
  - path: knowrohit07/know_sql
    type: context_qa.load_v2
    train_on_split: validation
dataset_prepared_path: last_run_prepared
val_set_size: 0.01
output_dir: ./qlora-out

adapter: qlora
lora_model_dir:

sequence_len: 2048
sample_packing: false
pad_to_sequence_len: true

lora_r: 32
lora_alpha: 16
lora_dropout: 0.05
lora_target_modules:
lora_target_linear: true
lora_fan_in_fan_out:

wandb_project:
wandb_entity:
wandb_watch:
wandb_run_id:
wandb_log_model:

gradient_accumulation_steps: 4
micro_batch_size: 2
num_epochs: 1
optimizer: paged_adamw_32bit
lr_scheduler: cosine
learning_rate: 0.0002

train_on_inputs: false
group_by_length: false
bf16: false
fp16: true
tf32: false

gradient_checkpointing: true
early_stopping_patience:
resume_from_checkpoint:
local_rank:
logging_steps: 1
xformers_attention:
flash_attention: true

warmup_steps: 10
eval_steps: 20
eval_table_size: 5
save_steps:
debug:
deepspeed:
weight_decay: 0.0
fsdp:
fsdp_config:
special_tokens:
  bos_token: "<s>"
  eos_token: "</s>"
  unk_token: "<unk>"
You’ll notice we are able to update parameters that were discussed in my previous article (fp16: true) as a means of optimising the training process and limiting memory requirements for the tuning of this model. If you are using different hardware, I’d suggest reading through the docs and checking any error messages you get from when we initialise the tuning process later on. Depending on your goal, axolotl has lots of example config files for you to use and adapt.
Save the config file into the fine_tune_llm directory that you created earlier as sql.yml. A further python script is required for handling tokenisation strategies. This should also be saved in your fine_tune_llm directory as context_qa2.py. Here is the script:
"""Module containing the classes for Context QA Prompt Tokenization Strategies"""
from typing import Tuple
from axolotl.prompt_tokenizers import InstructionPromptTokenizingStrategy
from axolotl.prompters import AlpacaPrompter, PromptStyle


# article, unanswerable_question, question, answer
def load_404(tokenizer, cfg):
    return AlpacaMissingInfoContextPromptTokenizingStrategy(
        AlpacaContextPrompter(PromptStyle.CHAT.value),
        tokenizer,
        cfg.train_on_inputs,
        cfg.sequence_len,
    )

def load(tokenizer, cfg):
    return AlpacaContextPromptTokenizingStrategy(
        AlpacaContextPrompter(PromptStyle.CHAT.value),
        tokenizer,
        cfg.train_on_inputs,
        cfg.sequence_len,
    )

class AlpacaContextPrompter(AlpacaPrompter):
    """
    Customized system prompted for concise QA
    """

    system_prompt = (
        "Use the following contextual information to concisely answer the question.\n"
    )
    system_no_input_prompt = (
        "Use the following contextual information to concisely answer the question.\n"
    )

class AlpacaContextPromptTokenizingStrategy(InstructionPromptTokenizingStrategy):
    """
    Tokenization Strategy to combine in-context article with a question and answer
    """

    def parse_instruction_fields(self, prompt) -> Tuple[str, str, str]:
        return (
            prompt["context"] + "\n===\n" + prompt["question"],
            "",
            prompt["answer"],
        )

class AlpacaMissingInfoContextPromptTokenizingStrategy(
    InstructionPromptTokenizingStrategy
):
    """
    Tokenization Strategy to combine in-context article with a question that can't be answered
    from the context and a default response to that effect
    """

    def parse_instruction_fields(self, prompt) -> Tuple[str, str, str]:
        return (
            prompt["context"] + "\n===\n" + prompt["unanswerable_question"],
            "",
            "The context provided does not contain any information about your inquiry. "
            "Therefore, I'm unable to answer your question based on the given context.",
        )
Great — now we should have everything ready to initialise the fine-tuning process. Our dependencies are installed, our config files are in their respective places in our Gdrive. You should have a fine_tune_llm folder that looks like this:
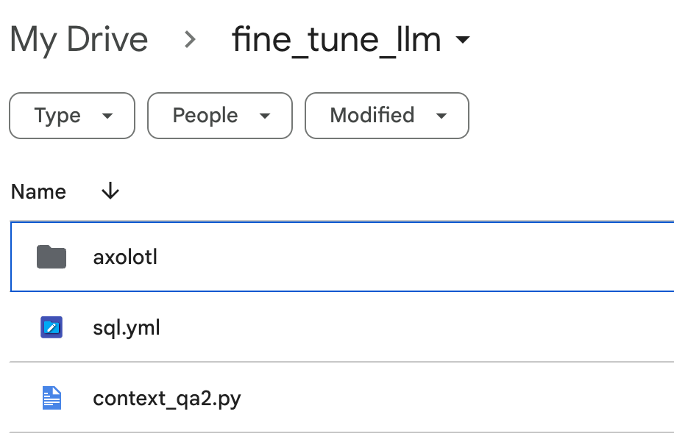
The .yml file is our config file. The .py file is our script that handles tokenisation. The axolotl directory is the one we cloned from the repo earlier.
Now all we need to do is run:
!accelerate launch -m axolotl.cli.train /content/drive/MyDrive/fine_tune_llm/sql.yml
This will initialise the process of fine-tuning our specified model using the sql.yml config file. This process took circa 2hrs for me. Your mileage may vary. If you receive any errors at this stage, it will most likely be due to dependency errors. I ran into an issue a few times where I had to manually install the correct cuda drivers and flash_attn again:
!pip install torch==2.0.1+cu118 -f https://download.pytorch.org/whl/torch_stable.html
!pip uninstall flash_attn -y
!pip install flash_attn
Great — we used fairly straightforward configurations provided by axolotl to initialise the fine-tuning of our LLM.
Let’s run inference on our tuned model to see how it performs.
As the data we used to tune the model has a fairly specific layout, we will need to manually create some prompts that the model can work with. Let’s create a question that we want answered based on an existing DB schema. We’ll use the same example as when we checked our dataset loaded correctly but we’ll overwrite the question:
tst = dict(**trn[4500])
tst['question'] = 'What is the highest number of goals for any player with less than 5 assists'
tst
###output###
# {'answer': 'SELECT MAX(field_goals) FROM table_19722233_5 WHERE assists = 27',
# 'question': 'What is the highest number of goals for any player with less than 5 assists',
# 'context': 'CREATE TABLE table_19722233_5 (field_goals INTEGER, assists VARCHAR)'}
Now we need to ensure the formatting is correct:
fmt = """SYSTEM: Use the following contextual information to concisely answer the question.

USER: {}
===
{}
ASSISTANT:"""
We’ll also create a quick function to handle this formatting:
def sql_prompt(d):
  return fmt.format(d["context"], d["question"])
Let’s check the above:
print(sql_prompt(tst))
###output###
# SYSTEM: Use the following contextual information to concisely answer the question.

# USER: CREATE TABLE table_19722233_5 (field_goals INTEGER, assists VARCHAR)
# ===
# What is the highest number of goals for any player with less than 5 assists
# ASSISTANT:
Great, now our prompt is ready to be fed into the model.
Now we need to run inference on our model that was saved in our qlora-out directory (as specified in our yaml config file). Let’s first install the dependencies required to run inference on our model and tokenise our prompt so the model can work with it. We’ll need to the Llama2–7B tokeniser from HuggingFace. The workflow will be very similar to what we covered in my previous article. Here is the code:
import torch
from peft import PeftModel
from transformers import AutoTokenizer, AutoModelForCausalLM, BitsAndBytesConfig

fine_tuned_model = '/content/drive/MyDrive/fine_tune_llm/axolotl/qlora-out'

tokr = AutoTokenizer.from_pretrained('meta-llama/Llama-2-7b-hf')

model = AutoModelForCausalLM.from_pretrained('meta-llama/Llama-2-7b-hf',
                                             torch_dtype=torch.bfloat16, device_map=0)
model = PeftModel.from_pretrained(model, fine_tuned_model)
model = model.merge_and_unload()
model.save_pretrained('sql-model')

toks = tokr(sql_prompt(tst), return_tensors="pt")

res = model.generate(**toks.to("cuda"), max_new_tokens=250).to('cpu')

print(tokr.batch_decode(res)[0])
###output###
# SYSTEM: Use the following contextual information to concisely answer the question.

# USER: CREATE TABLE table_19722233_5 (field_goals INTEGER, assists VARCHAR)
# ===
# What is the highest number of goals for any player with less than 5 assists
# ASSISTANT:
# SELECT MAX(field_goals) FROM table_19722233_5 WHERE assists < 5</s>
Awesome! As you can see from the ASSISTANT output, it provided the correct answer.
Whilst this is arguably a very straightforward query, you can see we’ve successfully trained a base LLM that could only be used for general language queries on a very specific task. It now writes SQL code!
By familiarising yourself with the above and checking through the axolotl documentation, you’ll hopefully be able to see how one may adapt my approach to different LLM tasks such as Q&A for example. Simply feed in a dataset of questions on a specific topic along with their respective answers, update your yaml config file using the examples provided by axolotl and begin another fine-tuning experiment
I hope you enjoyed reading the article as much as I did writing it. As always, please contact me if you have any questions.
All images belong to the author unless otherwise stated.


