
How to Effectively Work Out to Build Muscle at Home
Don’t wait for the gyms to reopen: a bar to hang from, a sturdy bag, resistance bands, and some creativity are all you need
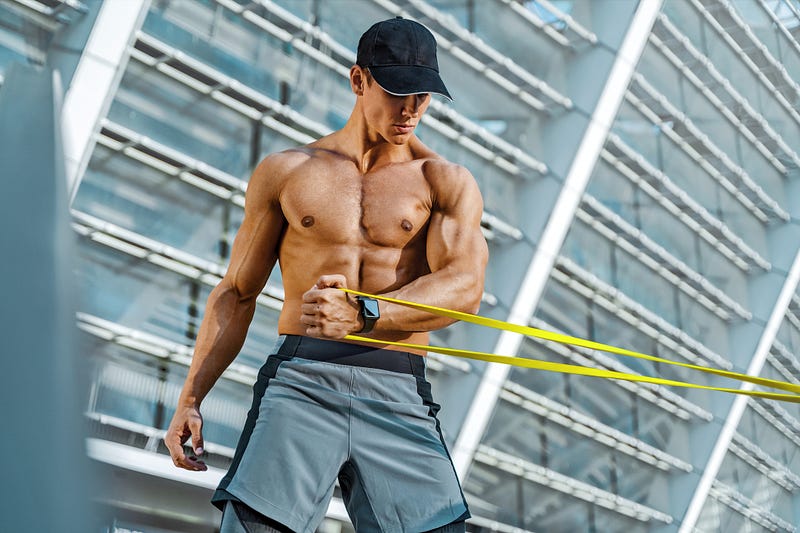
When the quarantine started, gyms closed everywhere. Being a fitness enthusiast that loved lifting weights, this was a highly unwelcome situation. For the first few days, I whined, lamented, and didn’t work out. But then I saw that I had two options — continue whining or work out at home.
I chose the latter but wasn’t very enthusiastic about it in the beginning. “What are mere pushups or tugging on resistance bands compared to lifting hundreds of pounds in the gym,” I thought.
I was absolutely wrong. It has been seven months since then and not only have I maintained my “gains” but have even made more. I went from 72 kgs to 76 kgs with barely any visual change when it comes to flab. This along with the fact that I have gained strength clearly shows that the weight I gained is mostly muscle mass with some fat.
I had started off with a rough initial plan which I greatly optimized over the course of these seven months through a lot of research and experimentation. Halfway through, my brother, a complete newbie, joined me, and with learning, trial, and error I managed to perfectly customize the program for him.
In this post, I’ll comprehensively discuss my workout plan breaking down exercises, reps, sets, rest times, progressions, and other nuances. I will also describe exactly how to customize it based on your convenience and training level. It’s thanks to my brother that I learned how to.
The best part is that irrespective of whether you are a complete newbie or an advanced lifter, you will be able to utilize this workout program.
Before we proceed, let me state a few things,
- I am a 20-year-old cis-gendered able-bodied male passionate about working out with more than four years of experience. I am not a certified fitness professional and all my knowledge comes from research, experience, aggressive self-experimentation, and mentoring others.
- The process of building muscle involves diet, training, and sleep. This post describes only the training aspect.
A Bit of Jargon
Before delving deeper, I want to go over some basic terminology that will be used throughout this post.
Rep
Reps, short for repetitions, refer to repeatedly performing an exercise. So 10 reps of pushups mean that you perform 10 pushups.
Set
Sets refer to how many reps of an exercise you perform before taking a rest or moving on to some other exercise. So 3 sets of 12 reps mean that you perform 12 reps, take a rest and repeat this 2 more times.
Volume
To put it in a crude way, your workout volume refers to “how much” you worked out. You can roughly compute the weekly volume by multiplying the total number of sets, reps per set, and the weight used per set in the week.
Intensity
Again in a crude way, your workout intensity refers to “how hard” a workout feels. Perceived intensity can be measured using the Borg’s scale.
Progressive overload
The strength and muscle is a result of your body’s adaptations to the stress placed on it. So to continually gain strength and muscle, you need to continually increase the demands placed on your body or by “progressively overloading.”
You can progressively overload by increasing the volume or intensity— by increasing the reps, sets, or weight used or decreasing the rest times.
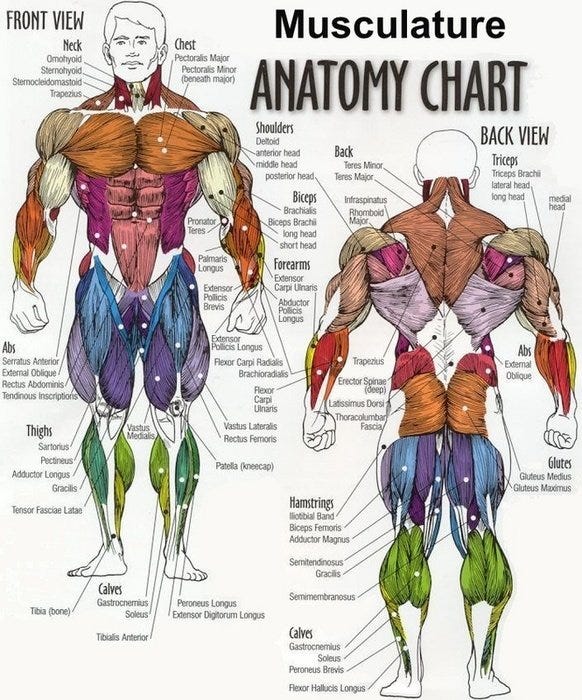
Thinking of the Entire Body in Terms of Movement Patterns
Our goal is to work out the entire body. Picking out and training individual muscles isn’t feasible as our body has hundreds of muscle groups. We can instead think of the body in terms of its movement patterns.
Movement pattern focused training has numerous benefits such as improving intramuscular coordination, mobility, agility, posture, and preventing muscle imbalances. Most of the best workout programs are structured around this paradigm.
Major movement patterns
With just 6 fundamental movement patterns, we can train almost every muscle in the body.
- Vertical Pushing: Think of pushing something up and over your head. Primarily involves your shoulders and triceps.
- Vertical Pulling: Think of drawing a pail of water from a well using a rope slung over a pulley. Primarily involves your back muscles, especially the lats and your biceps.
- Horizontal Pushing: Think of pushups or pushing someone away from you. Primarily involves your chest, shoulders, and triceps.
- Horizontal Pulling: Think of a tug of war. Primarily involves your back muscles, especially the lats and traps.
- Quad dominant: Think of sitting or squatting down. Primarily involves your quads and glutes.
- Hip dominant: Think of bending down to pick up something. Primarily involves your glutes and hamstrings.
Minor movements
With just 7 minor movement patterns, we can work the small muscles not targeted enough by the major movements.
- Elbow Flexion primarily involves your biceps and forearms.
- Elbow Extension primarily involves your triceps.
- Knee Flexion primarily involves your hamstrings.
- Knee Extension primarily involves your quadriceps.
- Shoulder Abduction primarily involves your side-delts.
- Shoulder Rotation primarily involves your rear-delts and side-delts.
- Plantar Flexion primarily involves your calves.
The Push-Pull-Legs (PPL) Workout Split
Over the years, I have experimented with different workout splits, and the split that has become my favorite and given me the best results is the Push-Pull-Legs (PPL) split. So I decided to use the same split for my home workout program too.
The PPL workout split involves three different workouts which are obtained by segregating the previously mentioned 13 movement patterns based on the similarity of movements and muscles involved.
- Push workout — Vertical push, horizontal push, elbow extension, and shoulder abduction movements to work the chest, shoulders, and triceps.
- Pull workout — Vertical pull, horizontal pull, elbow flexion movements, and shoulder rotation to work the back, rear delts, biceps, and forearms.
- Legs workout — Quad dominant, hip dominant, knee flexion, knee extension, and plantar flexion movements to work the entire leg musculature.
This split then involves working out 6 days a week in the order — Push, Pull, Legs, Push, Pull, Legs, Rest, and repeat.
Why the PPL split is one of the most effective and efficient workout splits
- Optimal frequency. Every muscle group is hit twice a week. A meta-analysis of the relevant studies by Schoenfeld et al. found training every muscle twice a week to be superior to training them only once and the effect of 3 times a week or higher to be inconclusive.
- Adequate time for recovery. Every muscle group is trained once every 3 days or 72 hours. This study by James Steele et al. compared the effect of 24, 36, 48, 72, and 96 hours of rest on performance and found 48 to 72 hours to be the most optimal.
- Movement pattern focused on whose benefits I talked about earlier.
- Specific focus. Since similar muscle groups are clumped together, you can target individual muscle groups and focus on them much better.
Building and Optimizing the Workout Program
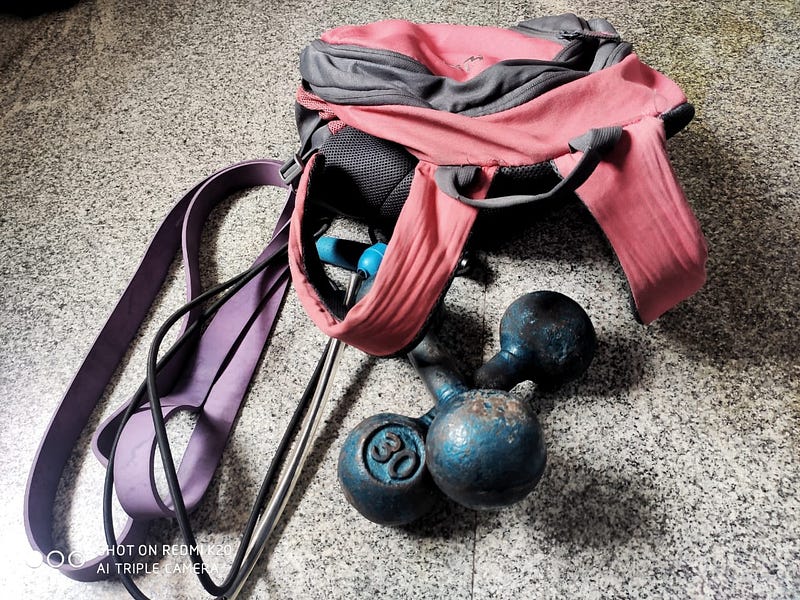
After scouring my house, I found a bag, a ledge to hang from, and a pair of light dumbbells. I then bought two resistance bands, a heavy one and a light one. Deeming this equipment enough, I threw together an initial workout program and started working out.
Don’t worry if you don’t have dumbbells, the final workout plan will contain suitable alternatives.
Over the months, through experimentation and learning, I made a lot of tweaks, changes, and optimizations. I want to share a few of the major ones with you. If you are in a hurry, don’t hesitate to skip to the next section.
Around 2 months in, I developed serious blisters and calluses on my fingers due to the ledge pullups. Since I live in a rented house, pullup bars were a strict “NO” as they require drilling. One day, as I was surfing the internet, I came across doorway pullup bars that can be fitted onto a doorway without any drilling. I ordered one right away, which cost me less than $25.

I installed it in the kitchen doorway. Being skeptical of its strength, I did a weight test and to my utter surprise, it held on with my bodyweight+a 25kg bag or around 100 kgs! So I started doing weighted pullups.
Coming to legs, as I couldn’t do pistol squats due to balance issues, I was doing Bulgarian split squats which weren’t hard or effective enough. One day, I came across floater squats, a version of pistol squats that don’t require as much balance. I started doing them right away and over the course of a few weeks, I progressed to weighted floater squats and finally to weighted pistol squats.
As for push, I was doing bag weighted pushups as my main horizontal push movement but as they fatigued my core and shoulders much more than my chest, my chest would feel underworked. While exploring bodyweight options, I came across archer pushups, and with these, I found that I could target my chest much better.
Apart from these, I made other minor changes such as restructuring the program, tweaking reps, sets, and exercises, incorporating intensity techniques, etc.
The Final Workout Program
The equipment
- Two resistance bands — one light and one medium. I haven’t recommended the band I bought from Amazon as it had extremely high resistance and wasn’t of much use to me.
- A sturdy bag. You can fill this up using books, water bottles, grocery items, milk packets, etc. You just have to look around for heavy things.
- A bar to hang from. If you can’t find one, I highly recommend getting a doorway pullup bar which I talked about previously.
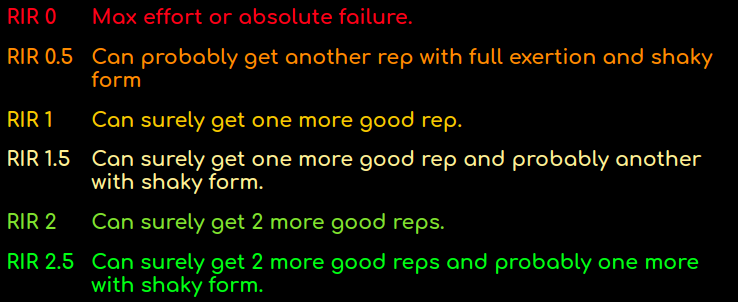
Intensity using Reps In Reserve (RIR)
RIR is a measure of “perceived intensity” that I’ll be using to denote the intensity that you should be aiming for in a set.
Intensity techniques
There are 3 major mechanisms for building muscle — mechanical tension, muscle damage, and metabolic stress. I incorporated the following four intensity techniques into the workout program to stimulate muscle growth using all three mechanisms:
- Slow negatives: The negative or the eccentric of a rep is the portion where you lower the weight after lifting it. Deliberately slowing down the negative is a great way to increase mechanical tension and induce more muscle damage.
- Controlled negatives: This involves controlling the negative instead of jerkily lowering the weight. This is great for increasing mechanical tension without causing too much muscle damage.
- Cheat reps with slow negatives: Instead of stopping once you reach the end of a set, you go on by cheating on the positive or jerking up the weight using momentum and controlling the negative. This is good for metabolic stress and muscle damage.
- Rest pause reps: Once you reach the end of a set, you rest for 5 to 10 seconds and try to get more reps. This is excellent for metabolic stress.
Volume
I decided on the appropriate volume based on Renaissance Periodization’s weekly volume recommendations and standard PPL workout programs.
I have given set ranges to adjust workout volume based on training experience. This is important as too much volume can lead to overtraining causing recovery issues, muscle breakdown, and more harm overall than good.
If you are a beginner, use the lower bound of the range. If you are an intermediate like me, stick to the middle of the range and if you are an advanced trainee, use the higher bound.
A few pieces of advice
- Do not ignore the warm-up. Warming up is crucial to prevent injuries and prepare you physically and mentally for the workout. A few weeks back, I severely cramped my hamstring when I skipped the warmup as I was in a “hurry.”
- Stay hydrated. You don’t have to down a gallon, just have a few sips of water after every set. When I recently blacked out midset due to inadequate hydration, it was only through sheer luck that I didn’t get injured.
- Use proper form to prevent injuries and maximize progress. For years, I made the mistake of “ego-lifting” or lifting with bad form. Only when I cleaned up my form, did my rate of progress drastically increase. To make it easy for you, I have linked every exercise to a video tutorial on how to perform it with proper form.
- Listen to music. I legit cannot get through a workout without music. Putting on my headphones and blasting some EDM or metal psyches me up, relieves boredom, and makes me go harder. Research has also shown music to have a positive effect on working out.

The Push workout
- Warmup — Shoulder & chest stretches, 12-15 arm circles, 3-5 downward dog to cobras, 2 sets of 10–20 light band face pulls, 2 sets of 3–4 reps of your horizontal push main exercise.
- Horizontal push main — Archer pushups — 3 to 6 sets of 8–12 reps at RIR 1 with 2–4 minutes rest between sets — controlled negatives — 2 rest-pause reps in the last set.
- Horizontal push accessory — Decline pushups — 3 to 5 sets of 12–20 reps at RIR 1.5 with 1–2 minutes rest between sets — 2 rest-pause reps in every set.
- Vertical push — Pike pushups — 3 to 4 sets of 6–12 reps at RIR 1.5 with 1–2 minutes rest between sets — controlled negatives — 2 rest-pause reps in the last set.
- Elbow extension 1 — Bodyweight Tricep extensions or Diamond pushups — 2 to 4 sets of 8–12 reps at RIR 2.5 with 45–60 seconds rest between sets.
- Elbow extension 2 — Double arm overhead tricep extensions using the bag — 2 to 3 sets of 12–20 reps at RIR 2.5 with 30–45 seconds rest between sets—slow negatives— 2 to 3 cheat reps with slow negatives in the last set.
- Shoulder abduction — Double arm dumbbell side lateral raises or Light resistance band side lateral raises — 3 to 5 sets of 10–15 reps at RIR 2.5 with 30–45 seconds rest in between sets — controlled negatives — 2 to 3 cheat reps with slow negatives in every set.
The Pull workout
- Warmup — lat stretches, bicep stretches, 3–5 downward dog to cobras, 2 sets of 10–20 light band face pulls, 5–8 hanging scapular retractions, 2 sets of 2–4 reps of your vertical pull.
- Vertical Pull — Weighted pullups using the bag — 3 to 6 sets of 6–10 reps at RIR 1 with 2–4 minutes rest between sets— controlled negatives and 2 rest-pause reps in the last set.
- Horizontal Pull — Single arm rows using the bag — 2 to 4 sets of 12–20 reps at RIR 1.5 with 1–2 minutes rest between sets — slow negatives and 2 rest-pause reps every set.
- Elbow Flexion 1 — Bag single arm bicep curls — 2 to 5 sets of 12–20 reps at RIR 2 with 45–60 seconds rest between sets— 3 cheat reps with slow negatives in the last set.
- Elbow Flexion 2 — Medium resistance band double-arm hammer curls — 1 to 3 sets of 12–20 reps at RIR 2.5 with 30–45 seconds rest between sets— slow negatives and 3 rest-pause reps every set.
- Shoulder rotation —Light resistance band face pulls or Dumbbell rear delt raises — 4 sets of 12–20 reps at RIR 2.5 with 45–60 seconds rest between sets — controlled negatives and 2 rest-pause reps in the last set.
The Leg workout
- Warmup — This excellent routine.
- Quad dominant — Weighted pistol squats —2 to 4 sets of 8–15 reps at RIR 1 with 2–4 minutes rest between sets— controlled negatives — 2 rest-pause reps in the last set.
- Hip dominant — Resistance band good mornings — 2 to 3 sets of 20–35 reps at RIR 1.5 with 1–2 minutes rest between sets— 2 rest-pause reps in the last set.
- Knee extension — Bodyweight leg extensions — 1 to 3 sets of 8–15 reps at RIR 2.5 with 45–60 seconds rest between sets — slow negatives — 2 rest-pause reps in the last set.
- Knee flexion — Bag lying hamstring curls —1 to 3 sets of 8–15 reps at RIR 2.5 with 45–60 seconds rest between sets— slow negatives — 2 rest-pause reps in the last set.
- Plantar flexion — Standing calf raises — 3 to 5 sets of 12–25 reps at RIR 2 with 30–45 seconds rest between sets— controlled negatives — 4 rest-pause reps every set.
For beginners or early intermediates, some of the above-listed exercises are hard or even downright impossible to perform while the same ones are easy for advanced athletes. Don’t worry, the next section’s got your back.
Progression
If you remember, we talked about the need to “progress” or progressively overload to build muscle and strength in the first section. You can progress by increasing the number of sets, reps, weight used, or by using a tougher variation of the exercise.
In this section, let’s delve deep into the progressions for every movement.
Vertical Pull
- Dead hang or just hanging off the bar. Progress once you can hang for about 15–20 seconds,
- Flexed hang from the bar. Progress once you can hang for 15–20 seconds.
- Hanging scapular retractions. Progress once you can do 12–15 reps.
- Pull-up negatives. Progress once you can do 8–10 reps.
- Resistance band-assisted pull-ups. Start with the medium resistance band, move to the light band. Progress once you can get 6–8 reps.
- Bodyweight pull-ups. Progress once you can get 8–12 reps.
- Weighted pullups. Now you can progress by increasing the reps or the weight used. I am at this progression and my recent best was my bodyweight+19 kgs for 6 reps.
Horizontal Push Main
- Wall pushups. Progress once you can do 15–20 reps.
- Incline pushup negatives. Start with a high incline and gradually decrease the incline. Once you can do 6–8 reps with an incline of around 30 degrees or so, progress.
- Incline pushups. Same as the above.
- Pushup negatives. Progress once you can do 8–12 reps.
- Pushups. Progress once you can do 12–15 reps. I started with this progression.
- Staggered pushups. Progress once you can do 12–15 reps.
- Archer pushups. Progress once you can do 6–12 reps. I am at this progression and my recent best was 10 reps.
- Decline archer pushups. Start with a low decline of around 20–30 degrees and gradually increase it. Progress once you can do 6–10 reps on a 45-degree decline.
- Incline one-arm pushups. Start with a high incline of around 45–40 degrees and gradually decrease it. Progress once you can do 6–10 reps on a 30-degree decline.
- One-arm pushups. Now you can progress by increasing the reps, slowing down the negatives, or improving form.
Vertical Push
- Incline pike pushup negatives. Start with a high incline and decrease it. Proceed once you can do 6–10 reps on a 30-degree incline.
- Incline pike pushups. Same as the above.
- Pike pushup negatives. Progress once you can do 6–10 reps.
- Pike pushups. Same as the above.
- Feet elevated pike pushups. I am at this progression. Start with a low elevation and gradually increase it until your torso is almost vertical. Progress when you can do 6–10 reps with an almost vertical torso.
- Wall handstand pushup negatives. Start with elbows flared and gradually tuck them in. Progress once you can do 6–10 reps with full depth and tucked elbows.
- Wall handstand pushups. Same as the above.
- Handstand pushups. Progress once you can do 6–10 reps.
- Deficit Handstand pushups. Now you can progress by increasing the deficit, the reps, and improving your form.
Quad Dominant
- Air squats with a bench. Progress once you can do 12–15 reps
- Air squats with feet wide apart. Same as the above.
- Air squats with feet close. Same as the above.
- Single leg box squats negatives. Start with a high box or bench and gradually decrease it. Progress once you can do 6–10 reps.
- Single leg box squats. Same as the above.
- Floater squat negatives. Progress once you can do 6–8 reps.
- Floater squats. Same as the above. I started with this progression.
- Pistol squat negatives. Progress once you can do 6–10 reps.
- Pistol squats. Same as the above.
- Weighted pistol squats. Now you can progress by increasing the reps or weight. I am at this progression and my recent best was bodyweight+14 kgs for 9 reps.
Horizontal Push Accessory
Start performing this movement only after you reach pushups in the horizontal push main progression.
- Decline pushup negatives. Start with a low decline and gradually increase it. Progress once you can do 8–12 reps on a roughly 30-degree decline.
- Decline pushups. Progress once you can do 8–12 reps on a roughly 30-degree decline.
- High decline pushups. Start with a 40–45 degree decline and you can progress by increasing the decline (up to a maximum of around 60), the reps, or by increasingly leaning forward.
Elbow extension
Until you are able to do pushups, do and progress on bodyweight tricep extensions only.
- Kneeling incline bodyweight tricep extensions. Start with a high incline and gradually decrease the incline. Progress once you can do 12–15 reps on a roughly 30-degree incline.
- Knee bodyweight tricep extensions. Progress once you can do 12–15 reps.
- Bodyweight tricep extensions. You can progress on these by increasing the reps and by gradually putting your hands further away.
Once you are able to do pushups, you can now choose between bodyweight tricep extensions and diamond pushups. I prefer diamond pushups as they are harder and I feel they hit my triceps much better.
- Knee diamond pushup negatives. Progress once you can do 8–10 reps.
- Knee diamond pushups. Same as the above.
- Diamond pushup negatives. Progress once you can do 6-8 reps.
- Diamond pushups. Now you can progress on these by increasing reps, slowing down the negative, or leaning forward.
Knee extension
- Bodyweight leg extension negatives. Try to go down as much as possible and gradually progress to going down completely. Progress once you can do 6–8 full reps.
- Bodyweight leg extensions. Again try to go as deep as possible and gradually progress to full reps. Once you can do full reps, you can now progress by increasing the reps or slowing down the negative.
Plantar Flexion
- Standing bodyweight calf raises. Progress once you can do 25+ reps.
- Standing bag weighted calf raises. Gradually increase the weight or reps. Progress once you can do 15–20 reps with 1.5 times your bodyweight.
- Standing single leg calf raises. Progress once you can do 20–25 reps.
- Standing single leg bag weighted calf raises. Now you can progress by increasing the weight or the reps.
What about the rest of the exercises?
They involve the bag or resistance bands so the way to progress on them is by either increasing the reps or the weight used. I use half-liter milk packets to increase the weight. You can use books, flour packets, soup cans, hair oil bottles, detergent bottles, metal items, etc. Just look around with a creative eye.
Start with a weight that allows you to get reps in the given rep range. Increase the reps until you reach the higher end of the rep range. Then increase the weight. Rinse and repeat.
When You Can’t or Don’t Want to Work Out 6 Days a Week
Not all of us have the time or the motivation to be able to work out 6 days a week, even I don’t on some occasions. On such occasions, I alter the PPL split or use a different workout split.
In fact, you don’t even have to work out 6 days a week. The number of days you work out ceases to matter when your workout volume and intensity are maintained.
Altering the PPL split
With the standard PPL routine (Push, Pull, Legs, Push, Pull, Legs, Rest), you complete one PPLx2 cycle every 7 days. You can alter it to include more rest days and prolong the cycle.
- Push, Pull, Legs, Rest, Repeat, or 3 days on and 1 day off. With this, you will complete one PPLx2 cycle every 8 days.
- Push, Pull, Legs, Push, Pull, Legs, Rest, Rest, Repeat, or 6 days on and 2 days off. So again one PPLx2 cycle in 8 days.
- Push, Pull, Legs, Rest, Push, Pull, Legs, Rest, Rest, Repeat, or 6 days on and 3 days off. So one PPLx2 cycle in 9 days. If you choose this, increase the sets you perform by 1 on the vertical pull, horizontal pull, horizontal push main, vertical push, quad dominant, and hip dominant movements to make up for the reduced volume.
4 days a week using an Upper Lower (UL) split
The upper-lower split is where you work out only 4 days a week and perform two distinct workouts — an upper body workout and a lower body workout in the order — Upper, Lower, Rest, Upper, Lower, Rest, Rest and repeat. So basically upper = push+pull while lower = legs.
For the Upper workout, I am a big fan of using “antagonistic supersets” for push/pull movements to not only reduce the workout duration but also increase the intensity and metabolic stress. A superset is where you perform one set of one movement, proceed to do one set of the other movement right away, and only then take a rest.
- Horizontal Pull + Horizontal Push Main— 3 to 6 supersets of 8–15 reps at RIR 1 with 1–2 minutes rest in between sets
- Vertical Pull + Vertical Push — 3 to 6 supersets of 6–12 reps at RIR 1.5 with 1–2 minutes rest in between sets — controlled negatives — 2 to 3 rest-pause reps in the last set.
- Horizontal Push Accessory — 2 to 4 supersets of 12–20 reps at RIR 1.5 with 1–2 minutes rest between sets — 2 rest-pause reps in every set.
- Elbow Flexion 1 + Elbow Extension 1— 2 to 4 supersets of 8–15 reps at RIR 2.5 with 45–60 seconds rest between sets.
- Elbow Flexion 2 + Elbow Extension 2 — 2 to 4 supersets of 8–15 reps at RIR 2.5 with 30–45 seconds rest between sets — slow negatives — 2 to 3 cheat reps with slow negatives in the last set.
- Shoulder Abduction + Shoulder Rotation — 2 to 4 supersets of 10–18 reps at RIR 2.5 with 30–45 seconds rest in between sets — controlled negatives — 2 to 3 cheat reps with slow negatives in every set.
3 days a week using a Full Body Split
The full-body split is where you perform three full-body workouts a week. Since the frequency with which we hit every muscle group is 3 instead of 2, we can lower the volume of each workout. I love incorporating antagonistic supersets here also. The workout would look like:
- Horizontal Pull + Horizontal Push Main — 2 to 4 supersets of 8–15 reps at RIR 1 with 1–2 minutes rest in between sets — controlled negatives — 2 rest-pause reps in the last set.
- Vertical Pull + Vertical Push — 2 to 4 supersets of 6–12 reps at RIR 1.5 with 1–2 minutes rest in between sets — controlled negatives — 2 to 3 rest-pause reps in the last set.
- Elbow Flexion 1 + Elbow Extension 1 — 2 to 5 supersets of 8–15 reps at RIR 2.5 with 45–60 seconds rest between sets.
- Shoulder Abduction + Shoulder Rotation — 1 to 3 supersets of 12–20 reps at RIR 2.5 with 30–45 seconds rest in between sets — controlled negatives — 2 to 3 cheat reps with slow negatives in every set.
- Quad dominant + Hip dominant— 2 to 3 supersets of 8–20 reps at RIR 1 with 2–4 minutes rest between sets — controlled negatives — 2 rest-pause reps in the last set.
- Knee extension + Knee Flexion — 1 to 2 sets of 8–15 reps at RIR 2.5 with 45–60 seconds rest between sets — slow negatives — 2 rest-pause reps in the last set.
- Plantar flexion— 2 to 4 sets of 12–15 reps at RIR 2 with 30–45 seconds rest between sets — controlled negatives — 4 rest-pause reps every set.
Keep Going
This 7-month journey has been insightful, chock-full of learning, and an eye-opener to the fact that the gym wasn’t a necessity but just a luxury I had gotten used to. With a will to work out, you can work out anywhere and anytime.
Along the way, I was inconsistent at times due to a lack of motivation, yearning for the gym, or plain laziness, but I made sure to promptly get back on track. Skipping a day or feeling down and slacking on a workout is completely okay. Making it a habit isn’t.
“Skipping a day or feeling down and slacking on a workout is completely okay. Making it a habit isn’t.”
Don’t wait for the gyms to reopen, start working out right now. The workout program I have given can be a good starting point. Use it as-is if you want. Tweak and customize it if you want.
Whatever you do, just work out.


