avatarDr. Shouke Wei

Free AI web copilot to create summaries, insights and extended knowledge, download it at here

3824

Abstract

<pre><span class="hljs-tag">%<span class="hljs-selector-tag">loadpy</span></span> hello</pre></div><p id="d321">After running the command, Jupiter notebook loads python code immediately in the cell as follows, and then you edit it.</p><figure id="b9a1"><img src="https://cdn-images-1.readmedium.com/v2/resize:fit:800/0*6ZQC5-ArlPdQCB4a.png"><figcaption></figcaption></figure><h1 id="3336">3. Append to .py File</h1><p id="bd37">The magic command <code>%%writefile -a</code> can be used to append codes to the end of the code in an existing file. For example, we want to add <code>hello("Sigmund")</code> at the end of the function.</p><figure id="6d9e"><img src="https://cdn-images-1.readmedium.com/v2/resize:fit:800/0*OrAz8oTS2ltywbQ5.png"><figcaption></figcaption></figure><p id="4abf">The above output of <b>Appending to hello.py</b> indicates code appending is successful. We can check the code by <code>%cat</code>, !cat (Linux) or <code>!type</code>(Windows).</p><figure id="9640"><img src="https://cdn-images-1.readmedium.com/v2/resize:fit:800/0*KLN658iHK9p7MquI.png"><figcaption></figcaption></figure><h1 id="7581">4. Update .py File</h1><p id="0640">If you would like to add code or edit the code in the file rather than to append code to the end, you can run <code>%%writefile</code> again, which will update your code by overwriting the old file. For example,</p><figure id="0c71"><img src="https://cdn-images-1.readmedium.com/v2/resize:fit:800/0*EaqzLVLBVlJ58I_w.png"><figcaption></figcaption></figure><h1 id="68f3">5. Run .py File</h1><p id="c180">To run the Python file, we use <code>%run filename.py</code>. For example, let's run "hello.py" by:</p><div id="9e6f"><pre><span class="hljs-tag">%<span class="hljs-selector-tag">run</span></span> hello.py</pre></div><p id="008e">or</p><div id="1610"><pre><span class="hljs-built_in">run</span> hello.py</pre></div><p id="d36a">The output looks as follows:</p><figure id="9ed4"><img src="https://cdn-images-1.readmedium.com/v2/resize:fit:800/0*YXV_Ul2kR0v5VqZ0.png"><figcaption></figcaption></figure><p id="81ac">For a function, there are other two convenient ways to run it.</p><p id="990a"><b>Method 1: run the function, and then call it</b></p><div id="9958"><pre><span class="hljs-comment"># run the function </span>

%<span class="hljs-built_in">run</span> greeting.py</pre></div><p id="f8ab">Then</p><div id="d3e5"><pre># call the <span class="hljs-function"><span class="hljs-keyword">function</span> <span class="hljs-title">hello</span><span class="hljs-params">(<span class="hljs-string">"Sigmund"</span>)</span></span></pre></div><p id="92a0"><b>Method 2: run the function as module</b></p><div id="e9b0"><pre># <span class="hljs-keyword">import</span> the function <span class="hljs-keyword">as</span> a <span class="hljs-keyword">module</span> <span class="hljs-keyword">import</span> hello</pre></div><div id="8f6c"><pre><span class="hljs-comment"># call the function </span> <span class="hljs-attribute">hello</span>.hello(<span class="hljs-string">"Sigmund"</span>)</pre></div><h1 id="2e16">6. Run External Jupyter Notebook .ipynb files</h1><p id="a090">Besides, we can also run another Jupyter notebook inside the current working one using <code>%run filename.ipynb</code> For example, let's create a Jupyter notebook named "myname.ipynb" and run it in a new Jupyter notebook.</p><figure id="2f83"><img src="https://cdn-images-1.readmedium.com/v2/resize:fit:800/0*1GUuP5FIPfP0DEhc.png"><figcaption></figcaption></figure><h1 id="72b7">7. Run Codes from a Python or IPython Shell Session</h1><p id="57d9">Another awesome feature of the Jupyter Notebook is that you can run scripts directly copied from a Python shell or IPython shell session. For example:</p><p id="ea28">(1) Code from a Python Shell session: <a href="https://docs.python.org/3/tut

Options

orial/interpreter.html">https://docs.python.org/3/tutorial/interpreter.html</a> (2) Code from a IPython Shell session: <a href="https://jakevdp.github.io/PythonDataScienceHandbook/01.02-shell-keyboard-shortcuts.html">https://jakevdp.github.io/PythonDataScienceHandbook/01.02-shell-keyboard-shortcuts.html</a></p><p id="e430">It need not remove these prompts, <b>>>></b> and <b>In [ ]</b>, whereas it has to remove them in other IDEs, or it will produce errors.</p><p id="694e">For example, a code snippet is taken from Python Shell session:</p><figure id="6038"><img src="https://cdn-images-1.readmedium.com/v2/resize:fit:800/0*Lzc6BzJ5OrHodIKL.png"><figcaption></figcaption></figure><p id="cb62">For example, a code snippet is taken from IPython Shell session:</p><figure id="edd4"><img src="https://cdn-images-1.readmedium.com/v2/resize:fit:800/1*oFwaHuzeu6pnxOruxFGKaA.png"><figcaption></figcaption></figure><p id="610e">This feature of Jupyter notebook is very helpful for us to have a quick test for some codes online from a Python shell or IPython shell session.</p><h1 id="68de">8. Brief Summary</h1><p id="c7c3">This article presents how to edit and run Python files in Jupyter Notebook, which includes how to display a <code>.py</code> file in Jupyter Notebook, load <code>.py</code> file in Jupyter Notebook, append <code>.py</code> file in Jupyter Notebook, update <code>.py</code> file in Jupyter Notebook, run <code>.py</code> file in Jupyter Notebook, run an external Jupyter Notebook <code>.ipynb</code> file in a new Jupyter notebook as well run a Python scripts directly copied from a Python shell or IPython shell session. If you are interested in learning Jupyter notebook, you are welcome to enroll one of my course <a href="https://academy.deepsim.xyz/courses/practical-jupyter-notebook-from-beginner-to-expert/">Practical Jupyter Notebook from Beginner to Expert</a>.</p><h1 id="b223">9. Videos</h1><p id="5b73">If you like video versions of this post, please go to my YouTube channel to watch them. If these are helpful, please subscribe to my channel to show your support.</p> <figure id="f02e"> <div> <div> <img class="ratio" src="http://placehold.it/16x9"> <iframe class="" src="https://cdn.embedly.com/widgets/media.html?src=https%3A%2F%2Fwww.youtube.com%2Fembed%2Fqsgx9IYG4-Y%3Ffeature%3Doembed&amp;display_name=YouTube&amp;url=https%3A%2F%2Fwww.youtube.com%2Fwatch%3Fv%3Dqsgx9IYG4-Y&amp;image=https%3A%2F%2Fi.ytimg.com%2Fvi%2Fqsgx9IYG4-Y%2Fhqdefault.jpg&amp;key=a19fcc184b9711e1b4764040d3dc5c07&amp;type=text%2Fhtml&amp;schema=youtube" allowfullscreen="" frameborder="0" height="480" width="854"> </div> </div> </figure></iframe></div></div></figure> <figure id="947a"> <div> <div> <img class="ratio" src="http://placehold.it/16x9"> <iframe class="" src="https://cdn.embedly.com/widgets/media.html?src=https%3A%2F%2Fwww.youtube.com%2Fembed%2FeNgPeBH8lzg%3Ffeature%3Doembed&amp;display_name=YouTube&amp;url=https%3A%2F%2Fwww.youtube.com%2Fwatch%3Fv%3DeNgPeBH8lzg&amp;image=https%3A%2F%2Fi.ytimg.com%2Fvi%2FeNgPeBH8lzg%2Fhqdefault.jpg&amp;key=a19fcc184b9711e1b4764040d3dc5c07&amp;type=text%2Fhtml&amp;schema=youtube" allowfullscreen="" frameborder="0" height="480" width="854"> </div> </div> </figure></iframe></div></div></figure><p id="8e00"><i>Originally published at <a href="https://academy.deepsim.xyz">https://academy.deepsim.x</a></i><a href="https://academy.deepsim.xyz">yz<i></i></a><i> on August 8, 2022.</i></p><p id="62d9">If <i>you think this post is helpful, please do not forget to give <b>a clap</b> to show your kind support. Thank you very much!</i></p></article></body>

Different Methods to Edit and Run Python Files in Jupyter Notebook

Jupyter notebook is a handy Python Web IDE

The Jupyter notebook is also a very handy Python Web IDE, in which, besides creating and running .ipynb files, one can create Python (.py) files, display and run them very conveniently. I showed how to create a Python (.py) file in the Jupyter notebook using different methods in a previous post. I will continue to show to how to display, edit, run Python (.py) file and an external .ipynb file in Jupyter note in this post.

1. How to Display a .py file in Jupyter Notebook

There are three commands, namely !cat, %cat, cat to show a Python code snippet in a code cell in Jupyter notebook on the Linux system, while we use !type on the Widows system to do the same work. For example, let's create hello.py file first and put the following code snippet in the file. If you are not sure how to create it, please read the post. Then put the file in the working directory.

def hello(name): 
    print(f"Hello, {name}!")

On Linux System

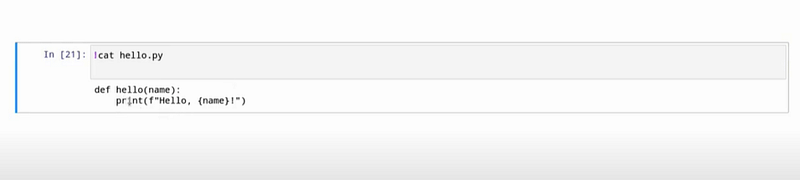
Type one of the following codes in a code cell of Jupyter notebook and then run it.

!cat hello.py

Or

%cat hello.py

Or

cat hello.py

The output looks as follows:

For Windows System:

Just use the following command code instead, we will get the similar output as above.

!type hello.py

Besides, there is another magic command %pycat, which works for both Linux and Windows. Whereas, Jupyter opens a pager and prints the output there.

It is good to know all these commands; but I suggest you using %cat on Linux and !type on Windows.

2. Load .py File

The magics %load and %loadpy are used to load a .py file into the current code cell, and then you can edit and run it.

For example, let’s load the “hello.py” file in the working directory, just run either of the following commands.

%load hello.py

or

%loadpy hello

After running the command, Jupiter notebook loads python code immediately in the cell as follows, and then you edit it.

3. Append to .py File

The magic command %%writefile -a can be used to append codes to the end of the code in an existing file. For example, we want to add hello("Sigmund") at the end of the function.

The above output of Appending to hello.py indicates code appending is successful. We can check the code by %cat, !cat (Linux) or !type(Windows).

4. Update .py File

If you would like to add code or edit the code in the file rather than to append code to the end, you can run %%writefile again, which will update your code by overwriting the old file. For example,

5. Run .py File

To run the Python file, we use %run filename.py. For example, let's run "hello.py" by:

%run hello.py

or

run hello.py

The output looks as follows:

For a function, there are other two convenient ways to run it.

Method 1: run the function, and then call it

# run the function 
%run greeting.py

Then

# call the function
hello("Sigmund")

Method 2: run the function as module

# import the function as a module 
import hello
# call the function 
hello.hello("Sigmund")

6. Run External Jupyter Notebook .ipynb files

Besides, we can also run another Jupyter notebook inside the current working one using %run filename.ipynb For example, let's create a Jupyter notebook named "myname.ipynb" and run it in a new Jupyter notebook.

7. Run Codes from a Python or IPython Shell Session

Another awesome feature of the Jupyter Notebook is that you can run scripts directly copied from a Python shell or IPython shell session. For example:

(1) Code from a Python Shell session: https://docs.python.org/3/tutorial/interpreter.html (2) Code from a IPython Shell session: https://jakevdp.github.io/PythonDataScienceHandbook/01.02-shell-keyboard-shortcuts.html

It need not remove these prompts, >>> and In [ ], whereas it has to remove them in other IDEs, or it will produce errors.

For example, a code snippet is taken from Python Shell session:

For example, a code snippet is taken from IPython Shell session:

This feature of Jupyter notebook is very helpful for us to have a quick test for some codes online from a Python shell or IPython shell session.

8. Brief Summary

This article presents how to edit and run Python files in Jupyter Notebook, which includes how to display a .py file in Jupyter Notebook, load .py file in Jupyter Notebook, append .py file in Jupyter Notebook, update .py file in Jupyter Notebook, run .py file in Jupyter Notebook, run an external Jupyter Notebook .ipynb file in a new Jupyter notebook as well run a Python scripts directly copied from a Python shell or IPython shell session. If you are interested in learning Jupyter notebook, you are welcome to enroll one of my course Practical Jupyter Notebook from Beginner to Expert.

9. Videos

If you like video versions of this post, please go to my YouTube channel to watch them. If these are helpful, please subscribe to my channel to show your support.

Originally published at https://academy.deepsim.xyz on August 8, 2022.

If you think this post is helpful, please do not forget to give a clap to show your kind support. Thank you very much!

Python
Jupyter Notebook
Recommended from ReadMedium
avatarAyesha sidhikha
Pandas Pivot Table

Pandas Pivot Table

6 min read