
How to Draw
How to Draw a Dog
How to draw Barker, and his pals, Howler, and Woofer and Growler and …
How to Draw a basic dog:
Materials needed: paper; pencil, pen — nothing fancy required.
The aim of this exercise is to learn to draw a dog very quickly. Drawing quickly and ending up with a pleasing result will give you the confidence to draw anything else. Forever. Anything.
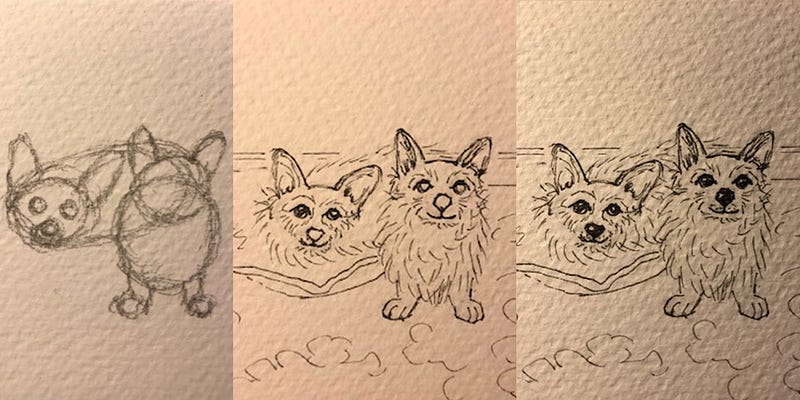
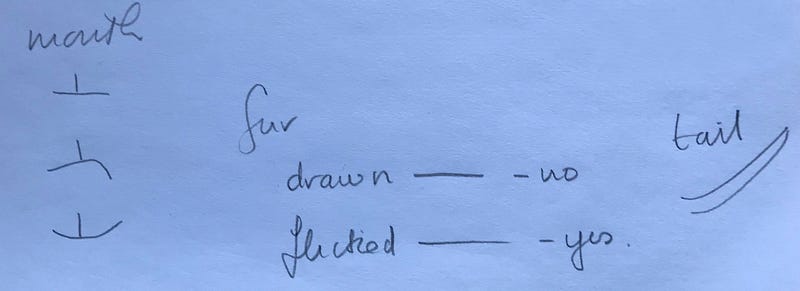
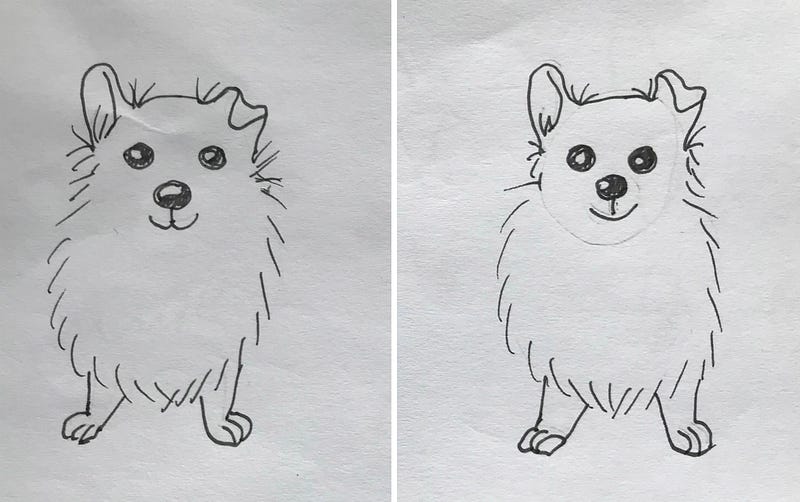
The techniques you learn drawing Barker (on the left) and Howler (on the right) (see below) will enable you to draw anything. The speed of drawing Barker and Howler (BnH) will give you the confidence to tackle them. In any style, too.
Most artists start with guidelines. Most beginners think this is a beginner thing. It isn’t. Guidelines will always be useful no matter how many drawings you do.
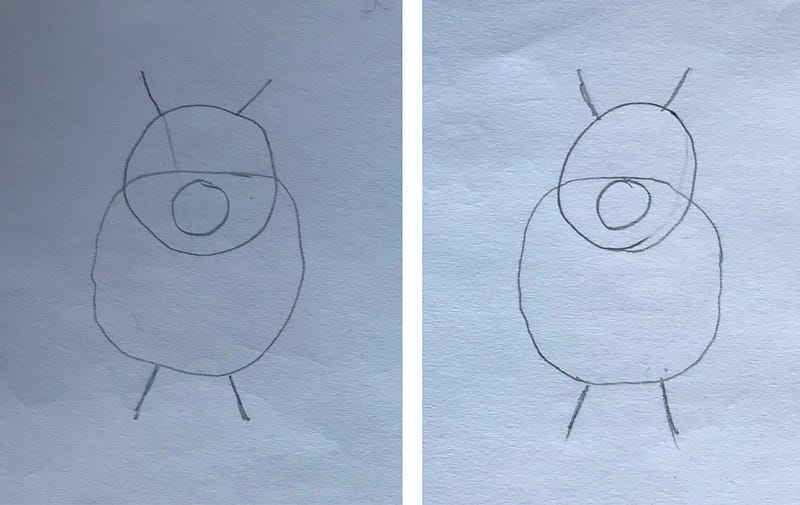
Talking of guidelines, start with a circle. It doesn’t need to be a circle-circle (as you can see) — it can just be an approximate circle. I can’t draw free-hand circles, and it doesn’t matter.
Halfway down that circle start to draw another circle — a bigger one — that is more of an oval, and bigger. Or it might even be a wonky square with the corners rounded off. The bottom of that shape will be BnH’s belly.
- then another, smaller, circle inside the first circle for Dog’s muzzle
- then a couple of antennae from the top of Dog’s head
- and a couple of stick legs that mirror the antennae
I’m drawing Barker and Howler at the same time so that you can see that you don’t have to do yours exactly the same as mine, or anyone else’s, to succeed in drawing a basic dog. That is, follow the guidelines so your dog is your dog and not a copy of another dog.
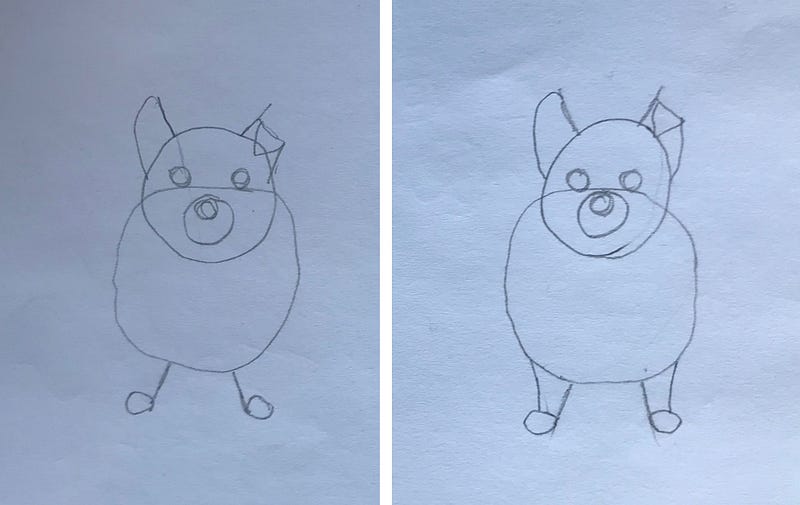
Add three small circles in an upside-down triangle position on the head — the bottom one in the muzzle circle — they will be the nose and eyes.
Add a circle to the outside of the stick legs for paws.
Make the left hand antenna into an ear by adding a curved line that comes down to the eye-line. Add an upside-down triangle to the right-hand ear and also bring the outside line down to eye-level.
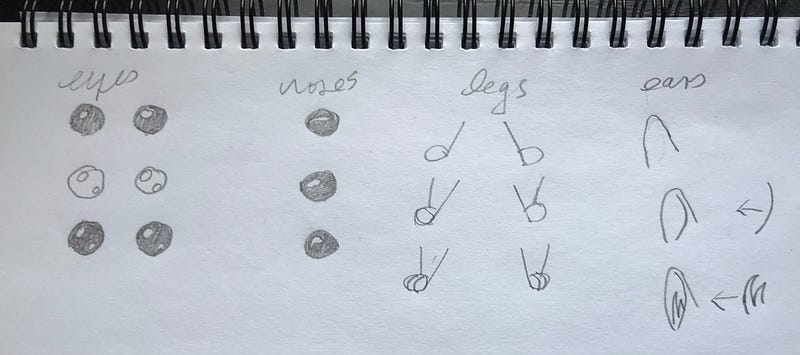
HnB’s eyes are round at the moment. The main things to bear in mind just now are they need to look the same way or HnB will look pretty weird. We don’t want him to look weird unless we do it on purpose.
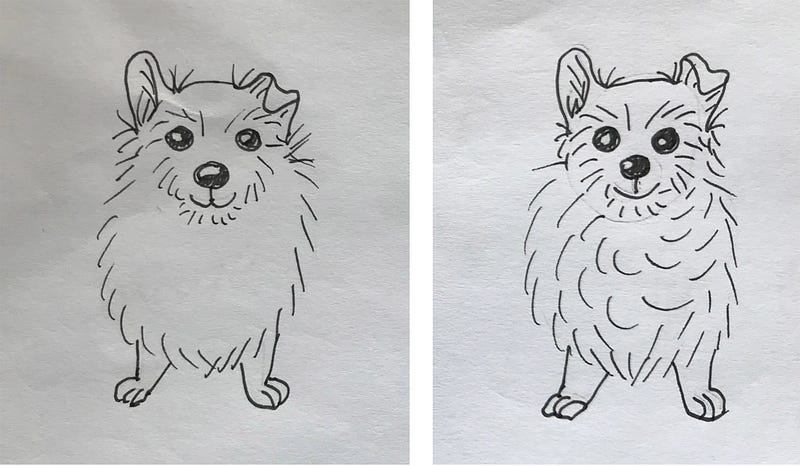
A highlight consisting of a dot of white adds realism to the eyes. The white (in this case) is the paper, so leave it white and scribble in black around it. Or you can get fancy and leave two dots of white — one bigger than the other.
The nose is the same — leave a highlight of white paper and scribble around it — a straight across ovalish highlight or a round highlight or a fancier one. You choose.
Bring a line down to the circle of the paw to form the outside of the leg. Then divide the circle into three with two curved lines.
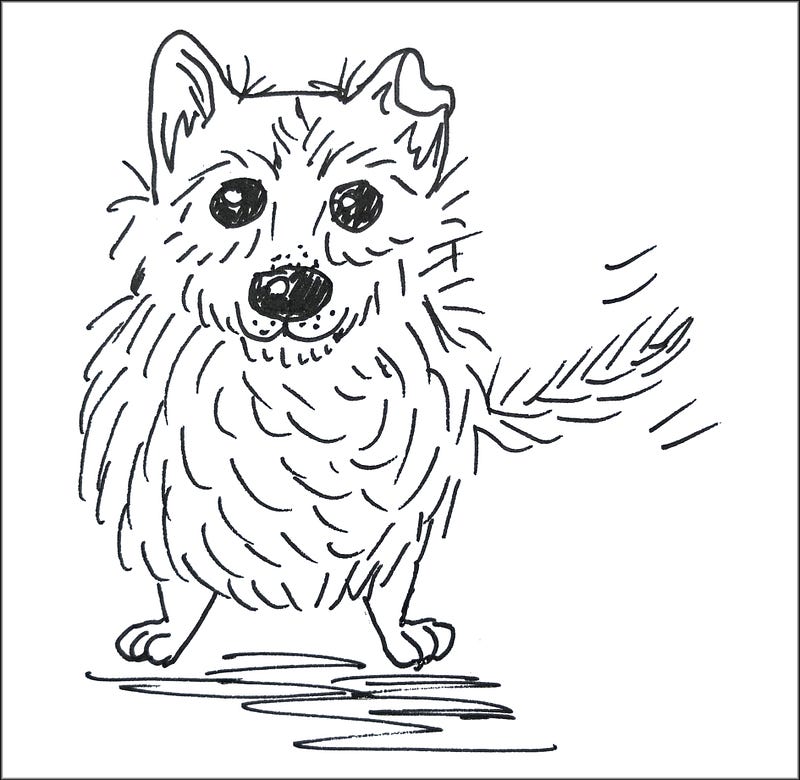
The ears require a curved line inside them — this shows there is depth to the ear and it isn’t just a flat flap of skin perched on BnH’s head. Put in a couple of tufts of fur and you have ears. (See all these features in the diagram above.)
Dog’s mouth is just two lines — a line down from the nose and another, longer line across the bottom of it — that line can be neutral, turned down or miserable; or turned up and smiley. I tend to make mine smiley.
Fur — if you deliberately draw fur it looks too laboured. The width of it is too similar along its full length, and too heavy. It’s better to give the impression of fur, rather than drawing it. If you flick it in, it looks much more natural and fur-like. You flick by putting the point of your pencil on the paper and literally flicking it up so that the line you draw starts thick and ends thinner. (The same thing can be done with a pen or a brush.)
Sometimes it’s easier to start with the point of your pencil underneath your hand and flick it forward until you’re used to the technique. This is something worth practising to get the lightness of touch you need for good fur. It applies to many things eg this technique can produce brilliant grasses in watercolour very easily and quickly.
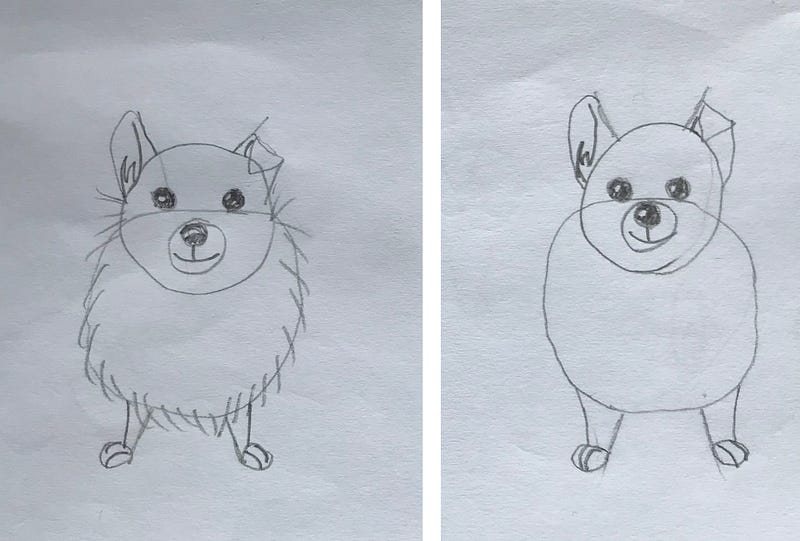
I’ve put the fur around Barker’s body in pencil. I’m going to ink him in now and see if he turns out the way I want. While I’m doing that I’m going to make his legs fatter. We are not stuck with our initial lines and we need to keep looking at our dog the whole time to see if every line we make produces the result we want.
So now I’ve reminded myself to look, I’m going to soften any angles I find. Dogs don’t have angles. In this case I shall round off the angles on ears and paws.
The pen I use is just an ink pen for drawing — nothing special — I buy several at a time online — it could equally as well be a ball-point pen. If I had a brown ink pen handy I might have done Barker with that.
Rubbing out the pencil, once I’m sure the ink is dry and isn’t going to smudge, means I can see more clearly what is needed to make Barker more dog.
And now Barker does look more dog. And less pig. Thank heaven for that! (I have nothing against pigs, but I wanted to draw a dog.)
I’ve done the same with Howler. I’ve drawn the same lines and followed the same guidelines, rather than copied anything. When you copy something, instead of using it simply as reference, you put yourself under extraordinary strain, which takes away from the joy of drawing.
Concentrating on making things exactly the same as the reference you’re using means a loss of spontaneity and lightness of touch and it means you’re worried about something that isn’t necessary to achieve the aim. (Portraits are different.)
Starting with the same basic shapes and features, we have two entirely different characters in Barker and Howler.
BnH need eyebrows, chins and cheeks. It’s best to indicate them with fur, rather than drawing them in. Oh, and a little more fur in their ears.
When indicating fur, flick it in using the direction that it would grow. I’m putting fur on their chests in a roughly circular motion. My dog’s hair, for example, grows in whirls. I will do it in pencil first to make sure I know where I’m going and then in ink. See Howler (above).
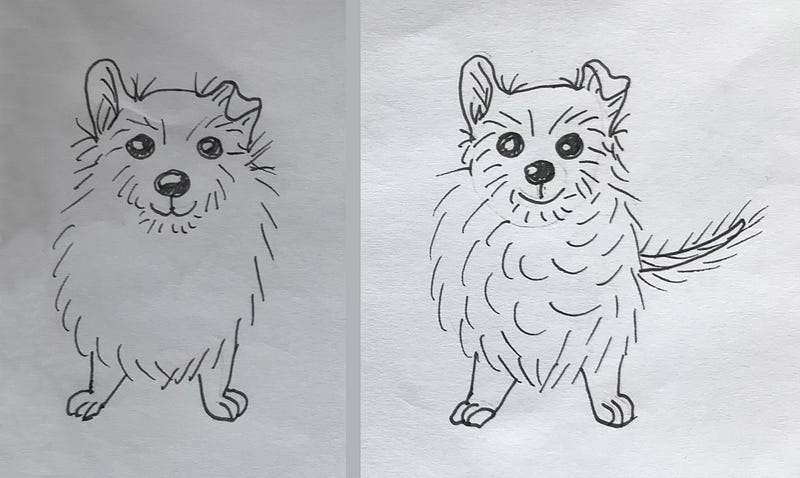
The tail is tail-shaped but do practice it and any of the other features on a separate piece of scrap paper first before putting them onto your masterpiece.
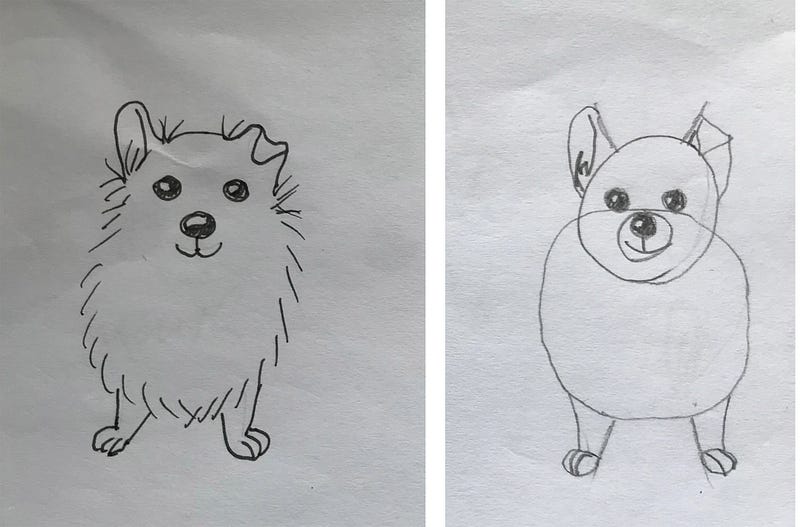
I put the tail on Howler first, but even with fur on top it doesn’t look right. The outline is too solid.

I pencilled in Barker’s tail so I knew where to put the fur — not forgetting that fur is coming towards the viewer as well as all around the outline of it. It looks a lot better than Howler’s tail now. Poor Howler.
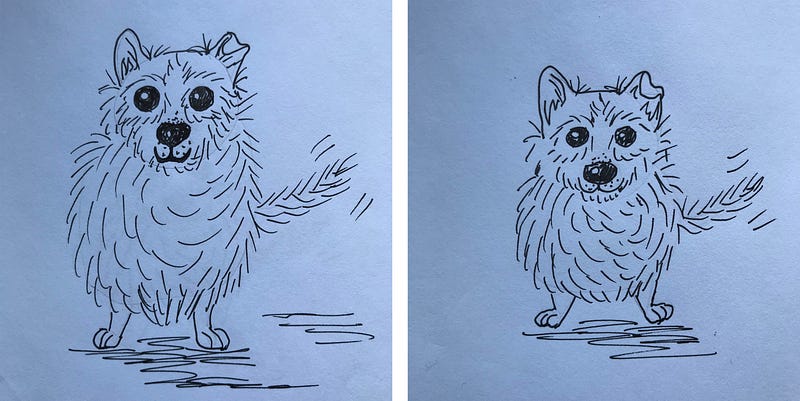
I’ve just timed myself to see how long it takes to draw a dog following these guidelines — less than five minutes. I did two because I wasn’t happy with the first one (poor Growler) — his body is too big, and his eyes are too big in relation to the rest of his face, so I did him again and here’s Woofer on the right. I’m happy with Woofer.
So — aim for five minutes or less. If you take longer then you’re worrying too much. This is a light-hearted exercise, not a worrying one.
I’ve added to Growler and Woofer (GnW) (above):
- some dots on the muzzle — they indicate whiskers rather than drawing in the actual whiskers
- some movement lines on top of, and underneath, the tail so it looks as if it’s wagging. The lines make it look like it’s moving because they indicate where the tail was before it moved to a new position.
- some fur under the eyes — this indicates the bottom edge of the eye socket and gives more shape to the face.
- a few lines under the dog for shadow to show that they are connected with the earth and not floating in mid-air.
The thing is that you can quickly learn how to draw anything from a base of simple shapes. This means you don’t need to worry about anything because you know you can do it again anytime. That will mean you can relax about it, and because you’ve relaxed about it, you’re more likely to be happy with your results.
There is more that can be done to these pics but that can wait. For now, we have a Barker, a Howler, a Growler and a Woofer who are all Good Dogs!
And, now you can draw anything!
(And — yes — dogs have four claws, not three — the reason for drawing three will be explained in a later how-to-draw session.)
If you have any questions about this session, do put them in the comments section.
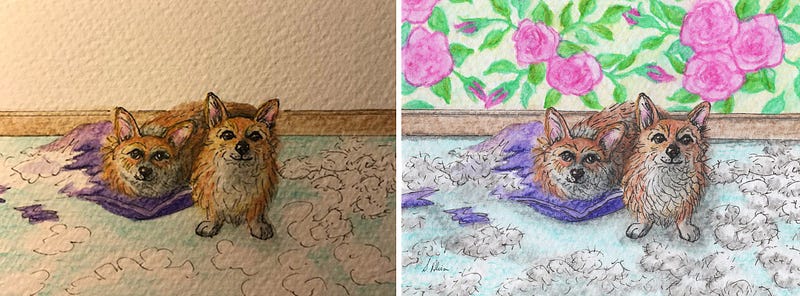
The pictures at the very top of this page, and at the very bottom, are a series of stages from the same guidelines used here to a finished painting called: “Wot?” — also known as: ‘Savaged cushion stuffing always expands to fill the available space’.
Different breeds of dog will be covered as we go along.


