
How To Develop and Build Next.js App with NodeJS Backend
Learn How you develop and build with an example project

There are so many ways we can build Next.js apps and ship them for production. One way is to build the Next.js app with NodeJS or Java and another way is to build the Next.js and serve that static content with NGINX web server. With NodeJS we have to deal with the server code as well, for example, you need to load the index.html page with the node.
In this post, we will see the details and implementation with the NodeJS. We will go through step by step with an example.
- Introduction
- Prerequisites
- Example Project
- Just Enough NodeJS For This Project
- Development Phase
- How To Build Project For Production
- Summary
- Conclusion
Introduction
Next.js is the React framework for static websites, the JAMstack, Production, Desktop, Lightweight Apps, Pre-rendered apps Mobile Web, etc. There are so many advantages using Next.js for your react application such as Pre-Rendering made easier, Exporting a static website with a single command, including CSS in JS code, very less configuration, fully extensible, and optimized for smaller builds, etc. You can get more information on their website here.
React.js is a library, not a framework so that you have to lot of things on your own and there is no specific way to do these as React is not opinionated like Angular. In this post, you can learn how fast we can develop React web application with the Next.js framework.
Next.js is a javascript framework for building web apps and it doesn’t load itself in the browser. We need some kind of mechanism that loads the index.html (single page) of the Next.js application with all the dependencies(CSS and js files) in the browser. In this case, we are using the node as the webserver which loads Next.js assets and accepts any API calls from the Next.js UI app.

If you look at the above diagram all the web requests without the /api will go to Next.js routing and the Next.js Router kicks in and loads components based on the path. All the paths that contain /api will be handled by the Node server itself.
In this post, we are going to develop the Next.js app with NodeJS and see how to build for production.
Prerequisites
There are some prerequisites for this article. You need to have nodejs installed on your laptop and know-how http works. If you want to practice and run this on your laptop you need to have these on your machine.
Example Project
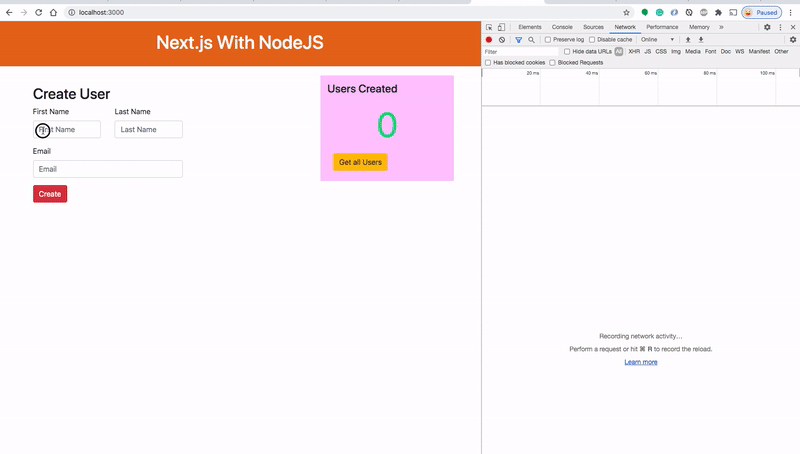
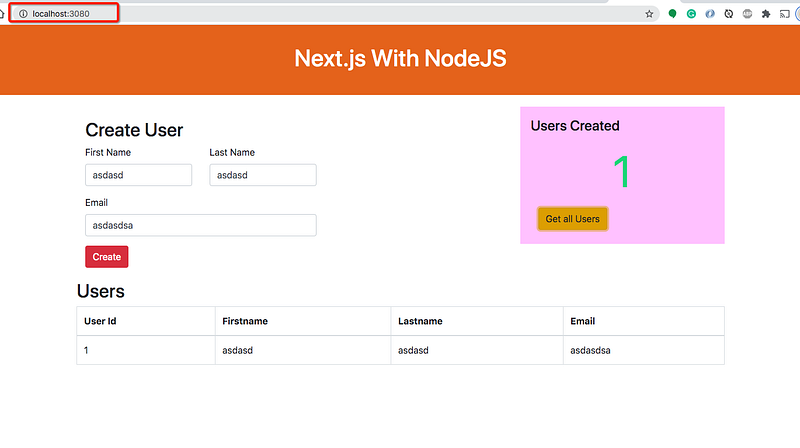
This is a simple project which demonstrates developing and running the Next.js application with NodeJS. We have a simple app in which we can add users, count, and display them at the side, and retrieve them whenever you want.

As you add users we are making an API call to the nodejs server to store them and get the same data from the server when we retrieve them. You can see network calls in the following video.
Here is a Github link to this project. You can clone it and run it on your machine.
// clone the project
git clone https://github.com/bbachi/nextjs-nodejs-example.git
// strat the api
cd api
npm install
npm run dev// start the nextjs app
cd my-app
npm install
npm run start:devJust Enough NodeJS For This Project
If you are new to NodeJS don’t worry this short description is enough to get you started with this project. If you are already aware of NodeJS, you can skip this section.
NodeJS is an asynchronous event-driven javascript runtime environment for server-side applications. The current version of the nodejs is 12 and you can install it from this link here. You can click on any LTS link and the NodeJS package is downloaded and you can install it on your laptop.
You can check the version of the Node with this command node -v. You can run javascript on the node REPL by typing the command node on the CLI.
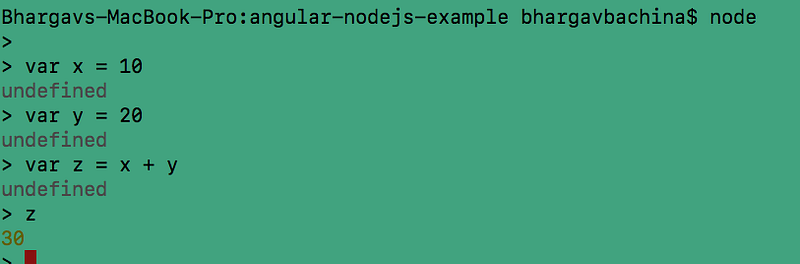
The installation of a node is completed and you know how to run javascript. You can even run javascript files. For example, Let’s put the above commands in the sample.js file and run it with this command node sample.js.
Development Phase
Usually, the way you develop and the way you build and run in production are completely different. Thatswhy, I would like to define two phases: The development phase and the production phase.
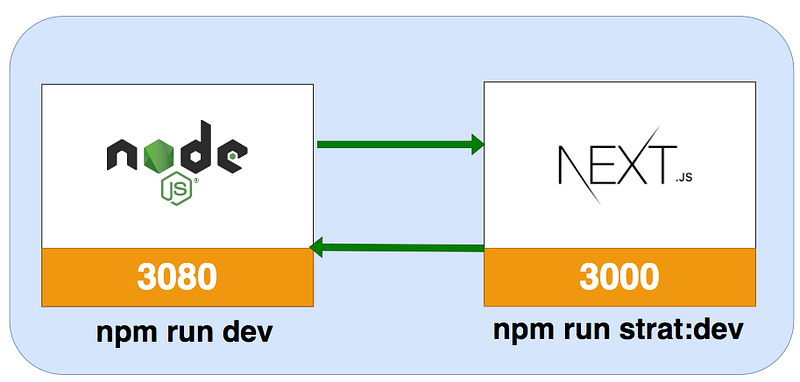
In the development phase, we run the nodejs server and the Next.js app on completely different ports. It’s easier and faster to develop that way. If you look at the following diagram the Next.js app is running on port 3000 with the help of http-proxy-middleware dev server and the nodejs server is running on port 3080.
Project Structure
Let’s understand the project structure for this project. We will have two package.json: one for the Next.js and another for nodejs API. It’s always best practice to have completely different node_modules for each one. In this way, you won’t get merging issues or any other problems regarding web and server node modules collision.
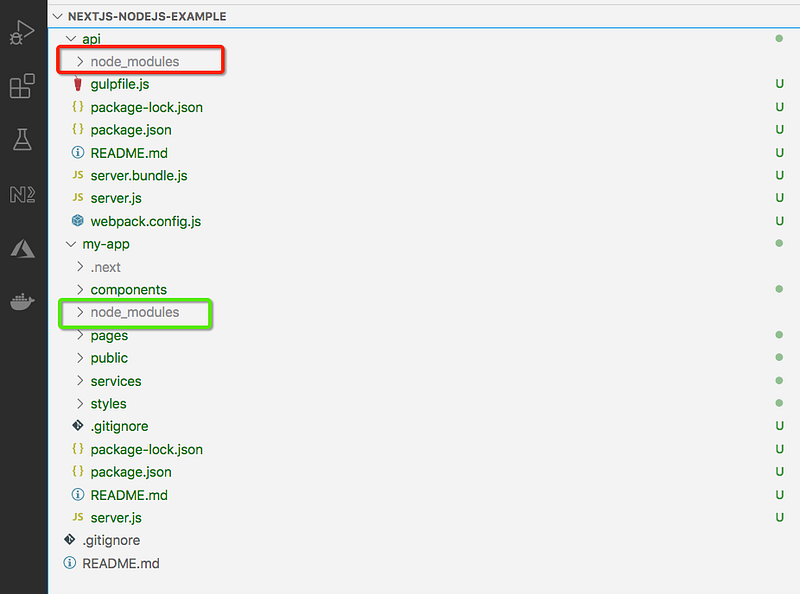
If you look at the above project structure, all the Next.js app resides under the my-app folder and nodejs API resides under the api folder. If you put NodeJS API at the root folder instead of in a separate folder you might have issues with the NextJS CLI picking up root node_modules.
NodeJS API
We use the express and nodemon on the server-side. Express is the Fast, unopinionated, minimalist web framework for NodeJS and nodemon is the library that makes your API reloads automatically whenever there is a change in the files. Let’s install these two dependencies. nodemon is only used for development so install this as a dev dependency.
npm install express --save
npm install nodemon --save-dev
Here is the package.json of nodejs API.
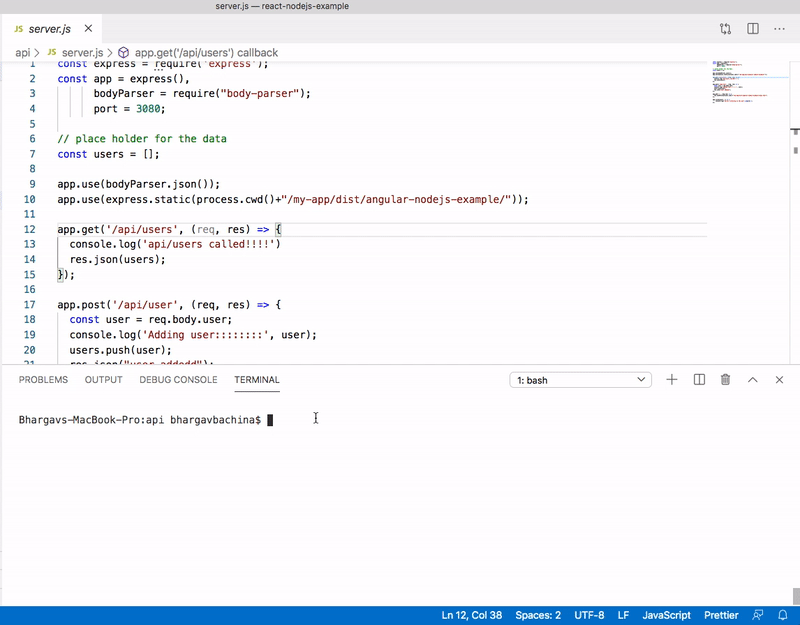
We need to import express and define two routes: /api/users and /api/user and the server listening on port 3080. Here is the server.js file. We use body-parser to handle data in the http request object.
You need to start the nodejs API with this command npm run devand the moment you change any file, it will be automatically updated. We are using nodemon to watch files.
Next.js UI
Now the nodejs API is running on port 3080. Now it’s time to look at the Next.js UI. The entire Next app is under the folder my-app. You can create with this command npx create-next-app my-appI am not going to put all the files here you can look at the entire files in the above Github link or here.
Let’s see some important files here. Here is the service file which calls node API. This is a service file with two async functions that use fetch API to make the API calls.
Here is the app component that calls this service and gets the data from the API. Once we get the data from the API we set the state accordingly and renders the appropriate components again to pass the data down the component tree. You can find other components here.
Interaction between Next.js UI and Node API
In the development phase, the Next app is running on port 3000 with the help of an http-proxy-middleware and nodejs API running on port 3080.
There should be some interaction between these two. We can proxy all the API calls to nodejs API. If you are familiar with the react library we can set up a proxy with the proxy object in the package.json like below.
"proxy": "http://localhost:3080"Even though Next.js is a React framework it doesn’t work that way at the time of writing. Typically you start your next server with next start. It's possible, however, to start a server 100% programmatically in order to use custom route patterns.
Then, to run the custom server you’ll need to update the scripts in package.json. You can find more about this on their site.
Proxy Setup
We can set up a proxy with the help of a custom server. We need to install http-proxy-middleware in the Next.js UI.
npm install http-proxy-middleware --saveHere is the custom server.js file where we are using http-proxy-middleware to proxy all the calls with context path /api. We are proxying only if it is a development environment and all other requests will be redirected to the Next.js router.
We are using server.js with the command npm run start:dev. Here are the instructions to run the app in the local environment.
// on Terminal 1
cd my-app
npm run start:dev
// on Terminal 2
cd api
npm run devHow To Build Project For Production
The Next app runs on port 3000 with the help of a http-proxy-middleware. This is not the case for running in production. We have to build the Next.js project and load those static assets with the node server. Let’s see those step by step here.
First, we need to build the Next.js project with this command npm run build and all the built assets will be put under the out folder. When you run this command the following command executes from the npm scripts.
next build && next export
Second, we need to make some changes on the server-side. Here is the modified server.js file.
- We need to import a path that resolves
.and.., and uses the appropriate file separator for any platform - We have to use express.static at line number 11 to let express know there are a build folder and assets of the React build.
- Load index.html for the default route / at line number 26
Once you are done with the above changes, you can actually run the whole app with the nodejs server running on port 3080 like below as nodejs acts as a web server as well. At this time you don’t need to run http-proxy-middleware or NextJS CLIon port 3000. Every time you change anything on the Nextjs side you need to build the project again to reflect the changes.
Summary
- There are so many ways we can build Next.js apps and ship them for production.
- One way is to build the Next.js app with NodeJS.
- In the development phase, we can run Next UI and Nodejs on separate ports.
- The interaction between these two happens with proxying all the calls to API.
- In the production phase, you can build the Next app and put all the assets in the build folder and load it with the node server.
- Nodejs act as a web server as well in the above case. You need to let express know where are all the Next build assets are.
- We can package the application in a number of ways.
- You can deploy the packaged zip folder in any node environment.
Conclusion
This is one way of building and shipping NextJS apps. This is really useful when you want to do server-side rendering or you need to do some processing. NodeJS is non-blocking IO and it is very good for normal websites as well. In future posts, I will discuss more on deploying strategies for this kind of architecture.


