
Deploy Machine Learning Models for Free
Introduction
Machine learning models are no good lying in the IPy notebooks or scattered python scripts. To change lives and make an impact in the world, the model needs to be deployed in a way it’s usable by the general public and not just by the domain experts. For this, the model needs to be encapsulated behind some sort of API that other applications could use to communicate with the model. It involves quite a bit of web development and people often get intimidated by it. However, it is not that difficult. Read through this post to discover it for yourself!
The aim of this post is to deploy a machine learning model as a general API over the web that can be used over various platforms such as:
- Websites
- Bots for apps such as telegram, slack, discord and many more
- Android/iOS apps
- Alexa skills
- Any other platform that allows you to send basic GET/POST requests over HTTP/HTTPS
Host the API for FREE*!
*Unless your model uses CUDA which requires nvidia GPUs this method is free.You need to buy a server with an nvidia GPU in case you want to use CUDA or any other GPU intensive library. In case you do have a server, I’ve covered introductory guidelines at the end of this post.
Prerequisites
Readers need to be able to create machine learning models, train them and later use them to predict results in python. This post is aimed to only provide insights on deploying a machine learning model into production for small-scale use.
Following are the few libraries and resources which will be used:
- pickle: A native python library to save (serialize) and load (de-serialize) python objects as files on the disk
- flask: A python based easy to use web framework. Here are the docs and a good series of video tutorials by sentdex
- pythonanywhere: A free to use educational website that allows hosting python flask and provides a complete python development environment.
Environment setup
Make sure to use python 3+
pip install the following packages:
- flask (our python-web framework)
- flask_cors: for CORS headers
- jsonify: to return JSON files using flask
- Other learning libraries as per needs like numpy, pandas, sklearn etc
pip install flask flask_cors jsonify numpy pandas
Data flow
Following is a diagrammatic representation of the data flowing between the user and server space.
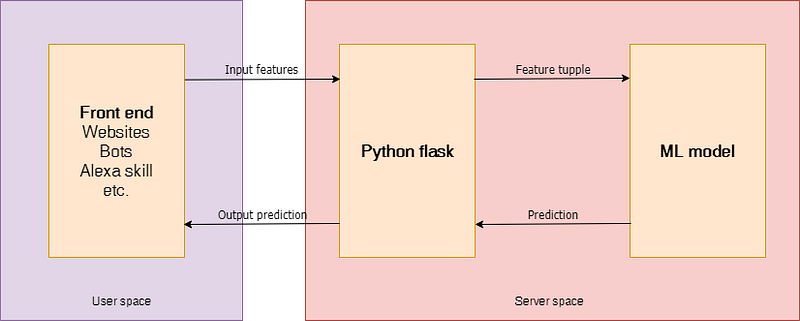
Here’s the summary of what needs to be done:
- Train the model using Jupyter notebook
- Save the trained model object as a pickle file (serialization)
- Create a flask environment that will have an API endpoint which would encapsulate our trained model and enable it to receive inputs (features) through GET requests over HTTP/HTTPS and then return the output after de-serializing the earlier serialized model
- Upload the flask script along with the trained model on pythonanywhere
- Make requests to the hosted flask script through a website, bot, android app or any other application capable of sending HTTP/HTTPS requests
Machine learning model
The purpose of this post is the deployment of a model and not its creation. Let's just assume we have a model which takes in date as input and predicts the price of bitcoin. The model is already trained over historical price data.
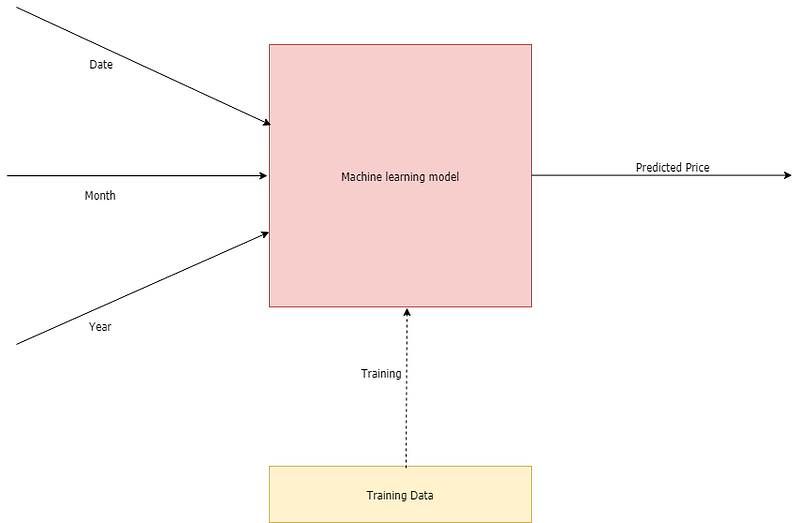
If you are interested in knowing about this model you may refer to my github repository. Although, beware! Bitcoin’s price can never be predicted using machine learning and this is just a failed attempt (that too a very stupid one) to only consolidate this point. Efficacy of the model is not the concern for this blog post so let’s just deal with this model for now.Serializing and de-serializing the model
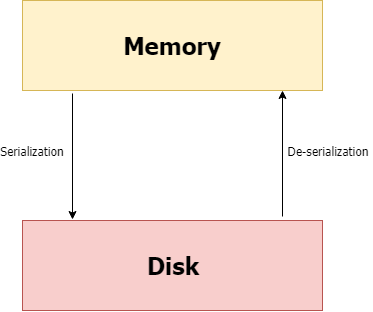
Pickle
A module called pickle helps perform serialization and deserialization in python.
Serializing
In simple words serializing is a way to write a python object on the disk that can be transferred anywhere and later de-serialized (read) back by a python script.
Here’s how it’s done:
After running the above code, a file called “mlp_nn.pkl” is created which is the trained model that can be transferred anywhere and used after de-serialization as follows:
De-serializing
Flask setup
Let’s first set up the flask server on the local host and later deploy it on pythonanywhere for free.
Setting up flask-app over the localhost:
Make sure flask is installed. pip install flask
The following script starts the flask server on localhost and default port (5000) making the URL: http://127.0.0.1:5000/
Just paste http://127.0.0.1:5000/ on browser and press enter to see the server working.
- App Route
app.route decorator is used for specifying the flask app route over the web.
“/” simply means the home that is “http://127.0.0.1:5000/”
“/price/” means http://127.0.0.1:5000/price/
- Arguments
Arguments can be passed over these routes as follows:
http://127.0.0.1:5000/price/?date=12&month=3&year=2019
A general template would look like this:
https://[HOME]/[ROUTE]/?[var1_name]=[var1_value]&[var2_name]=[var2_value]
These arguments are parsed in the flask script as follows:
- request.args.get(‘date’) will return 12
- request.args.get(‘month’) will return 3
- request.args.get(‘year’) will return 2019
When you enter the URL into browser it actually sends a GET request over HTTP/HTTPS to the specified url.
In our case, we sent a GET request with arguments having date, month and year to the flask server to get back the prediction of our model.
- jsonify
flask.jsonify() function will return a python dictionary as JSON. JSON format can be thought of as a python dictionary that can be nested any number of times and passed over the web. It’s a great way to structure data shared in between applications. It’s always advised to make use of JSON format when dealing with web APIs.
- CORS
flask_cors package is used to fix CORS headers used for AJAX calls making cross-origin AJAX possible.
travelingYou can either read more about CORS here or just use it as it is. You CAN NOT ignore it because without correct CORS headers our API would be unusable by almost any other external applications. I personally struggled a lot with the CORS errors and had to read flask and some web development documentation to come up with this simple solution. If you have a better way to deal with CORS headers using flask please let me know in the responses.
Predict function
The code above has a predict function in the class my_bitcoin_predictor that needs a little explanation
Predict function can take input features and output the prediction of the model. This is the function actually deployed over the web using python flask. Instead of receiving the input features from the same environment in a python script or IPy notebook the features are now received through web servers like flask over the web to return back the predicted result.
For the sake of simplicity, I am skipping a lot of parts of my_bitcoin_predictor class and just writing the important bits.
File structure
A simple file structure looks like this:
Bitcoin predictor
 |
 +-- flask_app.py
 |
 +-- predictor.py
 |
 +-- mlp_nn.pkl
 |
 +-- data
 |  |
 |  +-- bitcoin_price_historical_data.csv
I haven’t covered the part where the model gets trained by the historical data
The folder called Bitcoin predictor is the one needed to be uploaded on pythonanywhere
Hosting the flask app
flask app hosted on the localhost can’t be shared with others since it’s “local”. Host the script to a free python hosting website called pythonanywhere by following a few simple steps:
Step 1. Sign up for a new account.
For now, let's stick with the free account. You can buy better hosting plans for more diverse and complex needs. (There’s a nice tour for new users on this website which will help you)
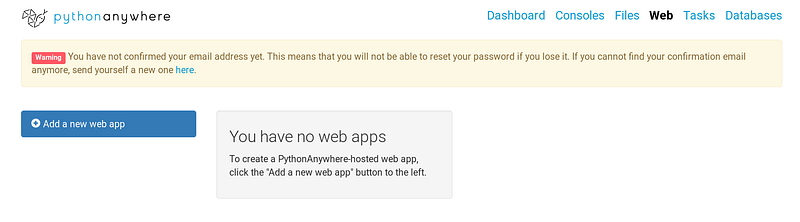
Step 2. Add a new web app
Choose flask and whichever python version you want. I will be using the latest Python 3.7 for the sake of this tutorial. After creating the web app, you will get a URL that points to your flask endpoint. By default, it will display a message saying “Hello from Flask!”. Your endpoint looks something like this: [username].pythonanywhere.com
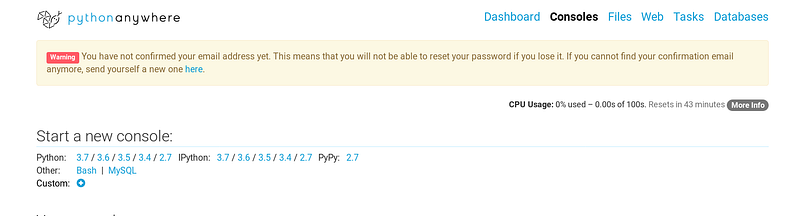
Step 3. Install dependencies
Your ML model must be using various external libraries such as sklearn, numpy, pandas etc. Install all of them in your pythonanywhere environment. To do so, open a new bash console and install libraries using pip. Make sure to install libraries with pip using the user option because we don’t get the superuser rights. Flask will already be installed, no need to install it again.
pip install --user flask_cors numpy pandas
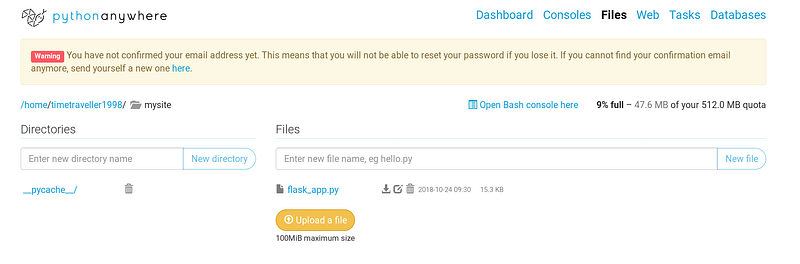
Step 4. Upload the files
Inside the default folder — /mysite/ you need to upload your complete folder. You can do it either using the files page on the website or using the bash console by using wget command to download your files.
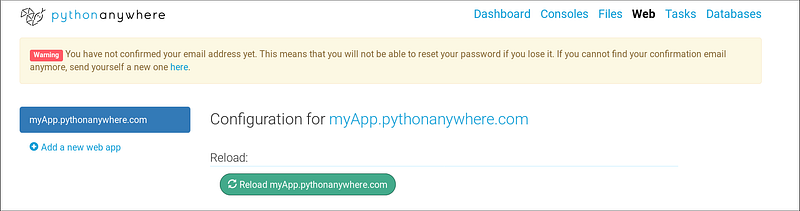
Step 5. Reload the web app
Your endpoint will now act as an API to facilitate other applications.
An example front-end application
You need to know basic HTML, CSS and JavaScript for this.
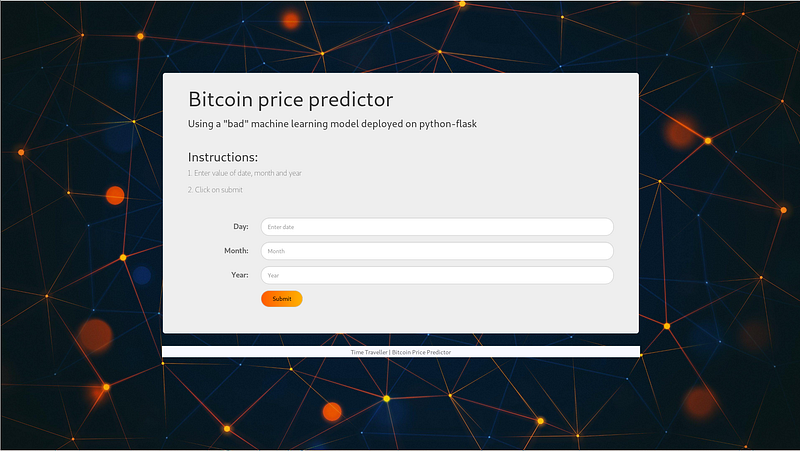
It’s observed that a lot of the machine learning enthusiasts don’t like web development which is why I have created a simple template that can be used to receive the input features through an HTML form and make a request to the API to fetch results. Even if you aren’t proficient with HTML-CSS-JavaScript you can easily edit this template.
Here’s the GitHub repository for the same.
For the example in discussion the edited JavaScript template would like this:
Host this website online and we’re done! Anyone anywhere can use this website to submit the features and get the predicted results from the ML model sitting at the back-end under various layers of data.
*I prefer uploading my website on GitHub and then making it live using netlify. All for free!
Hosting on personal server
pythonanywhere is only for educational purposes and lacks a GPU. For complex deep learning models relying heavily on CUDA and GPU based computation a stronger server is needed. Flask is made functional on a new server from scratch using a WSGI server like gunicorn behind a web server like nginx. A process control system like supervisor can also be used.
All of this requires some web development knowledge and writing about it would make this post too verbose. This webpage helped me setup flask on my server for the first time. It’s really simple and very well written.
You may also refer my image classification model that uses CUDA and was hosted on localhost. It shows how you can deal with image files using flask and pass it on to the model. I will be writing a complete post devoted to it soon.
Conclusion
Hosting and sharing machine learning models can be really easy. Creating android apps, chatbots and many more applications relying on the machine learning models back-end can now be created with great ease.
Thanks for reading. Please let me know in the responses if I made any mistakes or if something could’ve been done in a better way.


