
How to Deploy H2O Wave App on Heroku
Deploy H2O Wave app on Heroku using the “Heroku Git” method
H2O Wave is an open-source python development framework to develop real-time interactive web applications with sophisticated visualizations. What makes it special is, that you don’t need to have prior knowledge of any of the front-end technologies. H2O wave is created to overcome the hurdles of Data Scientists, Machine Learning Engineers, Researchers & others who are struggling in presenting their hard work through a great-looking dashboard or web app. If you are good at Python or R then you can build your web apps fast as any other web developer using H2O wave. See here to get your hands dirty with H2O Wave.
Heroku is a container-based cloud PaaS, which helps developers to deploy, manage and scale their web applications. Heroku provides a “Free and Hobby” package that can be used to deploy non-commercial web apps such as Proof of concepts, MVPs, and personal projects. To get to know more about Heroku please see here.
These two amazing products can help many of us to build and share/demo our web apps. There are three different ways you can deploy your apps on Heroku. Today let me show you how you can deploy your wave app using Heroku Git . We will see,
- Prerequisites
- Build & test your wave app locally
- Prepare your Wave App’s code base to deploy in Heroku
- Deploy & Share
Prerequisites
To deploy your wave app you need,
- Heroku free account, if you don’t have one create it.
- Git CLI, most probably every developer has it, if you don’t have get it installed.
- Heroku CLI, refer here to install it.
- H2O Wave app, if you have your own app go ahead with it, or feel free to use my demo app from here.
Build & test your wave app locally
Hope you have checked all the prerequisites, lets's get into action.
First, let’s check whether our app works locally. Here I am going to use the demo app I created. If you have your own app skip the next step and confirm it works as expected.
- Clone demo app
$ git clone https://github.com/Mathanraj-Sharma/wave-heroku-demo.git
$ cd wave-heroku-demo
$ tree
You should be able to see below file structure on the app repo
.
├── LICENSE
├── Makefile
├── Procfile
├── README.md
├── demo_app
│   ├── __init__.py
│   └── app.py
├── requirements.txt
├── runtime.txt
└── static
    └── h2o_logo.svg
2 directories, 9 files- Check the app locally, run
# to setup virutal environment with app dependencies
$ make setup--------------# start the app in no-reload mode
$ .venv/bin/wave --no-reload demo_app/app.pyOR simply you can use my make target
$ make runYou can see the app is starting fine and running from this log
./.venv/bin/wave run --no-reload demo_app/app.py
params: []2022/07/01 05:44:23 #
2022/07/01 05:44:23 # ┌────────────────┐ H2O Wave
2022/07/01 05:44:23 # │  ┐┌┐┐┌─┐┌ ┌┌─┐ │ 0.22.0 20220531173625
2022/07/01 05:44:23 # │  └┘└┘└─└└─┘└── │ © 2021 H2O.ai, Inc.
2022/07/01 05:44:23 # └────────────────┘
2022/07/01 05:44:23 # ┌──────────────────────────────────────┐
2022/07/01 05:44:23 # │  Running at http://localhost:10101/  │
2022/07/01 05:44:23 # └──────────────────────────────────────┘
2022/07/01 05:44:23 # {"address":":10101","base-url":"/","t":"listen","web-dir":"/Users/mathanraj/Desktop/contribs/wave-heroku-demo/.venv/www"}
INFO:     Started server process [2959]
INFO:     Waiting for application startup.
2022/07/01 05:44:23 # {"host":"http://127.0.0.1:8000","route":"/","t":"app_add"}
INFO:     Application startup complete.
INFO:     Uvicorn running on http://127.0.0.1:8000 (Press CTRL+C to quit)
If you go to http://localhost:10101/ you can see the app working.

Prepare your Wave App’s code base to deploy in Heroku
Inorder to deploy your wave app on Heroku using Heroku Gityou need three files.
runtime.txt: this file will be used to tell the Heroku which python version you would like to run your app on. It will contain only the version of python that you need. Eg:python-3.8.13requirements.txt: which contains all the dependencies that is required to run your application successfully. When we deploy our app Heroku’s python dependency manager will look for this file to setup the runtime environment for your app. You can have a look at the sample file in my demo repo to understand the contents of this file.Procfile: This is a special file used to declare the command that needs to be executed to start your app. In order to start your wave app successfully you need to have thiswebprocess in yourProcfile
web: WEB_CONCURRENCY=1 H2O_WAVE_ADDRESS="http://127.0.0.1:${PORT}" H2O_WAVE_LISTEN=":${PORT}" wave run --no-reload demo_app/app.pyLet’s take few minutes and understand what this command does.
wave run -no-realod demo_app/app.py is the command that we normally use to start the wave app.
H2O_WAVE_LISTEN is the environment variable used the tell, to which port our wave server should listen. Default value for this is 10101.
H2O_WAVE_ADDRESS is an environment variable that we use to tell the wave app which is the the public host/port of the Wave server. The default value for this is http://127.0.0.1:10101.
When we deploy an app on Heroku, it will specify a port number randomly on runtime. This value will be available via PORT environment variable. So when we deploy our app our server should bind with that specified port address & our app should look for our server through that port. That’s why we set those two environment variables.
The last variable is WEB_CONCURRENCY, we set it to tell our server only to start a single instance of our app.
Get to know more about this environment variables here.
That’s all we need inorder to deploy a basic wave app, you can play with the Procfile depending on your needs.
Deploy & Share
All set lets start deploying our app
- Open a terminal and go to wave app’s repo, and run below command to create an app on heroku to receive your source code.
$ heroku apps:create wave-heroku-demoCreating ⬢ wave-heroku-demo... done
https://wave-heroku-demo.herokuapp.com/ | https://git.heroku.com/wave-heroku-demo.gitwhen the app name is already taken it will ask for another name. Please use the name you choose moving forward.
This command will create a git repo for your app on heroku and will add a git remote named heroku on your local project.
- Next push your source code to Heroku app you created
$ git push heroku mainEnumerating objects: 17, done.
Counting objects: 100% (17/17), done.
Delta compression using up to 8 threads
Compressing objects: 100% (13/13), done.
Writing objects: 100% (17/17), 9.79 KiB | 668.00 KiB/s, done.
Total 17 (delta 1), reused 0 (delta 0), pack-reused 0
remote: Compressing source files... done.
remote: Building source:
remote:
remote: -----> Building on the Heroku-20 stack
remote: -----> Determining which buildpack to use for this app
remote: -----> Python app detected
remote: -----> Using Python version specified in runtime.txt
remote: -----> Installing python-3.8.13
remote: -----> Installing pip 22.1.2, setuptools 60.10.0 and wheel 0.37.1
remote: -----> Installing SQLite3
remote: -----> Installing requirements with pip
...
......
remote: Verifying deploy... done.
To https://git.heroku.com/wave-heroku-demo.git
* [new branch] main -> mainThe application is now deployed. Ensure that at least one instance of the app is running
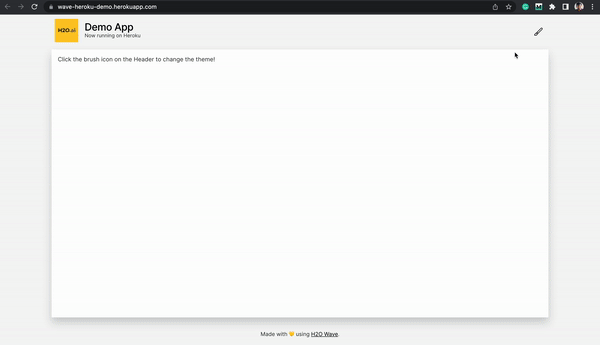
$ heroku ps:scale web=1- Open your app on browser
$ heroku open
this will open your app on your browser. Alternatively, you can go to your Heroku dashboard and open your app.
We have seen a brief intro about H2O Wave & Heroku and how we can use these two awesome technologies to overcome the hurdles of building sophisticated web apps with zero frontend knowledge. Hope this will be helpful for you!
References:


