

How to Deploy EC2 Instances in Multiple AZs, with a Load Balancer, and SSL Certificate in AWS with Terraform
In this story, we will learn how to build several components to create a good foundation base to deploy high available web applications in AWS.
We will deploy:
- Amazon Linux EC2 Instances in multiple AZs
- An Application Load Balancer (ALB) to distribute the load between these EC2
- ALB Target Group and Listeners for HTTP and HTTPS protocols
- Register DNS Records in Route 53
- Create an SSL certificate using AWS Certificate Manager
If you are interested in deploying similar workloads for internal applications (not accessible from the internet), please look at this story → How to Deploy EC2 Instances with an Internal Load Balancer, and ACM SSL Certificate in AWS with Terraform.
Prerequisite #1: AWS Credentials
Before creating our AWS EC2 Instance, we will need AWS Credentials to execute our Terraform code.
The AWS provider offers a few options for providing credentials for authentication:
- Static credentials
- Environment variables
- Shared credentials/configuration file
For this story, we will use static credentials. Please refer to the “How to create an IAM account and configure Terraform to use AWS static credentials?” story if you need help creating the credentials.
Note: Using static credentials are great for learning and testing; however, hard-coded credentials are not recommended in production environments. Never push hard-coded credentials to code repositories.
Prerequisite #2: AWS Key Pair
We will need an AWS Key Pair, consisting of a public key and a private key. The AWS Key Pair is a set of security credentials that we need to connect to an Amazon EC2 instance.
Amazon EC2 stores the public key on our instance, and we store the private key. For Linux instances, the private key allows us to securely SSH into our instance.
We can create the AWS Key Pair using the AWS Console, AWS CLI, or PowerShell. The instructions are in the “Amazon EC2 key pairs and Linux instances” official documentation.
A better way is using Terraform to create the AWS Key Pair. First, we will need to create a file called “key-pair-main.tf”, and we will add the following code:
# Generates a secure private key and encodes it as PEM
resource "tls_private_key" "key_pair" {
  algorithm = "RSA"
  rsa_bits  = 4096
}
# Create the Key Pair
resource "aws_key_pair" "key_pair" {
key_name = "linux-key-pair"
public_key = tls_private_key.key_pair.public_key_openssh
}# Save file
resource "local_file" "ssh_key" {
filename = "${aws_key_pair.key_pair.key_name}.pem"
content = tls_private_key.key_pair.private_key_pem
}This code will generate an AWS Key Pair, and using the resource “local_file” will save the file to the folder where we run our Terraform code.
Prerequisite #3: Register a Public Zone on AWS Route 53 (optional step required for ACM)
We need a public zone on AWS Route 53 if we want to use AWS Certificate Manager to create and manage our SSL certificates.
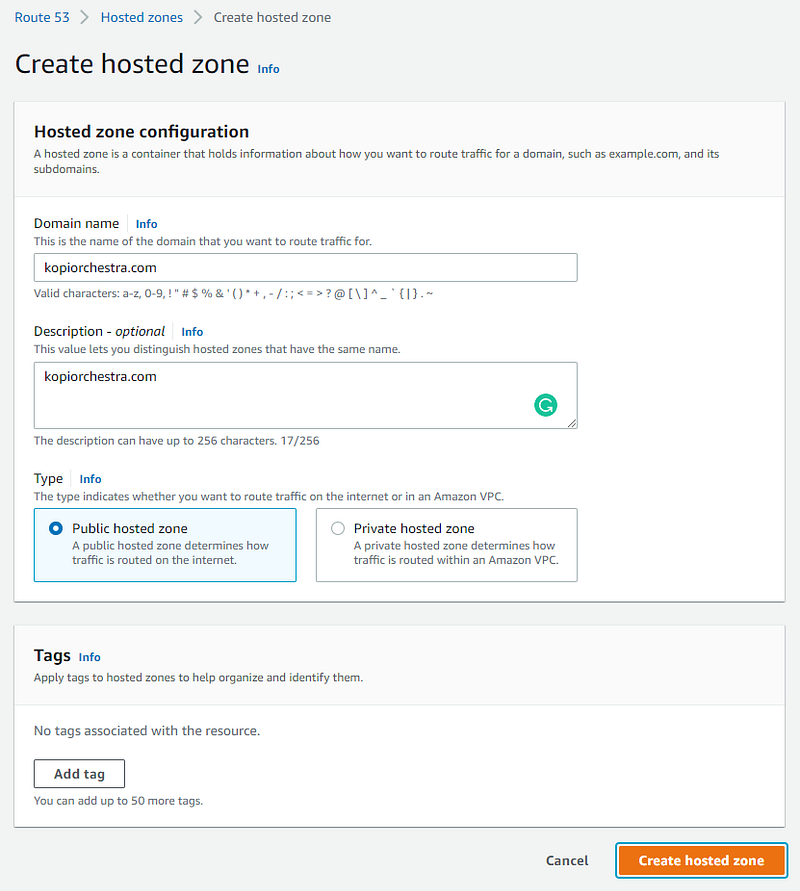
Go to the AWS Route 53 console and create a new Public Hosted Zone:
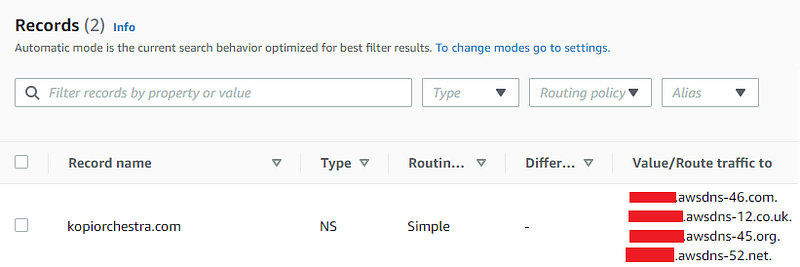
then look at the NS records
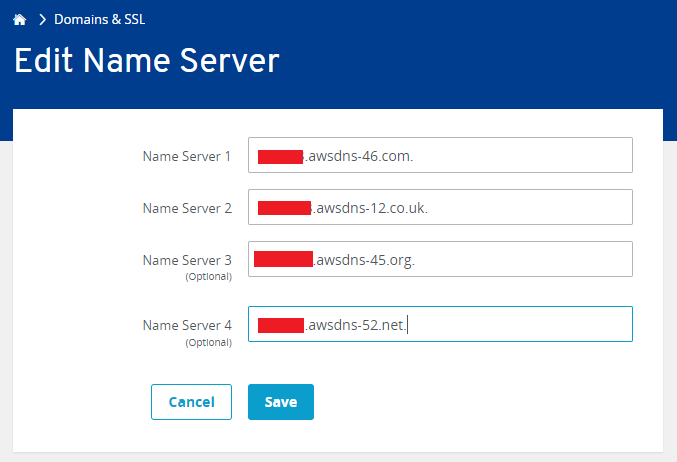
And update our internet provider’s DNS records (this step can vary based on your DNS provider). Depending on our DNS provider, the change will take a few minutes to hours. After that, we will be able to manage our domain from AWS Route 53.
Creating a Terraform file for AWS Authentication
First, we create a “provider-variables.tf” file used by the AWS authentication variables.
We will use an AWS Access Key, AWS Secret Key, and the AWS Region:
variable "aws_access_key" {
  type = string
  description = "AWS access key"
}
variable "aws_secret_key" {
type = string
description = "AWS secret key"
}variable "aws_region" {
type = string
description = "AWS region"
}After that, we edit the file “terraform.tfvars” and add the AWS credential information (we will replace ‘complete-this’ strings with our values at run time):
aws_access_key = "complete-this"
aws_secret_key = "complete-this"
aws_region     = "eu-west-1"
Finally, we create the “provider-main.tf”, used to configure Terraform and the AWS provider:
terraform {
  required_providers {
    aws = {
      source  = "hashicorp/aws"
      version = "~> 3.0"
    }
  }
}
provider "aws" {
access_key = var.aws_access_key
secret_key = var.aws_secret_key
region = var.aws_region
}Creating a Terraform file for the Network
In this step, we will create the file “network-variables.tf” to configure network variables and add the following code:
# AWS AZ #1
variable "aws_az_1" {
  type        = string
  description = "AWS AZ"
  default     = "eu-west-1a"
}
# AWS AZ #2
variable "aws_az_2" {
type = string
description = "AWS AZ"
default = "eu-west-1b"
}# AWS AZ #3
variable "aws_az_3" {
type = string
description = "AWS AZ"
default = "eu-west-1c"
}# VPC
variable "vpc_cidr" {
type = string
description = "CIDR for the VPC"
default = "10.1.64.0/18"
}# Subnet #1
variable "public_subnet_cidr_1" {
type = string
description = "CIDR for the public subnet"
default = "10.1.65.0/24"
}# Subnet #2
variable "public_subnet_cidr_2" {
type = string
description = "CIDR for the public subnet"
default = "10.1.66.0/24"
}# Subnet #3
variable "public_subnet_cidr_3" {
type = string
description = "CIDR for the public subnet"
default = "10.1.67.0/24"
}Then, we create the “network-main.tf” to configure the network and add the following code. This simple code will define 3 AZs, create a VPC, 3 public subnets, an internet gateway, and required routes. This can be easily adapted for 2 AZs, just removing a few pieces of code.
# Create the VPC
resource "aws_vpc" "vpc" {
  cidr_block           = var.vpc_cidr
  enable_dns_hostnames = true
  tags = {
    Name = "kopicloud-vpc"
    Environment = var.app_environment
  }
}
# Define the public subnet #1
resource "aws_subnet" "public-subnet-1" {
vpc_id = aws_vpc.vpc.id
cidr_block = var.public_subnet_cidr_1
availability_zone = var.aws_az_1
tags = {
Name = "kopicloud-public-subnet-1"
Environment = var.app_environment
}
}# Define the public subnet #2
resource "aws_subnet" "public-subnet-2" {
vpc_id = aws_vpc.vpc.id
cidr_block = var.public_subnet_cidr_2
availability_zone = var.aws_az_2
tags = {
Name = "kopicloud-public-subnet-2"
Environment = var.app_environment
}
}# Define the public subnet #3
resource "aws_subnet" "public-subnet-3" {
vpc_id = aws_vpc.vpc.id
cidr_block = var.public_subnet_cidr_3
availability_zone = var.aws_az_3
tags = {
Name = "kopicloud-public-subnet-3"
Environment = var.app_environment
}
}# Define the internet gateway
resource "aws_internet_gateway" "gw" {
vpc_id = aws_vpc.vpc.id
tags = {
Name = "kopicloud-igw"
Environment = var.app_environment
}
}# Define the public route table
resource "aws_route_table" "public-rt" {
vpc_id = aws_vpc.vpc.id
route {
cidr_block = "0.0.0.0/0"
gateway_id = aws_internet_gateway.gw.id
}
tags = {
Name = "kopicloud-public-subnet-rt"
Environment = var.app_environment
}
}# Assign the public route table to the public subnet 1
resource "aws_route_table_association" "public-rt-1-association" {
subnet_id = aws_subnet.public-subnet-1.id
route_table_id = aws_route_table.public-rt.id
}# Assign the public route table to the public subnet 2
resource "aws_route_table_association" "public-rt-2-association" {
subnet_id = aws_subnet.public-subnet-2.id
route_table_id = aws_route_table.public-rt.id
}# Assign the public route table to the public subnet 3
resource "aws_route_table_association" "public-rt-3-association" {
subnet_id = aws_subnet.public-subnet-3.id
route_table_id = aws_route_table.public-rt.id
}(Optional) Creating a Bootstrapping Script
We will use a simple Bash script called “aws-user-data.sh” to install Apache Tomcat on the server and create a simple web page. This extra step is useful to make sure the server is working properly.
Note: this step is optional. If we don’t want to deploy Apache, we will need to remove the user_data line from the “linux-vm-main.tf” file and the HTTP rule in the security group.
#! /bin/bash
sudo yum update -y
sudo yum install -y httpd
sudo systemctl start httpd
sudo systemctl enable httpd
echo "<h1>Test AWS</h1>" | sudo tee /var/www/html/index.html
Creating a Terraform file for Amazon Linux Versions Variables
We will create the “amazon-linux-versions.tf” file, used to store variables for the different versions of Amazon Linux.
data "aws_ami" "amazon-linux-2" {
  most_recent = true
  owners      = ["amazon"]
filter {
name = "name"
values = ["amzn2-ami-hvm*"]
}
}data "aws_ami" "amazon-linux-2022" {
most_recent = true
owners = ["amazon"]filter {
name = "name"
values = ["amzn2-ami-kernel-5*"]
}
}Creating a Terraform file for the Linux VM Variables
Now we will create the “linux-variables.tf” file, used to store variables for the EC2 Instance and the Linux operating system.
variable "ec2_count" {
  type        = number
  description = "Number of EC2 instances to create"
  default     = 2
}
variable "linux_instance_type" {
type = string
description = "EC2 instance type for Linux Server"
default = "t2.micro"
}variable "linux_associate_public_ip" {
type = bool
description = "Associate a public IP address to the EC2 instance"
default = false
}variable "linux_root_volume_size" {
type = number
description = "Volumen size of root volumen of Linux Server"
}variable "linux_data_volume_size" {
type = number
description = "Volumen size of data volumen of Linux Server"
}variable "linux_root_volume_type" {
type = string
description = "Volumen type of root volumen of Linux Server."
default = "gp2"
}variable "linux_data_volume_type" {
type = string
description = "Volumen type of data volumen of Linux Server."
default = "gp2"
}Creating a Terraform file for the Linux VM Main File
Finally, we create the “linux-vm-main.tf” file to build the EC2 Instance. We will split the code for better clarity.
Creating the Security Group for the EC2 Instance
This code section will create the security group that allows incoming SSH, HTTP, and HTTPS connections.
# Define the security group for the Linux server
resource "aws_security_group" "aws-linux-sg" {
  name        = "linux-sg"
  description = "Allow incoming traffic to the Linux EC2 Instance"
  vpc_id      = aws_vpc.vpc.id
ingress {
from_port = 80
to_port = 80
protocol = "tcp"
cidr_blocks = ["0.0.0.0/0"]
description = "Allow incoming HTTP connections"
} ingress {
from_port = 443
to_port = 443
protocol = "tcp"
cidr_blocks = ["0.0.0.0/0"]
description = "Allow incoming HTTPS connections"
} ingress {
from_port = 22
to_port = 22
protocol = "tcp"
cidr_blocks = ["0.0.0.0/0"]
description = "Allow incoming SSH connections"
} egress {
from_port = 0
to_port = 0
protocol = "-1"
cidr_blocks = ["0.0.0.0/0"]
}
}Creating the EC2 Instances
This section of code will create the EC2 Instances. To update the version of Amazon Linux, update the ami line with a variable from the “amazon-linux-versions.tf” file.
Here, we combine the count with the element function to distribute the instances in all public subnets (each associated with a different AZ).
locals {
  ec2_subnet_list = [aws_subnet.public-subnet-1.id, aws_subnet.public-subnet-2.id, aws_subnet.public-subnet-3.id]
}
# Create EC2 Instances
resource "aws_instance" "linux-server" {
count = var.ec2_count ami = data.aws_ami.amazon-linux-2022.id
instance_type = var.linux_instance_type
subnet_id = element(local.ec2_subnet_list, count.index)
vpc_security_group_ids = [aws_security_group.aws-linux-sg.id]
associate_public_ip_address = var.linux_associate_public_ip
source_dest_check = false
key_name = aws_key_pair.key_pair.key_name
user_data = file("aws-user-data.sh")
# root disk
root_block_device {
volume_size = var.linux_root_volume_size
volume_type = var.linux_root_volume_type
delete_on_termination = true
encrypted = true
} # extra disk
ebs_block_device {
device_name = "/dev/xvda"
volume_size = var.linux_data_volume_size
volume_type = var.linux_data_volume_type
encrypted = true
delete_on_termination = true
}
tags = {
Name = "linux-server-${count.index+1}"
Environment = var.app_environment
}
}Creating a Terraform file for DNS Variables
We will create a couple of variables to manage the public DNS name of our load balancer and save it on the “dns-variables.tf” file.
variable "public_dns_name" {
  type        = string
  description = "Public DNS name"
}
variable "dns_hostname" {
type = string
description = "DNS Hostname for load balancer"
}Creating a Terraform file for the Load Balance Main File
Now we will create the “linux-lb-main.tf” file, which will build the load balancer, create DNS records, and the ACM (AWS Certificate Manager) SSL Certificate. We will split the code for clarity.
Creating the Security Group for the Load Balancer
In this section, we will create a security group to allow web traffic to the load balancer on ports 80 and 443.
resource "aws_security_group" "linux-alb-sg" {
  name        = "linux-alb-sg"
  description = "Allow web traffic to the load balancer"
  vpc_id      = aws_vpc.vpc.id

  ingress {
    from_port   = 80
    to_port     = 80
    protocol    = "tcp"
    cidr_blocks = ["0.0.0.0/0"]
  }
ingress {
from_port = 443
to_port = 443
protocol = "tcp"
cidr_blocks = ["0.0.0.0/0"]
} egress {
from_port = 0
to_port = 0
protocol = "-1"
cidr_blocks = ["0.0.0.0/0"]
} tags = {
Name = "linux-alb-sg"
Environment = var.app_environment
}
}Creating the Application Load Balancer
The code below will create a public application load balancer:
# Create an Application Load Balancer
resource "aws_lb" "linux-alb" {
  name               = "linux-alb"
  internal           = false
  load_balancer_type = "application"
  security_groups    = [aws_security_group.linux-alb-sg.id]
  subnets            = local.ec2_subnet_list
enable_deletion_protection = false
enable_http2 = false tags = {
Name = "linux-alb"
Environment = var.app_environment
}
}Creating the Application Load Balancer Target Group for HTTP
The target group is used to route requests to one or more registered targets. In this case, we will attach all EC2 instances created above.
# Create a Load Balancer Target Group for HTTP
resource "aws_lb_target_group" "linux-alb-target-group-http" {
  name     = "linux-alb-tg-http"
  port     = 80
  protocol = "HTTP"
  vpc_id   = aws_vpc.vpc.id

  deregistration_delay = 60
stickiness {
type = "lb_cookie"
} health_check {
path = "/"
port = 80
healthy_threshold = 3
unhealthy_threshold = 3
timeout = 10
interval = 30
matcher = "200,301,302"
}
}# Attach EC2 Instances to Application Load Balancer Target Group
resource "aws_alb_target_group_attachment" "linux-alb-target-group-http-attach" {
count = var.ec2_count target_group_arn = aws_lb_target_group.linux-alb-target-group-http.arn
target_id = aws_instance.linux-server[count.index].id
port = 80
}Creating the Application Load Balancer Listener for HTTP
Before we start using our Application Load Balancer, we must add one or more listeners. A listener is a process that checks for connection requests using the protocol and port that we configure, in this case, the port 80 and HTTP protocol.
resource "aws_lb_listener" "linux-alb-listener-http" {
  depends_on = [
    aws_lb.linux-alb,
    aws_lb_target_group.linux-alb-target-group-http
  ]

  load_balancer_arn = aws_lb.linux-alb.arn
  port              = 80
  protocol          = "HTTP"

  default_action {
    target_group_arn = aws_lb_target_group.linux-alb-target-group-http.arn
    type             = "forward"
  }
}
Creating AWS Route53 A Record for the Load Balancer DNS record
Here, we create a reference to the AWS Route53 Public Zone, and then, using that data, we create a Route53 DNS record for the load balancer.
# Reference to the AWS Route53 Public Zone
data "aws_route53_zone" "public-zone" {
  name         = var.public_dns_name
  private_zone = false
}
# Create AWS Route53 A Record for the Load Balancer
resource "aws_route53_record" "linux-alb-a-record" {
depends_on = [aws_lb.linux-alb] zone_id = data.aws_route53_zone.public-zone.zone_id
name = "${var.dns_hostname}.${var.public_dns_name}"
type = "A" alias {
name = aws_lb.linux-alb.dns_name
zone_id = aws_lb.linux-alb.zone_id
evaluate_target_health = true
}
}Creating the SSL Certificate using ACM
In this step, we will create the SSL certificate and the DNS Records in Route53 for the ACM validation.
# Create Certificate
resource "aws_acm_certificate" "linux-alb-certificate" {
  domain_name       = "${var.dns_hostname}.${var.public_dns_name}"
  validation_method = "DNS"

  tags = {
    Name        = "linux-alb-certificate"
    Environment = var.app_environment
  }
}
# Create AWS Route 53 Certificate Validation Record
resource "aws_route53_record" "linux-alb-certificate-validation-record" {
for_each = {
for dvo in aws_acm_certificate.linux-alb-certificate.domain_validation_options : dvo.domain_name => {
name = dvo.resource_record_name
record = dvo.resource_record_value
type = dvo.resource_record_type
}
} allow_overwrite = true
name = each.value.name
records = [each.value.record]
ttl = 60
type = each.value.type
zone_id = data.aws_route53_zone.public-zone.zone_id
}# Create Certificate Validation
resource "aws_acm_certificate_validation" "linux-certificate-validation" {
certificate_arn = aws_acm_certificate.linux-alb-certificate.arn
validation_record_fqdns = [for record in aws_route53_record.linux-alb-certificate-validation-record : record.fqdn]
}Creating the Application Load Balancer Listener for HTTPS
Finally, we will create a listener for the port 443 and HTTPS protocol to forward traffic to the HTTP target group, and we will link the SSL certificate created in the previous steps.
# Create Application Load Balancer Listener for HTTPS
resource "aws_alb_listener" "linux-alb-listener-https" {
  depends_on = [aws_acm_certificate.linux-alb-certificate]
load_balancer_arn = aws_lb.linux-alb.arn
port = 443
protocol = "HTTPS"
certificate_arn = aws_acm_certificate.linux-alb-certificate.arn default_action {
target_group_arn = aws_lb_target_group.linux-alb-target-group-http.arn
type = "forward"
}
}Creating the Input Definition Variables File
In the last step, we will create the input definition variables file “terraform.tfvars” and add the following code to the file.
Then we add the AWS credentials, and we are ready to go!
# Application Definition
app_name        = "kopicloud" # Do NOT enter any spaces
app_environment = "dev"       # Dev, Test, Staging, Prod, etc
# Network
vpc_cidr = "10.11.0.0/16"
public_subnet_cidr_1 = "10.11.1.0/24"
public_subnet_cidr_2 = "10.11.2.0/24"
public_subnet_cidr_3 = "10.11.3.0/24"# AWS Settings
aws_access_key = "complete-this"
aws_secret_key = "complete-this"
aws_region = "eu-west-1"# DNS
public_dns_name = "kopiorquestra.com"
dns_hostname = "lbtest"# Linux Virtual Machine
ec2_count = 2
linux_instance_type = "t2.micro"
linux_associate_public_ip_address = true
linux_root_volume_size = 20
linux_root_volume_type = "gp2"
linux_data_volume_size = 10
linux_data_volume_type = "gp2"The full code is available at https://github.com/KopiCloud/terraform-aws-ec2-alb-acm
And that’s all, folks. If you liked this story, please show your support by 👏 this story. Thank you for reading!


