

How to Deploy Databricks in Azure with Terraform Step by Step
In this story, we will learn how to deploy Azure Databricks with Terraform step by step.
List of my Azure Databricks-related stories:
- How to Deploy Databricks in Azure with Terraform Step by Step (this story)
- How to Configure Azure Databricks Unity Catalog with Terraform Part 1
- How to Configure Azure Databricks Unity Catalog with Terraform Part 2
- How to Configure Azure Databricks Unity Catalog with Terraform Part 3
- How to Configure Azure Databricks Unity Catalog with Terraform Part 4
1. Intro: What is Azure Databricks, and What is it Used For?
Azure Databricks is a unified, open analytics platform for building, deploying, sharing, and maintaining enterprise-grade data, analytics, and AI solutions at scale.
The Azure Databricks Lakehouse Platform integrates with cloud storage and security in our cloud account and manages and deploys cloud infrastructure on your behalf.
Companies use Azure Databricks to process, store, clean, share, analyze, model, and monetize their datasets with solutions from BI to machine learning.
They use the Azure Databricks platform to build and deploy data engineering workflows, machine learning models, analytics dashboards, and more.
The Azure Databricks workspace provides a unified interface and tools for most data tasks, including:
- Data processing workflows scheduling, and management
- Working in SQL
- Generating dashboards and visualizations
- Data ingestion
- Managing security, governance, and HA/DR
- Data discovery, annotation, and exploration
- Compute management
- Machine learning (ML) modeling and tracking
- ML model serving
- Source control with Git
2. Intro: Azure Databricks Architecture
Azure Databricks operates out of a control plane and a data plane.
The control plane hosts backend services managed by Azure Databricks, and the data plane is all infrastructure managed by us.

- The control plane includes the backend services Azure Databricks manages in its Azure account. Notebook commands and other workspace configurations are stored in the control plane and encrypted at rest.
- Our Azure account manages the data plane and is where our data resides. This is also where data is processed. Use Azure Databricks connectors to connect clusters to external data sources outside of our Azure account to ingest data, or for storage. We can also ingest data from external streaming data sources, such as events data, streaming data, IoT data, and more.
- Our data is stored at rest in our Azure account in the data plane and in our own data sources, not the control plane, so we maintain control and ownership of your data.
3. Prerequisites to Deploy Azure Databricks
Databricks is a very large and complex application, requiring very important prerequisites.
3.1. Azure Subscription
We must have an Azure subscription that isn’t a Free Trial Subscription. If you have a free account, complete the following steps:
Go to your profile and change your subscription to pay-as-you-go.
Also, you need to Remove the spending limit.
3.2. Increase The Number of vCPUs in our Azure region
In a Pay as You Go Azure Subscription, we are limited to 10 vCPUs per region of each type by default.
So, when we want to create a cluster in Azure Databricks, we will get an error message:
This account may not have enough CPU cores to satisfy this request Estimated available: 10, requested: XX
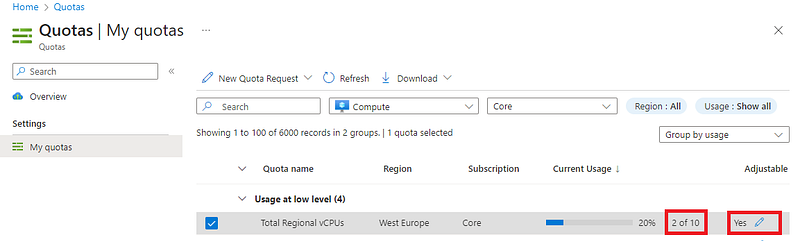
To view the Quotas page, we must sign in to the Azure portal, type “quotas” into the search box, and then select Quotas.
On the Overview page, we select Compute.
On the My quotas page, we select the Region and then unselect All.
In the Region list, we select the regions we want to include for the quota increase request and then select the quota(s) we want to increase.
Click on the Pencil icon to change the number of Cores. Usually, in a few minutes, the change will be approved automatically.
Recommended to increase:
- Total Regional vCPUs to 30
- Standard DSv3, DSv4, or DSv5 family (based on your preference) to 30
4. Creating a Service Principal for Databricks (Optional Step)
Azure Databricks requires lots of permissions to run correctly.
We will provision a new dedicated Azure Service Principal for Terraform in the code below.
Note: this step is optional for a simple test provision of an Azure Databricks Workspace. However, it is recommended for complex deployments such as private endpoint or cluster configurations.
4.1. Variables File
Create a “variables.tf” file and add the following code:
# ------------------------
# Authentication Variables
# ------------------------

variable "aad_tenant_id" {
  type        = string
  description = "The id of the Azure Tenant to which all subscriptions belong"
}

variable "aad_subscription_id" {
  type        = string
  description = "The id of the Azure Subscription"
}

variable "aad_client_id" {
  type        = string
  description = "The client id of the Service Principal for interacting with Azure resources"
}

variable "aad_client_secret" {
  type        = string
  description = "The client secret of the Service Principal for interacting with Azure resources"
  sensitive   = true
}

# -------------------
# Terraform Variables
# -------------------

variable "azure_service_principal_display_name" {
  description = "A display name for the Azure Active Directory (Azure AD) Service Principal."
  type        = string
  default     = "Terraform Databricks"
}
4.2. Provider File
Create a “provider.tf” file and add the following code to configure the Azure AD and Azure providers.
# -----------------------
# Azure Provider - Main #
# -----------------------

# Define Terraform provider
terraform {
  required_providers {
    azuread = {
      source  = "hashicorp/azuread"
    }
    azurerm = {
      source  = "hashicorp/azurerm"
    }
  }
}

# Define Azure AD provider
provider "azuread" {
  client_id       = var.aad_client_id
  client_secret   = var.aad_client_secret
  tenant_id       = var.aad_tenant_id
}

# Define Azure provider
provider "azurerm" {
  client_id       = var.aad_client_id
  client_secret   = var.aad_client_secret
  tenant_id       = var.aad_tenant_id
  subscription_id = var.aad_subscription_id
  features {}
}
4.3. Main File
Create a “main.tf” file and add the following code to create the Azure Service Principal for Terraform. Then, add it to the Owner Role of the Azure Subscription.
Note: In the code below, added an example for the default and other subscriptions)
# Create the Azure Service Principal for Terraform

resource "azuread_application" "this" {
  display_name = var.azure_service_principal_display_name
}

resource "azuread_service_principal" "this" {
  application_id = azuread_application.this.application_id
}

resource "time_rotating" "month" {
  rotation_days = 30
}

resource "azuread_service_principal_password" "this" {
  service_principal_id = azuread_service_principal.this.object_id
  rotate_when_changed  = { rotation = time_rotating.month.id }
}

# Assign the Service Principal to the Core Subscription Owner Role

data "azurerm_subscription" "core" {}

resource "azurerm_role_assignment" "core" {
  scope = data.azurerm_subscription.core.id
  role_definition_name = "Owner"
  principal_id = azuread_service_principal.this.object_id
}

# Assign the Service Principal to the Customer Subscription Owner Role

data "azurerm_subscription" "customer" {
  subscription_id = "complete-this"
}

resource "azurerm_role_assignment" "customer" {
  scope = data.azurerm_subscription.customer.id
  role_definition_name = "Owner"
  principal_id = azuread_service_principal.this.object_id
}
4.4. Output File
Create the “output.tf” file and add the following code:
output "azure_client_id" {
  description = "The Azure AD Service Principal's Application (Client) ID."
  value       = azuread_application.this.application_id
}

output "azure_client_secret" {
  description = "The Azure AD Service Principal's Client Secret Value."
  value       = nonsensitive(azuread_service_principal_password.this.value)
}
4.5. Input Variables File
Create a “terraform.tfvars” file and add the following code to configure the variables of the Terraform code.
# ------------------------
# Authentication Variables
# ------------------------
aad_client_id       = "complete-this"
aad_client_secret   = "complete-this"
aad_tenant_id       = "complete-this"
aad_subscription_id = "complete-this"

# -------------------
# Terraform Variables
# -------------------

azure_service_principal_display_name = "Terraform DBX"
5. Deployment of Azure Databricks Workspace
And here is the code to deploy our first Azure Databricks Workspace:
5.1. Variables File
Create a “variables.tf” file and add the following code:
# ------------------------
# Authentication Variables
# ------------------------

variable "aad_tenant_id" {
  type        = string
  description = "The id of the Azure Tenant to which all subscriptions belong"
}

variable "aad_subscription_id" {
  type        = string
  description = "The id of the Azure Subscription"
}

variable "aad_client_id" {
  type        = string
  description = "The client id of the Service Principal for interacting with Azure resources"
}

variable "aad_client_secret" {
  type        = string
  description = "The client secret of the Service Principal for interacting with Azure resources"
  sensitive   = true
}

# ---------------------
# Application Variables
# ---------------------

# Company name
variable "company" {
  type        = string
  description = "This variable defines the company name used to build resources"
}

# Application name
variable "app_name" {
  type        = string
  description = "This variable defines the application name used to build resources"
}

# Environment
variable "environment" {
  type        = string
  description = "This variable defines the environment to be built"
}

# Azure region
variable "location" {
  type        = string
  description = "Azure region where the resource group will be created"
  default     = "west europe"
}

# Azure short region
variable "shortlocation" {
  type        = string
  description = "Azure region where the resource group will be created"
  default     = "we"
}
5.2. Provider File
Create a “provider.tf” file and add the following code to configure the Azure providers.
# -----------------------
# Azure Provider - Main #
# -----------------------

# Define Terraform provider
terraform {
  required_providers {
    azurerm = {
      source  = "hashicorp/azurerm"
    }
  }
}

# Define Azure provider
provider "azurerm" {
  client_id       = var.aad_client_id
  client_secret   = var.aad_client_secret
  tenant_id       = var.aad_tenant_id
  subscription_id = var.aad_subscription_id
  features {}
}
5.3. Main File
Create a “main.tf” file and add the following code to create the Azure Databricks Workspace.
Note#1: In the code below, we used trial for a test environment. For production environments use the standard or the premium skus.
Note#2: To make the code easy to read, we ignore variables in the naming convention. Refer to the repo for the full code.
# Create the Resource Group
resource "azurerm_resource_group" "this" {
  name     = "kopicloud-dbx-dev-ne-rg"
  location = var.location

  tags = {
    application = var.app_name
    environment = var.environment
  }
}

# Create the Databricks Workspace
resource "azurerm_databricks_workspace" "this" {
  name                        = "kopicloud-dbx-dev-ne-workspace"
  resource_group_name         = azurerm_resource_group.this.name
  location                    = azurerm_resource_group.this.location
  sku                         = "trial"
  managed_resource_group_name = "kopicloud-dbx-dev-ne-workspace-rg"

  tags = {
    application = var.app_name
    environment = var.environment
  }
}
5.4. Output File
Create the “output.tf” file and add the following code:
output "databricks_host" {
  value = "https://${azurerm_databricks_workspace.this.workspace_url}/"
}
5.5. Input Variables File
Create a “terraform.tfvars” file and add the following code to configure the variables of the Terraform code.
# ------------------------
# Authentication Variables
# ------------------------
aad_client_id       = "complete-this"
aad_client_secret   = "complete-this"
aad_tenant_id       = "complete-this"
aad_subscription_id = "complete-this"

# ---------------------
# Application Variables
# ---------------------
company       = "kopicloud"
app_name      = "dbx"
environment   = "dev"
location      = "northeurope"
shortlocation = "ne"
6. Launching Azure Databricks Workspace
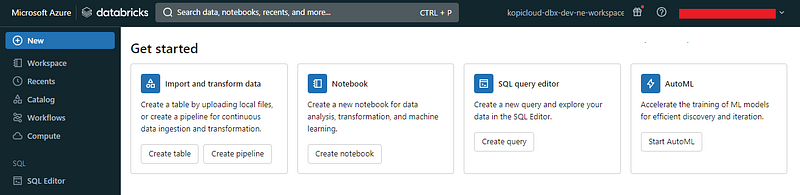
We open the Azure Portal and search for Databricks, and Azure will list all our Databricks deployments. Click on the name of our Azure Databricks Workspace.

We click on the Launch Workspace button to launch our Azure Databricks Workspace:
Note: we can also use the output URL generated during the execution of the Terraform code (step 5.4).

And here is our Databricks Workspace:
Read the next steps in How to Configure Azure Databricks Unity Catalog with Terraform Part 1 here, How to Configure Azure Databricks Unity Catalog with Terraform Part 2 is available here, and How to Configure Azure Databricks Unity Catalog with Terraform Part 3 is available here.
The complete code to provision an Azure Service Principal is available at https://github.com/KopiCloud/terraform-azure-service-principal
The full code to provision an Azure Databricks Workspace is available at https://github.com/KopiCloud/terraform-azure-databricks-workspace
And that’s all, folks. If you liked this story, please show your support by 👏 this story. Thank you for reading!


