
How to Deploy an Existing Application With Vercel
Fast, affordable, and simple

In the last years, we moved from professionals that were skilled in many competencies (full-stack) to focused developers. The limitation of the scope leads to more and more efficient people.
Anyway, while in the past a full-stack was able to build a full project, nowadays a frontend or backend developer finds it difficult to cover all the stack. This is not a real issue in enterprise projects because you have usually a multidisciplinary team where you have all the competencies that you need.
But what for small companies like startups or personal projects?
Well, fortunately, the cloud and new technologies help us. Modern tools offer the opportunity to host and deploy your application with a few configuration clicks, keeping the process smooth and cutting learning time.
In this article, we will learn how to address all these issues with Vercel, a simple and easy-to-use platform that’s suitable for any frontend technologies and supports also serverless functions for implementing the APIs that you need for making your SPA work. This is the roadmap:
- What is Vercel
- Create the project on Vercel
- Fix your project and test it in your local
Let start!
What is Vercel
Vercel is a cloud platform designed for frontend developers that enable developers to host websites and apps that deploy instantly, scale automatically, and require no human effort for maintenance. Vercel has also a free tier that let you start without any costs and offers the opportunity of deploying serverless functions for implementing your backend (included in the free tier).
Other advantages of using Vercel:
- one-click deployment from any GitHub repository (public or private)
- a free tier with the built-in option to host a backend
- custom domain names available in the free tier
- DevOps included: each push into your repo starts the build process and deploys the app automatically
- Marketplace to integrate third-party services (like database, or SMTP services)
Cool, not? Let’s see how to deploy an application on it.
Create the project on Vercel
First of all, you have to create an account. Then, if you start a project from scratch, Vercel itself can initiate a repository using one of the templates on its catalogue. However, it is quite common to be in a situation where you already have a project and you want to deploy it on Vercel. No problem: we will see the process in this article.
The next step is to create a project. In my case, I used the name crudit-demo because this is the public demo of CrudIt, my Nodejs framework for implementing the backend without being a backend developer.
Once you create a project, you will see a page like this one:
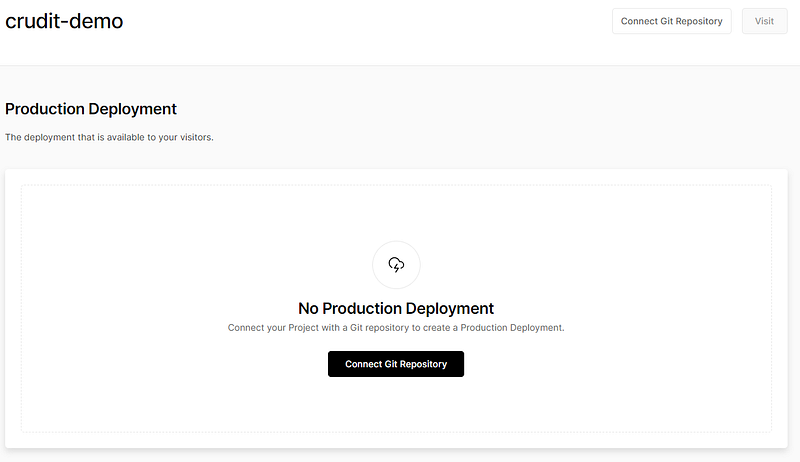
As told in the image before, you need to connect your repo before starting the deployment. This is quite easy: just click the “Connect Git Repository” button. You will be asked to give permission to see your repositories (you can allow them one by one or at all), and then you will see something like this in the following picture:
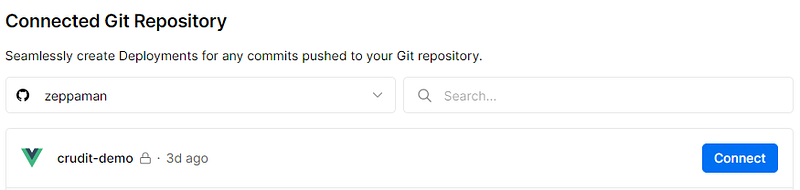
As you can see from the previous picture, Vercel understands the project type (see the Vue icon near the project name) and you have only to click connect. Then you will see the deploying and when done you will have something like in the following screenshot:

Your website or app is now online and can be visited! Anyway, most applications need a few additional configuration steps that we will see in the next section. Moreover, it is not told that your application is 100% compatible with Vercel deployments: in this case, you can debug it in your locally using the Vercel cli. We will see also this in the next sections.
Vercel panel overview
In this section, I will show a set of common sections of the admin panel that you may need to know.
Deployments
In this section, you will see the history of all the deployments that you have done. One by one, you can read the compilation log and see the status (each deployment is related to the source code that originates it).

If you click on the deployment section, you will land on a page showing the building details. Moreover, as you can see from the next image, you can see the list of URLs connected with the app. Each deployment has its own URL and in addition, you can add how many custom domains you want.
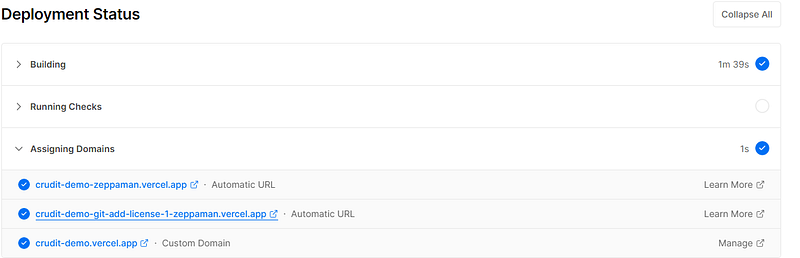
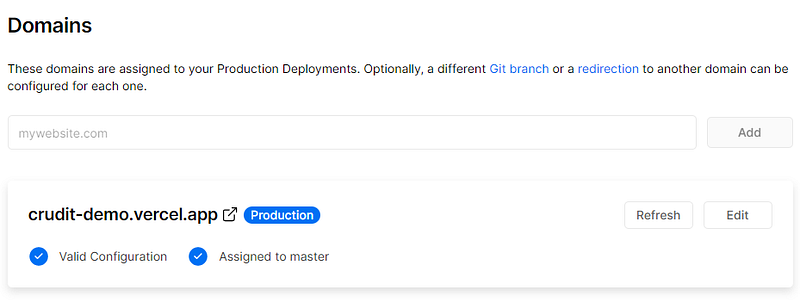
The list of domains can be changed by the “Domains” section. In my case, I have the default one which is a third-level domain under vercel.app the name of the project. Domain with the deployment name and the git repo name is added automatically (see the one marked as “automatic URL” in the previous image).
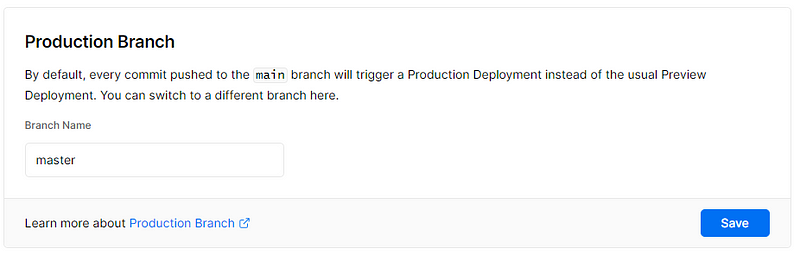
If you have multiple branches you can define what is the branch that originates new deployment in your app. See this configuration in the next picture:
At the beginning of the article I talked about the serverless function: well, you can choose the location where they are running for accomplishing legislative needs such as GDPR or nearest to the user.

Finally, most applications need different settings based on environments for the compilation process and at runtime. It can be some parameters about the API's backend for the frontend SPA, or the database connection string for the function. Vercel support variables natively: you have to enter it like in the next picture:
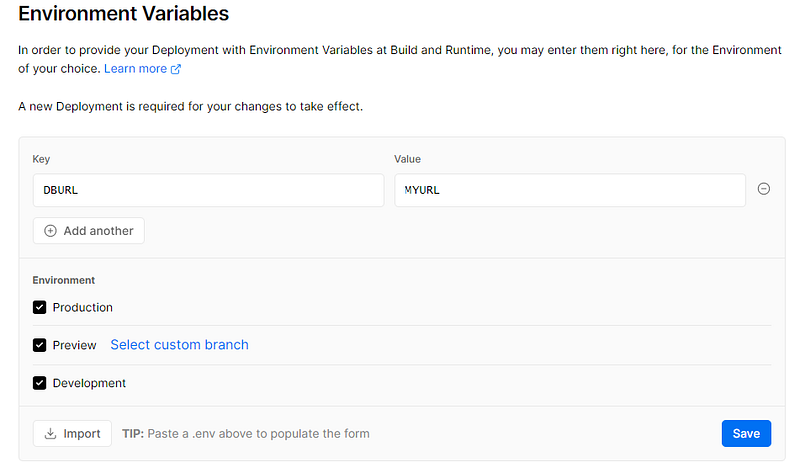
In the previous image, we have a DBURL variable with a value MYURL that is valid for all environments. In case you have a ready-to-go .env file, you can import it.
Of course, you can edit these values at any time by clicking on the pencil. You will see something like this in the following picture:

Well, now that everything about the configuration is clear, let’s see how to configure the project in your locally!
Fix your project and test it in your local
Vercel offers a cli that connects with your cloud account and emulates the working behaviour that you will have in the cloud. To do this, start by downloading and installing the cli:
npm i -g vercel
Now we can move into the project folder and run:
vercel dev
The command is an interactive process and requires login. At first execution, you will be asked to link your local folder to a remote project with a prompt like an image below.

Then you have to select your project scope and finally, you can enter the project name to link with the one previously created from UI.

As the last step, we can create the .env file based on the configuration we had for development environments. This can be done by typing:
vercel env pull devThe result is the creation of a .env file confirmed by this message.

Now you are ready to run your application locally and start debugging!
Wrap-up
In this article, we discovered what is Vercerl and how it helps us make the deployment process smooth.
Moreover, we had now an opportunity of hosting our application at affordable costs.
The Vercel adoption is really easy and can be applied also to an existing project, this tutorial is the proof.


