How to Deploy a Secure API with FastAPI, Docker and Traefik
A guide to configuring HTTPS

When we deploy an API to serve a machine learning model, we rarely care about that green padlock that makes the HTTP connection supposedly safe and the browser happy.

We usually take HTTPS for granted, and we may think that it just can be turned on with some easy configuration.
The truth is, adding HTTPS requires a few steps.
And that’s what this post is for: explaining why HTTPS matter and how you can add it as part of your deployment when you build web apps and APIs in Python.
Here’s what we’ll cover in this post:
- A brief introduction to HTTPS: how does it work and why you should care about it?
- Building an API with FastAPI
- Introducing Traefik and how it can handle HTTPS
- Integrating FastAPI with Traefik via Docker
- Deploying on AWS
This guide will ultimately help you add HTTPS to your projects. You can reuse the following code to build secure projects.
Without further ado, let’s jump right in 🚀
PS*: this code is available on Github.
PS**: if you want to learn more about FastAPI, Docker and Github Actions, make sure to have a look at my previous post.
What you need to have to reproduce this tutorial
- A registered domain name. You can buy one on Namecheap for a few bucks
- Docker and docker-compose installed on your local machine: you can follow the official documentation
- A remote server to deploy the API: I’m using a
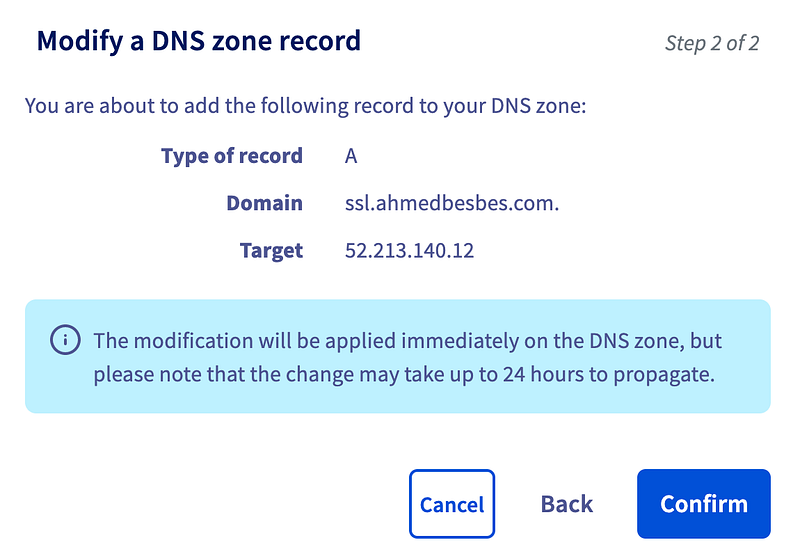
t2-mediuminstance on AWS EC2. Anything equivalent should be good as well. Make sure this instance has a fixed IP address. - On your domain provider, create an A record that points to the instance’s IP address. I currently own ahmedbesbes.com and for this tutorial, I created the following A record: ssl.ahmedbesbes.com. You can do the same with your domain by picking any subdomain you want. Here’s what it looks like on OVH’s interface (OVH is my domain’s provider)
What is HTTPS and why should you care about it?
HTTPS is HTTP over an encryption protocol. This protocol is called Transport Layer Security (TLS) and it was formerly known as Secure Sockets Layer (SSL).
In other words, HTTPS is encrypted in order to increase the security of data transfer.
How does it work?
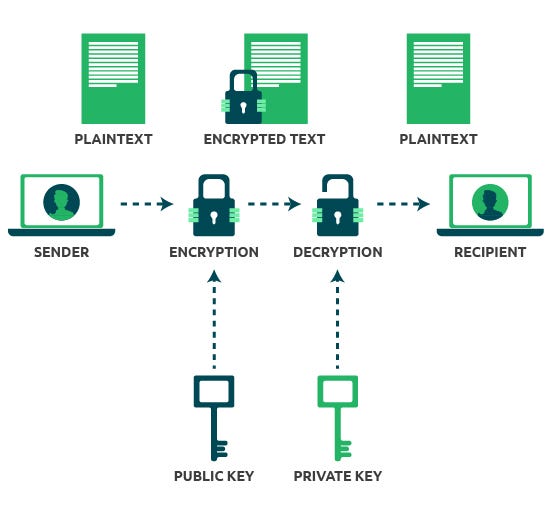
TLS, the protocol behind HTTPS, uses an asymmetric public key infrastructure. This system uses two different keys to encrypt communications between two parties:
- A private key 🔐: this key is controlled by the owner of the website, it’s kept private and lives on the remote web server. It’s used to decrypt the information encrypted by the public key
- A public key 🔑: this key is used by anyone who wants to interact with the server in a secure manner. This key’s role is to encrypt data that the private key will later decrypt.
Why do we need HTTPS?
HTTPS is a very useful protocol. You need it for 3 main reasons:
- Privacy: So that no one can intercept or eavesdrop on your message (a message can be a text you post to your friend, a credit card information you fill in a form, an image, a video, or anything you upload through the network). When sent through HTTPS, this data is encrypted, i.e. turned into a long alphanumerical string.
- Integrity: So that the message you send is not manipulated in any form on the way to its destination.
- Authentication: So that the remote server you request is sure that you are the one who you claim to be
Besides adding a security layer to your app, HTTPS is a pledge for good-quality software practices. This is very important to build a trusted user base.
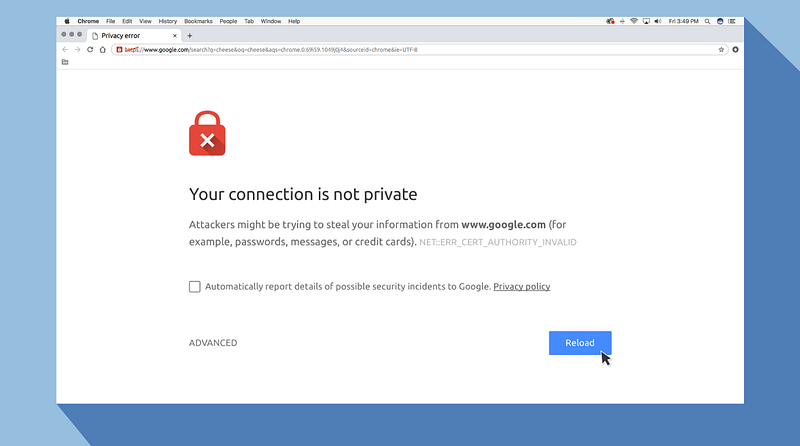
HTTPS is taken very seriously by major internet players. As a matter of fact, Google announced in 2014 that having HTTPS will increase your ranking in the search results. Google has also made Chrome flag any website without HTTPS as insecure.
Time to add HTTPS to your apps now!
Building a minimal API with FastAPI
In this section, we’ll get FastAPI up and running on a very simple example. We’ll see next how to secure it.
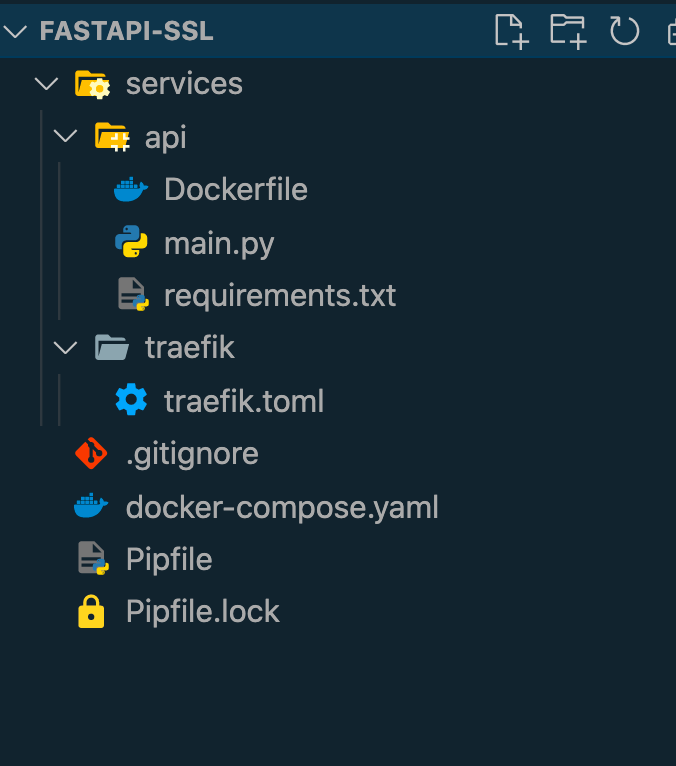
Before going into the code, here’s what the project structure looks like:
Let’s start by creating a virtual environment:
mkdir fastapi-ssl && cd _
pipenv install fastapi
Nothing really fancy, we’ll create an API that has two routes:
- one that handles GET requests and displays the following JSON response on the browser
{"message": "Hello FastAPI + SSL"}- another one that handles POST requests. This route expects a body containing two keys:
textandauthorand sends a JSON object back as a response with the sametextandauthoralready sent and an additionalstatusmessage.
{"status": "message received", "text": "Hello", "author": "Ahmed"}The following code defines these two routes.
Check this post to learn more about building APIs with FastAPI.
What is Traefik and how can it help with HTTPS?
Before packaging the app with Docker, let’s introduce Traefik.
Traefik is an open-source reverse proxy and load-balancer for HTTP and TCP-based applications that is easy, dynamic, automatic, fast, full-featured, production-proven, provides metrics, and integrates with every major cluster technology…
Traefik’s goal is to intercept incoming HTTP requests from the internet and route them towards the dedicated containers that are run by Docker. It can attach any DNS record to the running services.
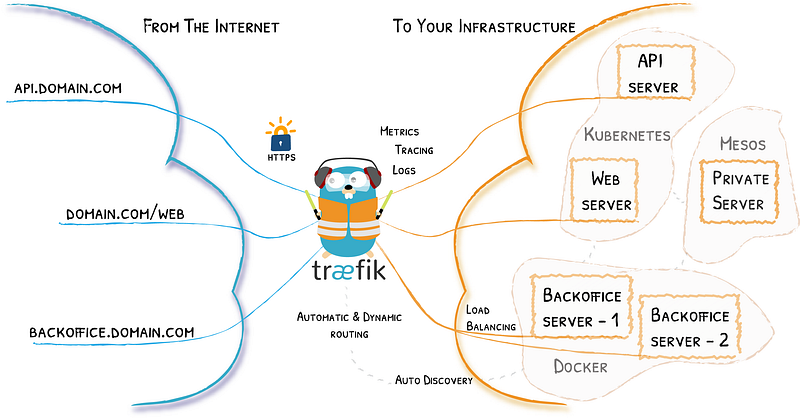
Traefik is cloud-native. This means that it integrates easily with cloud technologies such as Docker and Kubernetes. In this tutorial, we’ll link Traefik to Docker.
The cherry on top: Traefik has automatic support for Let’s Encrypt certificates. This means that it automatically handles the creation and the renewal of these files for you to ensure that HTTPS is properly configured.
What’s Let’s Encrypt?
Let’s Encrypt is a free, automated, and open certificate authority (CA), run for the public’s benefit. It is a service provided by the Internet Security Research Group (ISRG).
Let’s Encrypt is an organization that will issue free SSL certificates for us.
What is an SSL certificate?
An SSL certificate is what allows a website to have HTTPS.
It’s a file that’s kept on the remote server where your app is deployed. It makes SSL/TLS encryption possible and holds information such as the public key and the website’s identity.
When a client (your browser for example) attempts to connect to a secure website, it first gets a copy of this certificate. This allows the client to check the identity of the remote server and to get the public key in order to start an encrypted session.
Set up Traefik for HTTPS
Let’s start by configuring Traefik. This can be done using the following TOML file. This file will be located inside services/traefik
Let’s detail what happens in each of these sections:
[entrypoints]
This section specifies the ports that Traefik will listen to. These ports are 80 and 443. 80 is the default HTTP port and 443 is the HTTPS port. We’ll call them web and websecure respectively.
Then, we tell Traefik to redirect HTTP to HTTPS.
[accessLog]
This section tells Traefik to print out the logs to stdoutto know who calls whom.
[providers]
In this section, we configure the so-called providers.
Providers are infrastructure components, whether orchestrators, container engines, cloud providers, or key-value stores. The idea is that Traefik queries the provider APIs in order to find relevant information about routing, and when Traefik detects a change, it dynamically updates the routes.
We want Traefik to act as a proxy in front of Docker containers, so we’ll simply pick Docker as one of the providers.
Setting exposedByDefault to false simply means that Traefik will not act as a proxy in front of all containers. It’ll only act so in front of those who have specific labels that are described in docker-compose. (we’ll cover these labels in the Docker part below)
[certificatesResolvers.letsencrypt.name]
This section configures the certificates resolver. In other words, Traefik will communicate with Let’s Encrypt via the ACME protocol: to do that, you’ll have to set a valid email address and a filename where Traefik will save the information it receives from Let’s Encrypt. When Traefik communicates with Let’s Encrypt, certificates can be successfully generated and renewed.
Preparing deployment with Docker
In this section, we define two containers inside a docker-compose file: a container for our FastAPI web service and another one that launches Traefik.
Note that you can have multiple containers running different services to whom Traefik will route the traffic.
Let’s detail what happens in each container:
— api
We first start by building the image by referencing the path to the following Dockerfile:
Then, we define docker labels that will be read by Traefik
traefik.enable=trueensures that Traefik sees this container and routes traffic to it- The other labels define the DNS record that points to the container (ssl.ahmedbesbes.com, i.e. the domain I set up for this API). They also tell Traefik to use TLS and to resolve the certificates with Let’s Encrypt.
— traefik
We first pull the image from the official registry.
We map the ports 80 and 443 on the container to the ports 80 and 443 on the host.
We define three volumes:
- The first volume makes Traefik aware of other containers
- The second volume passes the Traefik configuration file to the container
- The third volume keeps the generated certificates on the host so that they are not regenerated every time the container restarts. This is important because Let’s Encrypt has a limit on the number of certificates that you can acquire
Deploy on AWS
Make sure everything is working locally, connect to the VM, clone the repo and run the following command at the root:
docker-compose up --build -dTo make the deployment smooth with Github Actions, have a look at my previous post.
Resources
Here’s a compiled list of the resources I used to learn about HTTPS, Traefik and deploying FastAPI applications with Docker.
Don’t hesitate to let me know about other resources you found useful in this area 😉
https://www.cloudflare.com/fr-fr/learning/ssl/what-is-https/
Thanks for reading 🙏
Let’s wrap it up. This post was an opportunity to:
- learn about HTTPS and what it brings to the table
- learn more about Traefik and how to use it as a reverse proxy to create an HTTPS connection
- use Docker to deploy and manage FastAPI with Traefik
I hope this was a good starting point to implementing HTTPS into your projects.
Again, the code is available on Github: feel free to use it as is or modify it for projects of yours.
That’s all for me now, see you next time!