How to Deploy a Machine Learning Model with FastAPI, Docker and Github Actions
An end-to-end pipeline with a CI/CD

You’re a data scientist and you work at a software company.
You’ve just trained a model and you’re happy with it because it performs well on your local cross-validation.
Now is the time to put this model into production so that other teams within your organization can consume it and embed it in their applications.
This is a very common situation that data scientists face. It can be cumbersome and painful to manage but with the right tools, the process can go smoothly.
In this tutorial, I will present an end-to-end use case to explain the workflow of putting a model to production. This is a relatively long post so feel free to skip to the parts you’re interested in.
Here’s what we’ll cover:
- Introduction to production machine learning and APIs
- A quick overview of FastAPI features
- Using FastAPI and SpaCy to build an inference API
- Packaging the API with Docker and docker-compose
- Deploying the API to AWS EC2 and automating the process with a Github Actions CI/CD
I hope you're ready. Without further ado, let’s jump right in 🚀.
PS: all the code is available on Github.
New to Medium? You can subscribe for $5 per month and unlock an unlimited number articles I write on programming, MLOps and system design to help data scientists (or ML engineers) produce better code.
What does it mean to put a model in production?
Let’s start with a common ground before we go any further.
Broadly speaking and without going into many details, putting a model in production is a process in which a model is integrated into an existing IT environment and made available to other teams to use and consume.
To make this process as efficient as possible, many steps should be carefully managed: data storage, serving, artefacts logging, resource management, to name a few.

If your model never leaves your local computer and all your experiments are floating around in jupyter notebooks, you’re most likely not ready for production.
No worries though. This tutorial is meant to help your start putting your models to production with APIs.
What exactly is an API?
It’s short for Application Programming Interface. It’s simply an intermediary between two independent applications that communicate with each other.
If you’re a developer and want to make your application available for other developers to use and integrate with, you build an API that acts as an entry point to your app. The developers will therefore have to communicate with this API through HTTP requests to consume and interact with your service.
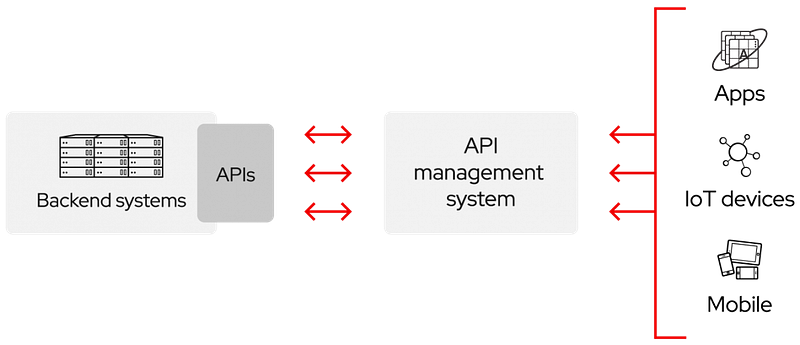
Think of APIs as an abstraction of your app (the users don’t see your code and don’t install anything, they simply call the API) and a simplification of the integration with third parties (developers, apps, other APIs, etc.)
APIs are used everywhere. The data science world is no exception.
What is FastAPI and why is it suited to production machine learning?
FastAPI is currently the go-to framework for building robust and high-performance APIs that scale in production environments.

FastAPI has gained a lot of popularity lately and saw a huge increase in user adoption among web developers but also data scientists and ML engineers.
Let me explain all the hype surrounding this framework by presenting the most interesting features I can think of.
Then, we’ll move to the part where we use FastAPI on a specific use case.
PS: This list is not exhaustive and if you want to have a global overview, you can refer to the official documentation.
1) A simple syntax
FastAPI’s syntax is simple and this makes it fast to use. It actually resembles Flask’s syntax: so if you’re thinking about migrating from Flask to FastAPI, the transition should be easy.
Instantiating Flask and FastAPI apps is merely the same. However, unlike Flask, FastAPI doesn’t come with an integrated webserver. FastAPI is specifically designed to build APIs. It has no the responsibility to serve them.
FastAPI does one thing and it does it well.
Serving the API is uvicorn’s responsibility which is a good choice given that uvicorn is a lightning-fast ASGI server implementation, using uvloop and httptools.
Flask:
FastAPI:
Defining routes for HTTP requests and attaching handlers to them follow the same syntax in both libraries. You use decorators.
The syntax is even simpler with FastAPI: you have a decorator for each specific HTTP request, unlike Flask where you pass the request type as an argument to the route decorator.
Flask:
FastAPI:
In both Flask and FastAPI, path parameters are parsed from the path we pass to the route. With FastAPI, we add these parameters as arguments to the function. I personally find FastAPI’s syntax in this particular situation simpler to read and understand.
Flask:
FastAPI:
Extracting query parameters is a lot easier in FastAPI: you just mention them as arguments of the handler and FastAPI will take care of the rest: it parses them from the route and cast them to the type you indicated.
When using Flask, you’d have to call the request class, get each argument individually and apply some eventual post-processing.
Flask:
FastAPI:
For a quick introduction to FastAPI’s syntax, have a look at this link.
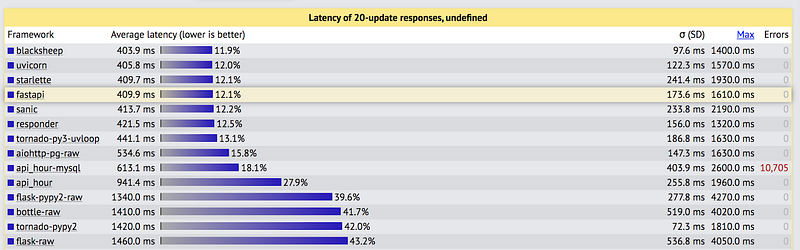
2) A blazing-fast framework
According to techempower, an independent website that benchmarks web servers by running a variety of tests on them, FastAPI+uvicorn is one of the fastest web servers.
This is a performance comparison executing fundamental tasks such as JSON serialization, database access, and server-side template composition. Each framework is operating in a realistic production configuration.
3) Asynchronous requests
FastAPI brought to the table a new feature that previous web frameworks such as Flask and Django were lacking: asynchronous requests.
Asynchronous programming is a pattern of programming that enables code to run separately from the main application thread. Asynchronous programming is used in many use-cases such as event-driven systems, highly scalable apps, and I/O bound tasks such as reading and writing files through the network.
If you use an asynchronous function in your handler, you’ll have to add async to the handler and add the await argument before calling that function.
You can learn more about asynchronous programming here.
4) Modern python typing with Pydantic
FastAPI integrates with Pydantic under the hood to type requests and responses body with standard python types.
This enforces validation at runtime and improves your coding productivity by allowing your IDE to auto-complete properly and detect type-related errors.
In the following example, we design a small API to post job applications and receive random decisions. The request’s body follows the schema defined in the Application class. It simply means that it must have:
- a
first_namekey of type string - a
last_namekey of type string - an
agekey of type int - a
degreekey of type string - an optional
interestkey of type string
Similarly, you can type the API response with the schema defined in the Decision class.
Now how is this useful?
Imagine that you accidentally passed an integer to the first_name field. FastAPI will detect a type mismatch and will raise an error accordingly.
You can learn more about more Pydantic here.
5) Validation of string query parameters
FastAPI allows validating user inputs by adding constraints on string query parameters. You can for example set a maximum or a minimum length or set a regular expression that the query must match.
You can learn more about string validations here.
6) Validation of numerical parameters
Similarly, when using the numerical parameters, you can set a range as a constraint by using the gt (greater than) and le (lower or equal than).
You can learn more about numeric validations here.
7) Better error handling and custom messages
With FastAPI, you can define and raise custom errors with a specific message and status code. This helps other developers easily understand the errors and debug while using your API.
You can learn more about error handling here.
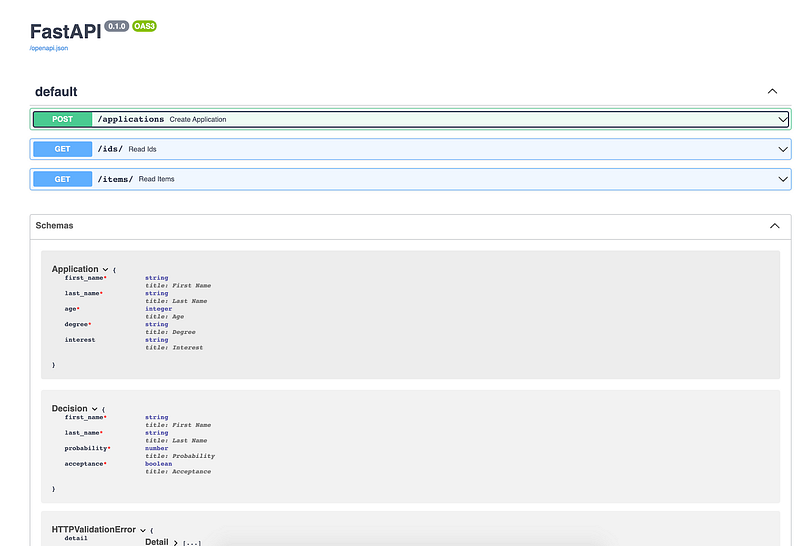
8) Automatic doc generation following OpenAPI standards
Once you start playing with FastAPI, interactive API documentation and exploration is automatically generated for you.
You can access it via this linkhttp://localhost:8000/docs after starting the API locally.
You’ll see the documentation for every route you created as well as an interactive interface where you can test each endpoint directly from the browser.

9) A world-class documentation to learn and start using the framework
I’ve rarely seen such complete and easy-to-follow documentation. FastAPI’s team, led by Sebastián Ramírez, has made amazing work documenting every piece of code.
You can start learning how to use FastAPI here, and quite frankly there’s no better alternative.

Create an anonymization API with FastAPI and Spacy
Let’s get to the interesting part.
In one of my previous posts, I built a Streamlit app that anonymizes text by detecting named entities with SpaCy models. To use this app, you’d have to open up a browser and interact with the UI.
BUT,
What if we could create an API endpoint that does the same thing so that developers can interact with this program easily without using the UI?
This looks like a perfect job for FastAPI.
Here’s a diagram that represents the schema of the API we’ll be building:

We’ll define one route only that will accept POST requests on the path /entities and it will expect a request body containing three fields:
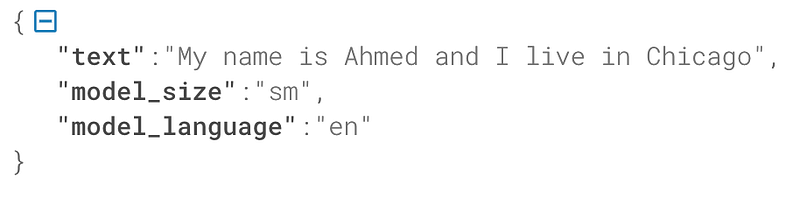
- text: the text to anonymize
- model_size: the size of the NER model (defaults to “sm”)
- model_language: the language of the NER model (defaults to “en”)
As output, the API will return a JSON object containing two keys:
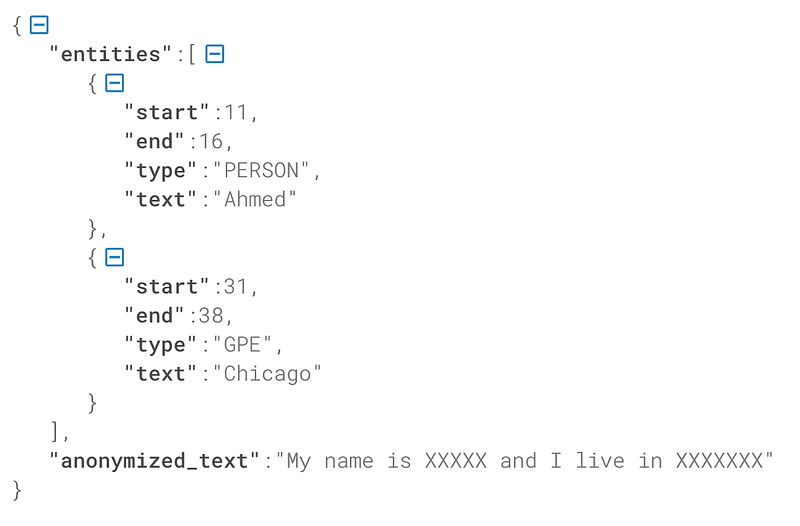
- entities: a list of extracted entities. Each entity is a JSON containing four keys (start: the start index of the entity in the text, end: the end index, type: the type of the entity, text: the value of the entity)
- anonymized_text: the original input text with the entities anonymized
To set the types of both the request and the response body, we will use, as you expect, Pydantic.
- For the request’s body, we define the
UserRequestInas a subclass of the BaseModel class. It’ll have three attributes:text,model_languageandmodel_size. I could’ve set the types ofmodel_languageandmodel_sizeto string, but, for the sake of this tutorial, I defined two classes for them: ModelLanguage and ModelSize. These two classes inherit fromstrandEnum. The idea of using Enum is to limit possible values for each of the fields. For the language, we want English (“en”) and French (“fr”) only, and for the size, we want three possible values (“sm” for small, “md” for medium, and “lg” for large). - As for the response’s body, we define the
EntitiesOutclass, again as a subclass of BaseModel. It will have, as shown in the previous screenshot of the response’s body, two keys: entities and anonymized_text. anonymized_text is a string but entities is a List of EntityOut objects. EntityOut is simply a BaseModel class that represents the schema of each entity: it’ll have four fields: start (int), end (int), type (str), and text (str).
As you see, it’s very intuitive to use Pydantic to build custom types for your requests and responses. You can get even more creative by composing and combining other complex types.
Now that data models are created, we can start building the API: for starters, we load the language models with Spacy. These models will be saved in the ml/models/ folder.
Then, we’ll define the API route and the handler.
A few things are happening here:
- Inside the decorator
@app.post, we set the path toentities/and we set theresponse_modelargument toEntitiesOut. Here’s where FastAPI forces the response’s body to follow the schema declared with Pydantic in theEntitiesOutclass. - The first argument of the handler is the request’s body: we set its type to
UserRequestInto force input validation. - The remaining is pure python code: we extract the data, call the model and anonymize the detected entities.
- A dictionary is returned at the end with two keys: entities and anonymized_text.
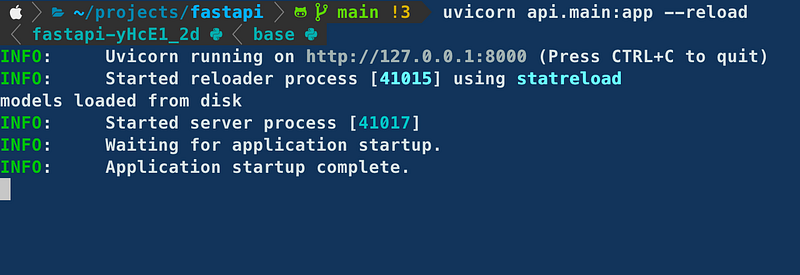
Now everything should be ready to run locally. Go in the root of the project, and run uvicorn api.main:app --reload

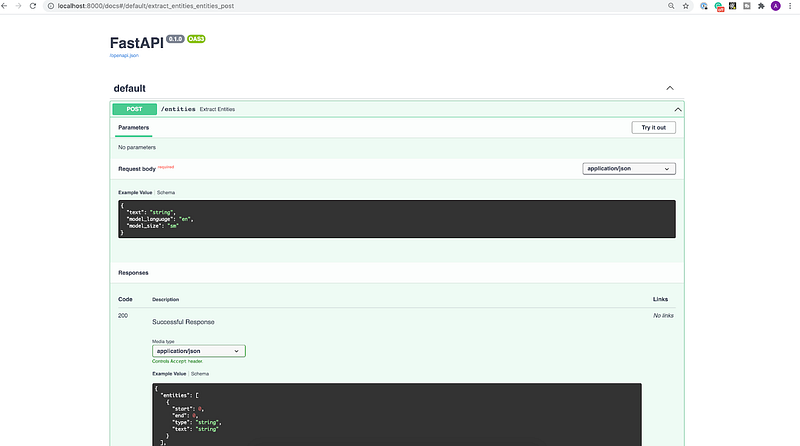
To check that the API is working, you can open http://localhost:8000/docs to see the interactive interface where you can try the API from the browser.
Package the API with Docker
Now that the API is working locally, we can build a Docker image to package its dependencies and run it in an isolated execution environment, aka a container.
You can think of containers as virtual machines even though they don’t offer as strict isolation as VMs.
A Docker image is defined by theDockerfile which is basically a set of instructions for Docker to build the image.
Images are usually built on top of other base images. These images can be pulled from Docker Hub, an equivalent of Github, but for Docker images.
Here’s the Dockerfile of our API. It’s contained in the root of the project.
Let’s detail what happens, line by line:
- We indicate the base image we start from
python:3.7. Docker pulls it from the central repository upon building the image. - Python dependencies (fastapi, uvicorn and spacy) are installed using
pipinside the image. - We copy the content of the
api/folder (from the host) to the/api/api/folder (on the image) PS: this folder is created automatically in the image - We set the PYTHONPATH variable to
/api - We set the working directory for the subsequent CMD command. It simply means that the last line of the Dockerfile will be executed from the working directory.
- We indicate to Docker that the container will listen at port 8000 at runtime.
ENTRYPOINTallows configuring a container that will run as an executable.- We set the command to be executed (we’ll omit the
uvicorncommand since it’s been declared as an entry point.
Now we’ll define a docker-compose that will create a service for our API. I could have just used a Dockerfile only because docker-compose is a tool for defining multi-container applications and we have one container so far.
But for the sake of this tutorial, let’s see how it’s done: in general, you may want to have multiple services running in separate containers and docker-compose is a great tool for combining them together.
We create a docker-compose.yaml file again at the same location.
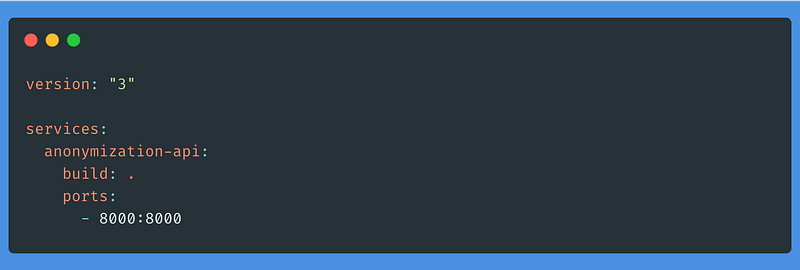
Inside this file, we set the version of docker-compose to 3 (the latest). We give a name to our service (anonymization-api ), we set the path to the Dockerfile for the build step and we map the port 8000(on the container) to the port 8000 (on the host).
Finally, we run this command that will serve the API inside the container and make it accessible from the host.
docker-compose up --buildLaunch and configure an EC2 instance on AWS
Let’s create an EC2 instance where we’ll deploy the API with Docker.
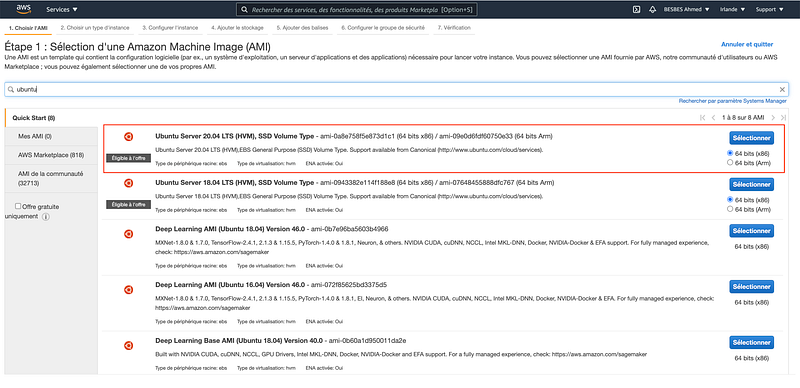
- First, connect to your AWS account, go to the EC2 section and pick a distribution. I recommend Ubuntu 20.04 LTS for this tutorial.
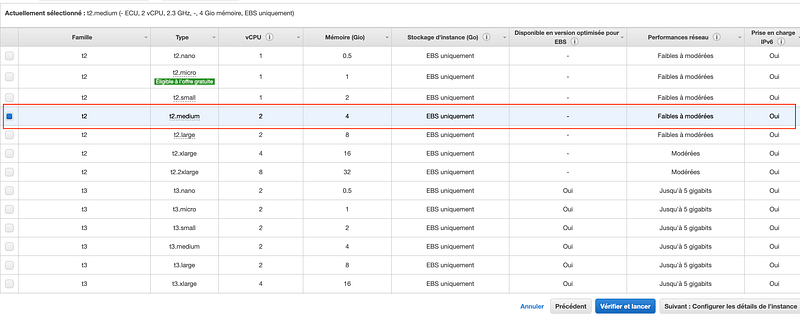
- Pick an instance: we’re not gonna go crazy here. We’ll just pick a relatively small one: a
t2.medium.
- Now launch the instance.
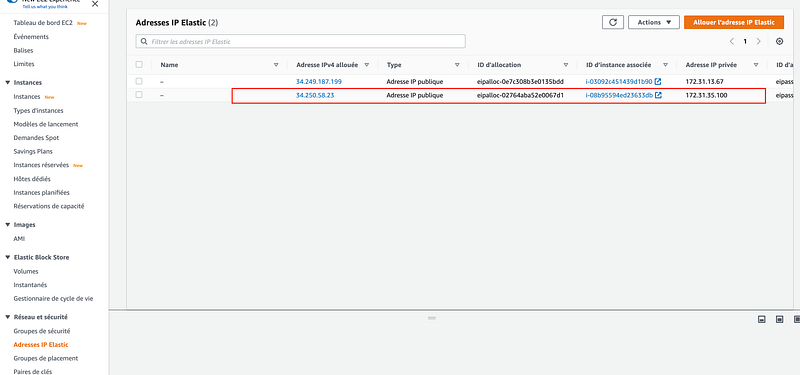
- Create an elastic IP address and associate it to the running instance. This way this IP won’t change every time we restart the instance.
- Add a new security group (I named it fastapi) to allow inbound traffic on port 8000.

- Then, add it to the instance security groups:
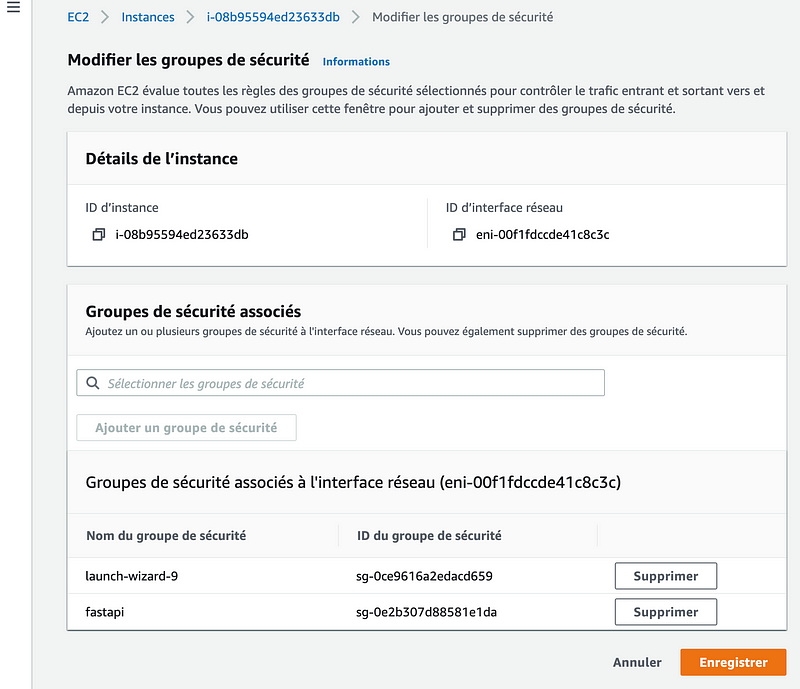
Now the instance is ready to accept requests on port 8000.
- SSH into it using your terminal.
- Install
dockeranddocker-composeby following the official Docker documentation for ubuntu - Generate an ssh key and add it to your Github account so that it can perform git clones seamlessly (we’ll use this in the following section)
Create a deployment workflow on Github Actions
Github Actions is Github’s CI/CD service. It allows you to automate testing, building and deploying applications based on events such as git commits, merges or pull requests.
To learn more about Github Actions, have a look at this link.
To add a workflow in your repo, click on the Actions tab.

Then, click on setup a workflow yourself.
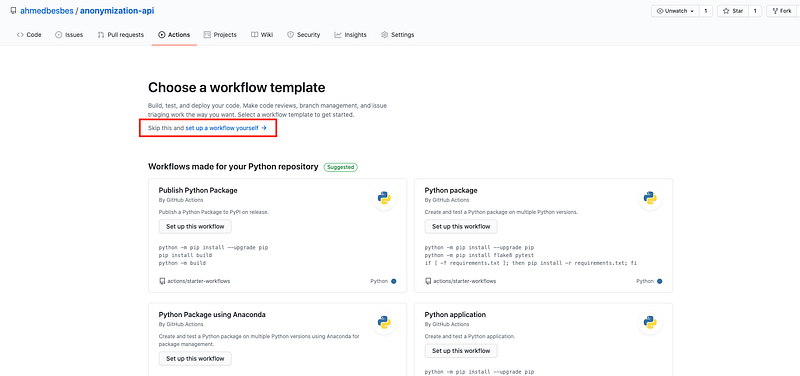
A YAML file will be automatically created inside a workflowsfolder which will be created in a .github folder at the root of the repo.
In our case, we will set the workflow to be triggered on push requests only on the main branch.
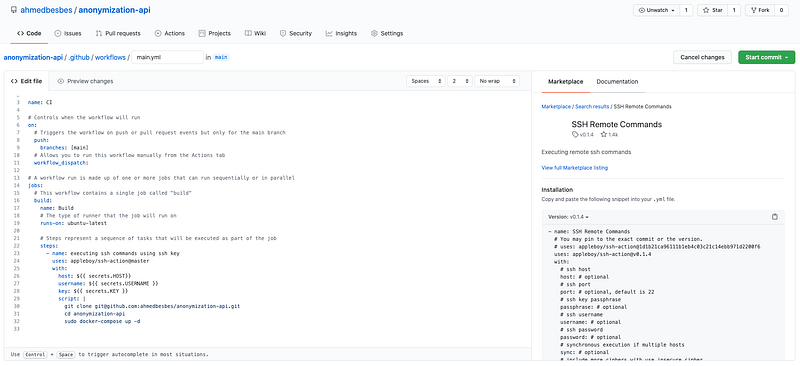
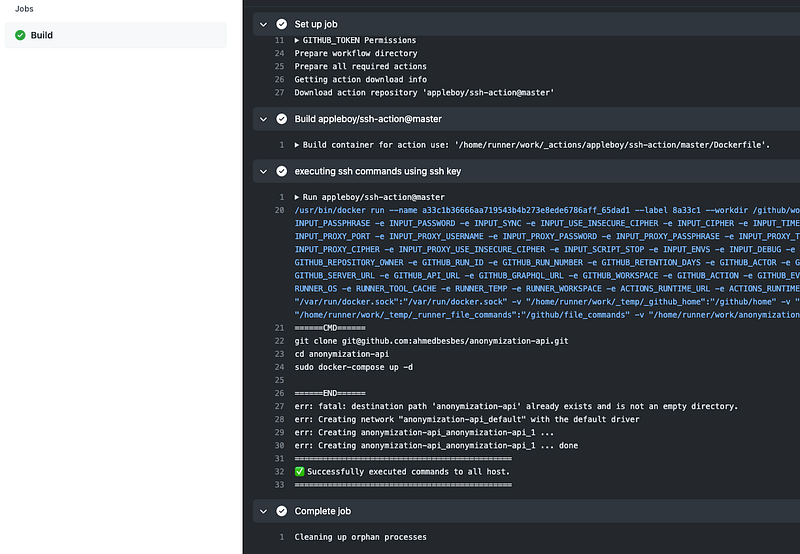
The job that will be triggered will be run on a remote server that GitHub Actions will connect to through the SSH Remote Commands. In other situations, this job may run on Github runners, i.e. instances provided by Github.
SSH Remote Commands is a custom GitHub Action that you can find from the marketplace. It’s free to use, you’ll just have to call it after the uses section.
The SSH Remote Commands Github Action will be called with the following arguments
- host: the hostname of the server (i.e. its public IP)
- username: the ssh username
- key: the content of ssh private key
- script: the script that will be executed once the ssh connection is established
The script will list the commands that will be run on the server once the SSH connection is established: it’ll:
- clone the repo
- cd into it
- run the docker-compose build and up commands.
git clone [email protected]:ahmedbesbes/anonymization-api.git
cd anonymization-api
sudo docker-compose up --build -d
The previous arguments host, username and key will not be hard-coded in the YAML file. They’ll never be. This information is sensitive.
They will rather be stored as Github Secrets and referenced with the $ sign, the same way you would call environment variables.
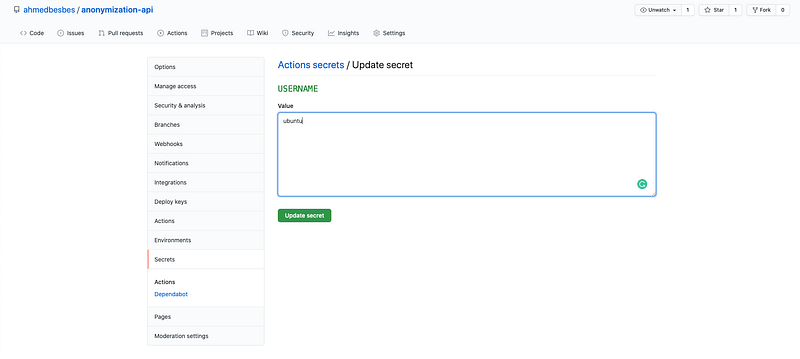
To create Github secrets, go to the settings of the repository and click on Secrets on the left tab. Github Secrets are always defined in the scope of a Github repo.

Then define your secrets by setting their name (in capital letters) and their value.
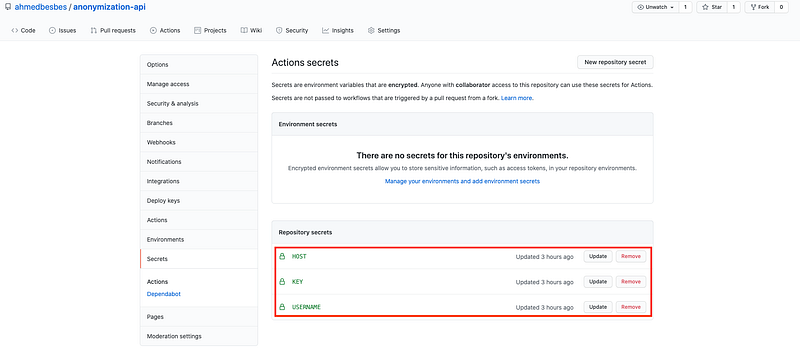
Here’s how you would set the USERNAME secret for example.
Now you can commit, push and look out for the magic happening!
Once you push your code (after testing that everything works fine locally) you will notice, after clicking on the Actions tab that a new runis queued to start.
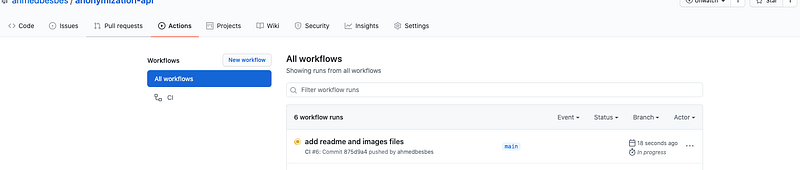
By clicking on it, you can see the different steps of the build.
Once the API is successfully deployed on your remote server, fire up Postman and execute some requests on the API endpoint to check if it’s working properly.
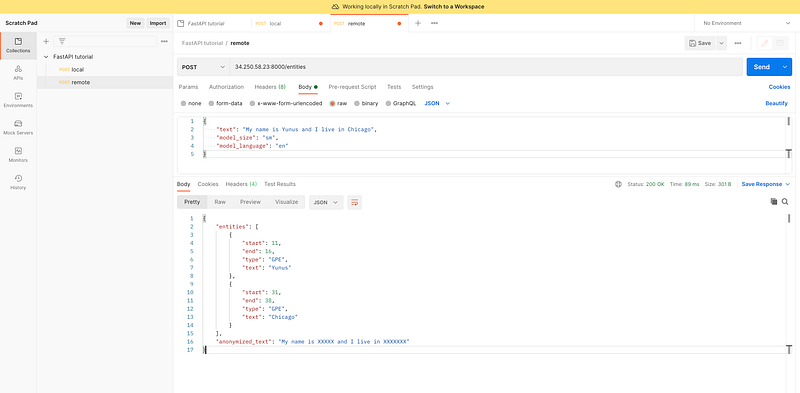
Youhou! 🎊 Now the API is deployed, working, and ready to accept requests.
Conclusion & Next steps
A lot of things have been covered so far.
We learned about interesting features that FastAPI proposes. Then, we built an API using this framework and finally deployed it on AWS using Docker.
To make the deployment process as smooth as possible, we’ve also used a GitHub Actions workflow that is triggered at each push and uses a custom action.
Now to make this API even more production-ready, we can think of these features (I’ll maybe cover them in future blog posts)
- Setting up a domain name for the API
- Securing the API by adding HTTPS
- Using
gunicorninstead ofunicornfor the deployment - Adding a database service (PostgreSQL for example) to store the inputs and the predictions: a good opportunity to apply asynchronous requests.
Resources:
Here is some quality material I went through while learning about FastAPI and deployment.
Thanks for reading! 🙏
I hope you found this post useful. If you have any suggestions on improving the workflow I set up, don’t hesitate to reach out on Github or in the comments.
Again, the code is available on my repo: feel free to try it out on projects of yours.
That’s it for me now, see you next time!