avatarChloe Chong

Free AI web copilot to create summaries, insights and extended knowledge, download it at here

7225

Abstract

ing you have installed Heroku’s CLI tools, we can now use it for deployment. If you haven’t already, login to Heroku.</p><div id="eb31"><pre><span class="hljs-symbol"></span> heroku login <span class="hljs-comment">// enter in your credentials</span> <span class="hljs-symbol"></span> heroku create crae-example</pre></div><figure id="3b9a"><img src="https://cdn-images-1.readmedium.com/v2/resize:fit:800/1*L7jVrv1bu_H6363-5B_yCw.png"><figcaption>That was easy wasn’t it?</figcaption></figure><p id="66fd">Now we just need to push our code up to Heroku.</p><div id="5c4e"><pre> git <span class="hljs-built_in">push</span> heroku master</pre></div><figure id="0aa9"><img src="https://cdn-images-1.readmedium.com/v2/resize:fit:800/1*fkiFKDP73O4IE2ATTWCdkA.png"><figcaption>It’s always nice to see done in the console.</figcaption></figure><p id="9667">If we go to <a href="https://crae-example.herokuapp.com/api/cow">https://crae-example.herokuapp.com/api/cow</a> we should see the same gibberish output as above. Our cow (app) is now live on the internet!</p><h1 id="d77a">The Frontend React App</h1><p id="39ee">We need a frontend to show our cow don’t we? Let’s install the create-react-app cli tool.</p><div id="b569"><pre> <span class="hljs-built_in">npm</span> i -g create-react-app</pre></div><p id="4fcd">Inside our root directory that houses our Express app, let’s create our frontend app:</p><div id="0baf"><pre> <span class="hljs-built_in">create-react-app</span> <span class="hljs-string">client</span></pre></div><p id="0f9c">Since that in of itself is an app, we need to proxy API requests from the frontend app to our backend Express app. Luckily that is easily done by adding the following in <code>client/package.json</code> .</p><div id="017b"><pre><span class="hljs-attr">"proxy"</span><span class="hljs-punctuation">:</span> <span class="hljs-string">"http://localhost:5000"</span></pre></div><p id="1f8a">What that does is when we call on /api/cow from the client side, instead of going to<b> <a href="http://localhost:3000/api/cow,">http://localhost:3000</a></b><a href="http://localhost:3000/api/cow,">/api/cow,</a> it will proxy us to <a href="http://localhost:5000/api/cow"><b>http://localhost:5000</b>/api/cow</a>.</p><p id="faeb">Next, we’ll replace <code>src/App.js</code> with the following:</p><div id="76ce"><pre><span class="hljs-keyword">import</span> React, { Component } <span class="hljs-keyword">from</span> <span class="hljs-string">'react'</span> <span class="hljs-keyword">import</span> <span class="hljs-string">'./App.css'</span></pre></div><div id="7644"><pre><span class="hljs-class"><span class="hljs-keyword">class</span> <span class="hljs-title">App</span> <span class="hljs-keyword">extends</span> <span class="hljs-title">Component</span> </span>{ state = { cow: '', text: '' }</pre></div><div id="8631"><pre><span class="hljs-function"><span class="hljs-title">componentDidMount</span><span class="hljs-params">()</span></span> { this<span class="hljs-selector-class">.fetchCow</span>() }</pre></div><div id="3854"><pre>fetchCow = <span class="hljs-keyword">async</span> () =&gt; { <span class="hljs-keyword">const</span> response = <span class="hljs-keyword">await</span> fetch(`/api/cow`) <span class="hljs-keyword">const</span> initialCow = <span class="hljs-keyword">await</span> response.json() <span class="hljs-keyword">const</span> cow = initialCow.moo <span class="hljs-keyword">this</span>.setState({ cow }) }</pre></div><div id="c587"><pre>customCow = <span class="hljs-keyword">async</span> evt =&gt; { evt.<span class="hljs-title function_">preventDefault</span>() <span class="hljs-keyword">const</span> text = <span class="hljs-variable language_">this</span>.<span class="hljs-property">state</span>.<span class="hljs-property">text</span> <span class="hljs-keyword">const</span> response = <span class="hljs-keyword">await</span> <span class="hljs-title function_">fetch</span>(<span class="hljs-string">`/api/cow/<span class="hljs-subst">{text}</span>`</span>) <span class="hljs-keyword">const</span> custom = <span class="hljs-keyword">await</span> response.<span class="hljs-title function_">json</span>() <span class="hljs-keyword">const</span> cow = custom.<span class="hljs-property">moo</span> <span class="hljs-variable language_">this</span>.<span class="hljs-title function_">setState</span>({ cow, <span class="hljs-attr">text</span>: <span class="hljs-string">''</span> }) }</pre></div><div id="a404"><pre>handleChange = evt => { this.<span class="hljs-built_in">set</span>State({ [evt.target.name]: evt.target.value }) console.<span class="hljs-keyword">log</span>(this.<span class="hljs-keyword">state</span>.text) }</pre></div><div id="0abc"><pre><span class="hljs-title function_">render</span>(<span class="hljs-params"></span>) { <span class="hljs-keyword">return</span> ( <span class="language-xml"><span class="hljs-tag"><<span class="hljs-name">div</span> <span class="hljs-attr">className</span>=<span class="hljs-string">"App"</span>></span> <span class="hljs-tag"><<span class="hljs-name">h3</span>></span>Text Cow. Moo<span class="hljs-tag"></<span class="hljs-name">h3</span>></span> <span class="hljs-tag"><<span class="hljs-name">code</span>></span>{this.state.cow}<span class="hljs-tag"></<span class="hljs-name">code</span>></span> <span class="hljs-tag"><<span class="hljs-name">form</span> <span class="hljs-attr">onSubmit</span>=<span class="hljs-string">{this.customCow}</span>></span> <span class="hljs-tag"><<span class="hljs-name">label</span>></span>Custom Cow Text:<span class="hljs-tag"></<span class="hljs-name">label</span>></span> <span class="hljs-tag"><<span class="hljs-name">input</span> <span class="hljs-attr">type</span>=<span class="hljs-string">"text"</span> <span class="hljs-attr">name</span>=<span class="hljs-string">"text"</span> <span class="hljs-attr">value</span>=<span class="hljs-string">{this.state.text}</span> <span class="hljs-attr">onChange</span>=<span class="hljs-string">{this.handleChange}</span> /></span> <span class="hljs-tag"><<span class="hljs-name">button</span> <span class="hljs-attr">type</span>=<span class="hljs-string">"submit"</span>></span>Show me a talking cow!<span class="hljs-tag"></<span class="hljs-name">button</span>></span> <span class="hljs-tag"></<span class="hljs-name">form</span>></span> <span class="hljs-tag"></<span class="hljs-name">div</span>></span></span> ) } }</pre></div><div id="e8ec"><pre><span class="hljs-built_in">export</span><span class="hljs-built_in"> default </span>App</pre></div><p id="37fe">It looks like a lot, but it isn’t! We simply call fetchCow in our componentDidMount which will give us our ‘Hello World’ cow and set it on state so we can display it on render. We also render an input form that lets users type in their custom string text for the cow output.</p><p id="5409">Optional: update <code>src/App.css</code> I recommend at

Options

least adding <code>white-space: pre</code>, which will keep all the white spaces instead of compressing multiple white spaces into one. It’s very important for the cow!</p><div id="8e1d"><pre><span class="hljs-selector-class">.App</span> { <span class="hljs-attribute">display</span>: flex; <span class="hljs-attribute">flex-direction</span>: column; <span class="hljs-attribute">align-items</span>: center; <span class="hljs-attribute">margin</span>: <span class="hljs-number">2em</span>; <span class="hljs-attribute">white-space</span>: pre }</pre></div><div id="fd30"><pre><span class="hljs-selector-class">.App</span> <span class="hljs-selector-tag">code</span> { <span class="hljs-attribute">margin</span>: <span class="hljs-number">2em</span>; <span class="hljs-attribute">margin-top</span>: <span class="hljs-number">0</span>; <span class="hljs-attribute">padding</span>: <span class="hljs-number">0</span>; <span class="hljs-attribute">text-align</span>: left; <span class="hljs-attribute">font-size</span>: <span class="hljs-number">2em</span>; }</pre></div><div id="f454"><pre><span class="hljs-selector-tag">h3</span> { <span class="hljs-attribute">font-size</span>: <span class="hljs-number">2.5em</span>; <span class="hljs-attribute">margin</span>: <span class="hljs-number">1em</span>; <span class="hljs-attribute">padding</span>: <span class="hljs-number">0</span>; <span class="hljs-attribute">border</span>: <span class="hljs-number">0</span> }</pre></div><div id="f311"><pre><span class="hljs-selector-tag">button</span> { <span class="hljs-attribute">font-size</span>: <span class="hljs-number">1em</span>; <span class="hljs-attribute">font-family</span>: <span class="hljs-string">"Courier New"</span>, monospace; <span class="hljs-attribute">border</span>: <span class="hljs-number">2px</span> solid <span class="hljs-number">#000</span>; <span class="hljs-attribute">padding</span>: <span class="hljs-number">10px</span> <span class="hljs-number">25px</span>; }</pre></div><div id="f039"><pre><span class="hljs-selector-tag">button</span><span class="hljs-selector-pseudo">:hover</span> { <span class="hljs-attribute">background-color</span>: <span class="hljs-built_in">rgb</span>(<span class="hljs-number">255</span>, <span class="hljs-number">235</span>, <span class="hljs-number">59</span>); }</pre></div><div id="d937"><pre><span class="hljs-selector-tag">button</span><span class="hljs-selector-pseudo">:active</span> { <span class="hljs-attribute">background-color</span>: <span class="hljs-built_in">rgb</span>(<span class="hljs-number">255</span>, <span class="hljs-number">244</span>, <span class="hljs-number">142</span>); }</pre></div><div id="3945"><pre><span class="hljs-selector-tag">form</span> { <span class="hljs-attribute">display</span>: flex; <span class="hljs-attribute">flex-direction</span>: column; <span class="hljs-attribute">font-family</span>: <span class="hljs-string">"Courier New"</span>, monospace; }</pre></div><div id="5c68"><pre><span class="hljs-selector-tag">input</span> { <span class="hljs-attribute">font-size</span>: <span class="hljs-number">1.5em</span>; <span class="hljs-attribute">margin-top</span>: <span class="hljs-number">1em</span>; <span class="hljs-attribute">margin-bottom</span>: <span class="hljs-number">1em</span>; <span class="hljs-attribute">border</span>: <span class="hljs-number">1px</span> solid grey }</pre></div><p id="4d2a">Since this is a simple app, we define css attributes directly on elements instead of specifying classes (not recommended). To test that everything works, we have to start both our apps (from the root directory):</p><div id="958e"><pre><span class="hljs-variable"></span> npm run <span class="hljs-built_in">start</span> <span class="hljs-variable"></span> <span class="hljs-built_in">cd</span> client <span class="hljs-variable"></span> npm run <span class="hljs-built_in">start</span></pre></div><p id="ddf6">Go to <a href="http://localhost:3000">http://localhost:3000</a> and you should see this:</p><figure id="cb70"><img src="https://cdn-images-1.readmedium.com/v2/resize:fit:800/1*KCtbmYJgtJX2evyVCqQpyQ.png"><figcaption>It works! Hello World!</figcaption></figure><p id="704f">One last thing: we need to update our <code>index.js</code> in our root directory to serve up our React files once it’s in production:</p><div id="e06e"><pre><span class="hljs-variable">const</span> <span class="hljs-variable">path</span> = <span class="hljs-function"><span class="hljs-title">require</span>(<span class="hljs-string">'path'</span>)</span></pre></div><div id="717b"><pre><span class="hljs-comment">// Serve static files from the React frontend app</span> app<span class="hljs-selector-class">.use</span>(express<span class="hljs-selector-class">.static</span>(path<span class="hljs-selector-class">.join</span>(__dirname, <span class="hljs-string">'client/build'</span>)))</pre></div><div id="8ed9"><pre><span class="hljs-comment">// Anything that doesn't match the above, send back index.html</span> app<span class="hljs-selector-class">.get</span>(<span class="hljs-string">'*'</span>, (req, res) =&gt; { res<span class="hljs-selector-class">.sendFile</span>(path<span class="hljs-selector-class">.join</span>(__dirname + <span class="hljs-string">'/client/build/index.html'</span>)) })</pre></div><h1 id="4500">Final Takeoff</h1><p id="c419">Before we can deploy again, we first need to configure Heroku to build the frontend React app after we push all our code up. This is because we explicitly specified above to serve static files from <code>client/build</code>. Let’s configure our root directory’s <code>package.json</code> one last time:</p><div id="7ec0"><pre><span class="hljs-string">"scripts"</span>: { <span class="hljs-string">"test"</span>: <span class="hljs-string">"echo \"</span><span class="hljs-keyword">Error</span>: <span class="hljs-keyword">no</span> <span class="hljs-keyword">test</span> specified\<span class="hljs-string">" &amp;&amp; exit 1"</span>, <span class="hljs-string">"start"</span>: <span class="hljs-string">"node index.js"</span>, <span class="hljs-string">"heroku-postbuild"</span>: <span class="hljs-string">"cd client &amp;&amp; npm install &amp;&amp; npm run build"</span> },</pre></div><p id="6e37">We add a heroku-postbuild script so it knows to run the built in build method create-react-app gives us after Heroku is done doing its own build. Now we can deploy!</p><div id="71ad"><pre><span class="hljs-variable"> </span>git add -A <span class="hljs-variable"> </span>git commit -m <span class="hljs-string">'Deploy takeoff!'</span> <span class="hljs-variable"> </span>git push heroku master</pre></div><p id="63de">A bunch of stuff will happen in the terminal. but at the end you should see the same url as before. Go to your Heroku url and see your app running! You can play with mine at <a href="https://crae-example.herokuapp.com/">https://crae-example.herokuapp.com/</a>. Congratulations! You have a React and Express app in production!</p><p id="a6d8">Check out the code <a href="https://github.com/minichloe/crae-example">here on Github</a>. Happy coding! : )</p></article></body>

How to deploy a create-react-app with an Express backend to Heroku

You used the create-react-app cli tool to create your React app, and now you want to add a backend such as Express. How do you do it?

There are several ways to go about it:

Host them separately: Deploy the Express app on one machine, and the React app on another machine.

Use a proxy: Both apps are hosted together, but served by different servers.

Keeping them together: Have your frontend React files and backend Express files exist on one server, and have Express serve your React files in addition to the API requests.

Here, we will focus on the third option. Together, we will create a simple app that uses Express to create a backend API, and also serve React files. Then we will deploy it on Heroku. If you don’t have a Heroku account, sign up for free! In addition, install the Heroku cli tools. (Alternatively, just $ brew install heroku)

Let’s create our app!

The Backend Express app

First we’ll create our root directory. I’ve named mine crae-example but feel free to be creative. Then, initialise it with NPM or Yarn.

$ mkdir crae-example
$ cd crae-example
$ npm init

Install packages with NPM or Yarn, then make our index file.

$ npm i express cors cowsay
$ touch index.js

We want to create our Express server to serve two routes. A basic route that will return a cow saying ‘Hello World!’, and one that accepts custom input. Since it’s a simple app, we’ll keep everything in one file, although in practice it is much better to modularise.

const express = require('express')
const cowsay = require('cowsay')
const cors = require('cors')
// Create the server
const app = express()
// Serve our api route /cow that returns a custom talking text cow
app.get('/api/cow/:say', cors(), async (req, res, next) => {
  try {
    const text = req.params.say
    const moo = cowsay.say({ text })
    res.json({ moo })
  } catch (err) {
    next(err)
  }
})
// Serve our base route that returns a Hello World cow
app.get('/api/cow/', cors(), async (req, res, next) => {
  try {
    const moo = cowsay.say({ text: 'Hello World!' })
    res.json({ moo })
  } catch (err) {
    next(err)
  }
})
// Choose the port and start the server
const PORT = process.env.PORT || 5000
app.listen(PORT, () => {
  console.log(`Mixing it up on port ${PORT}`)
})

That’s it for our index.js. Let’s add a start script to our package.json and test out our single route.

"scripts": {
    "test": "echo \"Error: no test specified\" && exit 1",
    "start": "node index.js"
  },

Alternatively, you can use nodemon index.js to listen for any changes. Let’s start our app:

$ npm start

You should see the console log in your terminal.

Our app is up and running on port 5000!

Then navigate to http://localhost:5000/api/cow. It’s gibberish, but it is our moo-ing text cow!

It doesn’t really look like a cow…

Deploying to Heroku

It is good practice to deploy in the beginning, make sure everything works, then keep adding. Let’s initialise a git repository so we can deploy to Heroku.

$ git init
$ echo node_modules > .gitignore
$ git add -A
$ git commit -m "First commit"

Assuming you have installed Heroku’s CLI tools, we can now use it for deployment. If you haven’t already, login to Heroku.

$ heroku login // enter in your credentials
$ heroku create crae-example
That was easy wasn’t it?

Now we just need to push our code up to Heroku.

$ git push heroku master
It’s always nice to see done in the console.

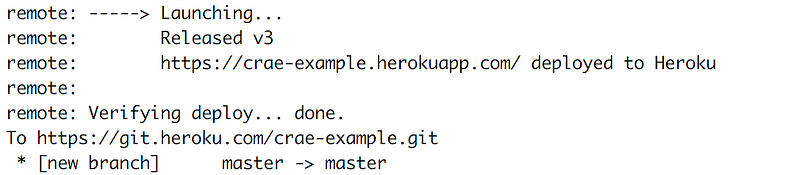
If we go to https://crae-example.herokuapp.com/api/cow we should see the same gibberish output as above. Our cow (app) is now live on the internet!

The Frontend React App

We need a frontend to show our cow don’t we? Let’s install the create-react-app cli tool.

$ npm i -g create-react-app

Inside our root directory that houses our Express app, let’s create our frontend app:

$ create-react-app client

Since that in of itself is an app, we need to proxy API requests from the frontend app to our backend Express app. Luckily that is easily done by adding the following in client/package.json .

"proxy": "http://localhost:5000"

What that does is when we call on /api/cow from the client side, instead of going to http://localhost:3000/api/cow, it will proxy us to http://localhost:5000/api/cow.

Next, we’ll replace src/App.js with the following:

import React, { Component } from 'react'
import './App.css'
class App extends Component {
  state = {
    cow: '',
    text: ''
  }
componentDidMount() {
    this.fetchCow()
  }
fetchCow = async () => {
    const response = await fetch(`/api/cow`)
    const initialCow = await response.json()
    const cow = initialCow.moo
    this.setState({ cow })
  }
customCow = async evt => {
    evt.preventDefault()
    const text = this.state.text
    const response = await fetch(`/api/cow/${text}`)
    const custom = await response.json()
    const cow = custom.moo
    this.setState({ cow, text: '' })
  }
handleChange = evt => {
    this.setState({ [evt.target.name]: evt.target.value })
    console.log(this.state.text)
  }
render() {
    return (
      <div className="App">
        <h3>Text Cow. Moo</h3>
        <code>{this.state.cow}</code>
        <form onSubmit={this.customCow}>
          <label>Custom Cow Text:</label>
          <input
            type="text"
            name="text"
            value={this.state.text}
            onChange={this.handleChange}
          />
          <button type="submit">Show me a talking cow!</button>
        </form>
      </div>
    )
  }
}
export default App

It looks like a lot, but it isn’t! We simply call fetchCow in our componentDidMount which will give us our ‘Hello World’ cow and set it on state so we can display it on render. We also render an input form that lets users type in their custom string text for the cow output.

Optional: update src/App.css I recommend at least adding white-space: pre, which will keep all the white spaces instead of compressing multiple white spaces into one. It’s very important for the cow!

.App {
  display: flex;
  flex-direction: column;
  align-items: center;
  margin: 2em;
  white-space: pre
}
.App code {
  margin: 2em;
  margin-top: 0;
  padding: 0;
  text-align: left;
  font-size: 2em;
}
h3 {
  font-size: 2.5em;
  margin: 1em;
  padding: 0;
  border: 0
}
button {
  font-size: 1em;
  font-family: "Courier New", monospace;
  border: 2px solid #000;
  padding: 10px 25px;
}
button:hover {
  background-color: rgb(255, 235, 59);
}
button:active {
  background-color: rgb(255, 244, 142);
}
form {
  display: flex;
  flex-direction: column;
  font-family: "Courier New", monospace;
}
input {
  font-size: 1.5em;
  margin-top: 1em;
  margin-bottom: 1em;
  border: 1px solid grey
}

Since this is a simple app, we define css attributes directly on elements instead of specifying classes (not recommended). To test that everything works, we have to start both our apps (from the root directory):

$ npm run start
$ cd client
$ npm run start

Go to http://localhost:3000 and you should see this:

It works! Hello World!

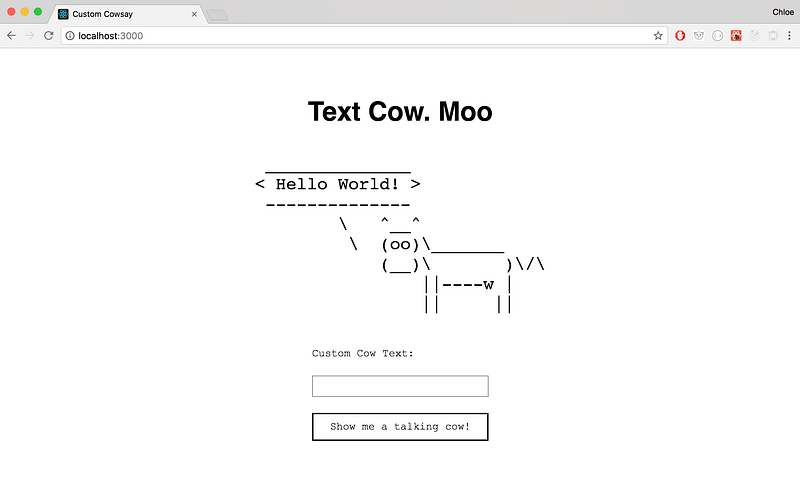
One last thing: we need to update our index.js in our root directory to serve up our React files once it’s in production:

const path = require('path')
// Serve static files from the React frontend app
app.use(express.static(path.join(__dirname, 'client/build')))
// Anything that doesn't match the above, send back index.html
app.get('*', (req, res) => {
  res.sendFile(path.join(__dirname + '/client/build/index.html'))
})

Final Takeoff

Before we can deploy again, we first need to configure Heroku to build the frontend React app after we push all our code up. This is because we explicitly specified above to serve static files from client/build. Let’s configure our root directory’s package.json one last time:

"scripts": {
    "test": "echo \"Error: no test specified\" && exit 1",
    "start": "node index.js",
    "heroku-postbuild": "cd client && npm install && npm run build"
  },

We add a heroku-postbuild script so it knows to run the built in build method create-react-app gives us after Heroku is done doing its own build. Now we can deploy!

$ git add -A
$ git commit -m 'Deploy takeoff!'
$ git push heroku master

A bunch of stuff will happen in the terminal. but at the end you should see the same url as before. Go to your Heroku url and see your app running! You can play with mine at https://crae-example.herokuapp.com/. Congratulations! You have a React and Express app in production!

Check out the code here on Github. Happy coding! : )

JavaScript
React
Express
Heroku
Cowsay
Recommended from ReadMedium