
How to Cut Your AWS ECS Costs with Fargate Spot and Prefect
Serverless Data Engineering Pipelines in Python

Prefect is a flexible tool to orchestrate the modern data stack. In contrast to many other solutions on the market, it doesn't tie you to any specific execution framework or cloud provider — whether you want to use Kubernetes on GCP, AWS ECS, a bare-metal server, or an on-demand distributed Dask cluster such as Coiled, Prefect got you covered. As with any flexible platform, there are some things you need to configure to let Prefect know where your data workflows should run. In this article, we'll look at how to leverage spot instances on AWS ECS Fargate as your cost-effective execution layer.
Table of contents· Spot instances & Prefect
∘ Why spot instances?
∘ What value does Prefect provide in managing containers deployed to spot instances?
· Architecture
· Prefect Setup
∘ Sign up or sign in
∘ Create an API Key
∘ Install Prefect
∘ Create a service account for the ECSAgent
· AWS Setup
∘ Store the ECSAgent’s API Key as an encrypted parameter
∘ Configure the ECS cluster
∘ Prepare the IAM roles
∘ Task execution role
∘ Task role
∘ Create a CloudWatch log group
∘ Register a task definition for the ECSAgent
∘ Look up your subnet IDs
∘ Start a continuously running ECS Service for the ECSAgent
∘ Validate the agent setup in the Prefect UI
· Deploy an example Prefect flow
∘ Build a custom Docker image for your Prefect flows
· ConclusionSpot instances & Prefect
Why spot instances?
First of all, why would you want to use spot instances in the first place? The reason is simple: to save costs. Spot instances cost up to 70 percent less than on-demand instances.
What value does Prefect provide in managing containers deployed to spot instances?
While spot instances can offer significant cost savings, they have one significant drawback: they can be shut down with a two minutes' notice. Prefect helps to circumvent this shortcoming in that:
- it provides visibility into which jobs failed due to spot instances being shut down,
- it can automatically restart such failed workflows thanks to the service called Lazarus. As Prefect documentation explains:
“The Lazarus process is meant to gracefully retry failures caused by factors outside of Prefect’s control. The most common situations requiring Lazarus intervention are infrastructure issues, such as Kubernetes pods not spinning up or being deleted before they’re able to complete a run.”
- Prefect automates many tedious tasks that you would otherwise have to do to deploy your workloads to ECS, such as creating and registering new task definitions, deregistering old task definitions, etc.
- Prefect also allows you to modify metadata of the "Run ECS Task" directly from the Prefect UI. This way, you can adjust resources such as CPU and memory needed for your workflow on an ad-hoc per-run basis.
Architecture
Within your AWS account, you create an ECS service with a Prefect ECSAgent process. This process continuously polls Prefect Cloud API for new flow runs. The scheduled flow runs are then automatically deployed by Prefect as ECS tasks while injecting the metadata you provided for each particular run (e.g., CPU, memory). The ECS control plane is responsible for provisioning the infrastructure and placing the containers on the ECS data plane.
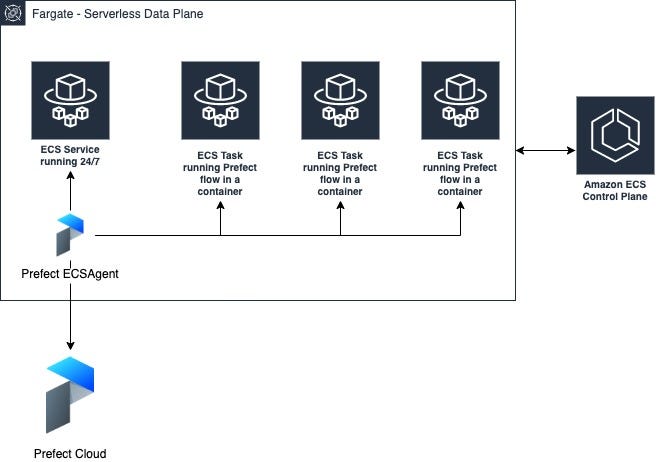
While in this article, we'll focus on using Fargate as your data plane, ECS allows you to add up to six capacity providers per ECS cluster. This way, your ECS data plane could simultaneously use FARGATE_SPOT, FARGATE, EXTERNAL on-prem servers, and self-managed custom EC2 instances, possibly with GPUs. The capacity providers allow you to customize cluster resources to match your desired latency, maintenance, and capacity needs.
Prefect Setup
Sign up or sign in
If you don't have an account yet, sign up for a "Standard" Prefect Cloud account. While there is also a "Starter" option, Standard has many more features. Both plans have a remarkably generous tier of 10,000 free successful task runs. You can find more about that here.
Create an API Key
Once logged in, you can create an API key to authenticate your local development environment with Prefect Cloud.

Install Prefect
To install Prefect with AWS submodule on your local machine, use:
pip install "prefect[aws]"Then, you can switch to the Prefect Cloud backend and authenticate with your previously generated API key:
prefect backend cloud
prefect auth login --key <YOUR-API-KEY>
After successful authentication, you can now register new flows, start new agents, and view them in the Prefect Cloud UI.
Note: older versions of Prefect used API tokens that had different scopes for agents and users. From Prefect 0.15.0 on, you should use API keys instead. If you want to know more, this blog post explains the reasons for that change.
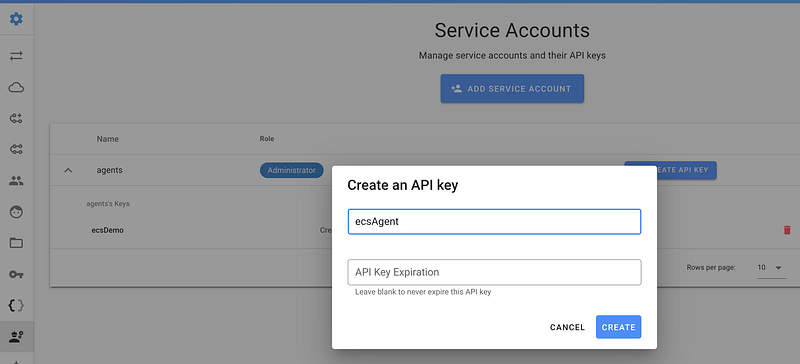
Create a service account API key for the ECSAgent
While API keys are designed to authenticate users, service account API keys are meant for machines, i.e., automated processes such as Prefect agents and CI/CD tools. To create a new key for the ECSAgent, go to the Team's Service Account page.
AWS Setup
The entire setup demonstrated below is available in this GitHub Gist as a bash script that you can adjust and run as:
bash prefect_ecs_agent_deploy_script.bashBefore you run it, you need to replace
AWS_ACCOUNT_IDby your account ID, and set other variables, as described in the code comments.
In the following sections, we'll walk through all steps from the Gist so that you understand what resources get created and how you can adjust this script to your use case.
Store the ECSAgent's API Key as an encrypted parameter
To securely access the previously created Service Account's API key in our AWS ECS service, we'll want to store it as an encrypted secret in the AWS Systems Manager Parameter Store. Make sure to set your AWS region, your API key, and adjust other variables:
export AWS_REGION=us-east-1
export ECS_CLUSTER_NAME=prefectEcsCluster
export ECS_LOG_GROUP_NAME=/ecs/prefectEcsAgent
export ECS_SERVICE_NAME=prefectECSAgent
export PREFECT_API_KEY=yourPrefectCloudAPIKey
export AWS_PAGER=""
aws ssm put-parameter --type SecureString --name PREFECT__CLOUD__API_KEY --value $PREFECT_API_KEY --region $AWS_REGIONThe AWS_PAGER variable is set to disable paged output from the AWS CLI.
Configure the ECS cluster
aws ecs create-cluster --cluster-name $ECS_CLUSTER_NAME \
--capacity-providers FARGATE_SPOT FARGATE \
--default-capacity-provider-strategy \
capacityProvider=FARGATE_SPOT,weight=3 \
capacityProvider=FARGATE,base=1,weight=2 \
--region $AWS_REGION
We set base=1 because, at a minimum, one ECS task for the ECSAgent process will be running 24/7 as an ECS service. Since this service must run at all times for robust scheduling, it wouldn't make sense to use a spot instance for that process.
By leveraging weights, we specify a ratio between FARGATE_SPOT and FARGATE, which means that 60% of our flows will be deployed to FARGATE_SPOT and 40% will run on the FARGATE capacity provider. You should adjust the ratio to your needs.
Note that FARGATE_SPOT should only be used for interruptible workloads such as regular (e.g., hourly) batch jobs. If you prefer a standard Fargate cluster, use:
aws ecs create-cluster --cluster-name $ECS_CLUSTER_NAME \
--region $AWS_REGION
Prepare the IAM roles
AWS differentiates between a task execution role (a general role that grants access to start the containers defined in a task) and a task role that gives permissions to the actual application once the container is started. You can find a more detailed explanation in section #4 in this article:
Task execution role
#1. Create a role that assumes a trust policy:
cat <<EOF >ecs_tasks_trust_policy.json
{
  "Version": "2012-10-17",
  "Statement": [
    {
      "Effect": "Allow",
      "Principal": {
        "Service": [
          "ecs-tasks.amazonaws.com"
        ]
      },
      "Action": "sts:AssumeRole"
    }
  ]
}
EOF

aws iam create-role --role-name prefectECSAgentTaskExecutionRole \
--assume-role-policy-document file://ecs_tasks_trust_policy.json --region $AWS_REGION
#2. Attach the general service role policy AmazonECSTaskExecutionRolePolicy :
aws iam attach-role-policy --role-name prefectECSAgentTaskExecutionRole \
--policy-arn "arn:aws:iam::aws:policy/service-role/AmazonECSTaskExecutionRolePolicy"
#3. Attach our custom role policy because the ECS task will need to retrieve API key secret from the AWS Systems Manager Parameter Store in the task's environment variable.
cat <<EOF >ecs_tasks_execution_role.json
{
  "Version": "2012-10-17",
  "Statement": [
    {
      "Effect": "Allow",
      "Action": [
        "ssm:GetParameters"
      ],
      "Resource": "*"
    }
  ]
}
EOF

aws iam put-role-policy --role-name prefectECSAgentTaskExecutionRole \
--policy-name prefectECSAgentTaskExecutionRolePolicy \
--policy-document file://ecs_tasks_execution_role.json
Note that instead of "Resource": “*", you could narrow it down to a specific secret that we need:
"Resource": "arn:aws:ssm:YOUR_REGION:YOUR_AWS_ACCOUNT_ID:parameter/PREFECT__CLOUD__API_KEY"Task role
This role is required to grant Prefect access to AWS resources such as CloudWatch, EC2, ECS, IAM, S3, etc. For each FlowRun, Prefect creates a new ECS task definition. While doing that, it needs to retrieve information about your VPC, subnets, security groups, and IAM permissions for a flow. Additionally, it must be authorized to create a new CloudWatch log stream and place logs for each FlowRun. The policy below describes the necessary permissions:
# permissions needed by Prefect to register new task definitions, deregister old ones, and create new flow runs as ECS taskscat <<EOF >ecs_task_role.json
{
"Version": "2012-10-17",
"Statement": [
{
"Effect": "Allow",
"Action": [
"ec2:AuthorizeSecurityGroupIngress",
"ec2:CreateSecurityGroup",
"ec2:CreateTags",
"ec2:DescribeNetworkInterfaces",
"ec2:DescribeSecurityGroups",
"ec2:DescribeSubnets",
"ec2:DescribeVpcs",
"ec2:DeleteSecurityGroup",
"ecs:CreateCluster",
"ecs:DeleteCluster",
"ecs:DeregisterTaskDefinition",
"ecs:DescribeClusters",
"ecs:DescribeTaskDefinition",
"ecs:DescribeTasks",
"ecs:ListAccountSettings",
"ecs:ListClusters",
"ecs:ListTaskDefinitions",
"ecs:RegisterTaskDefinition",
"ecs:RunTask",
"ecs:StopTask",
"iam:PassRole",
"logs:CreateLogStream",
"logs:PutLogEvents",
"logs:DescribeLogGroups",
"logs:GetLogEvents"
],
"Resource": "*"
}
]
}
EOFaws iam create-role --role-name prefectTaskRole --assume-role-policy-document file://ecs_tasks_trust_policy.json --region $AWS_REGIONaws iam put-role-policy --role-name prefectTaskRole --policy-name prefectTaskRolePolicy --policy-document file://ecs_task_role.jsonNote: Some permissions mentioned above are defined to allow spinning up a temporary Dask cluster on ECS. If you want to narrow it down to absolutely necessary standard permissions for Prefect, this Github issue can help you.
When using Prefect with AWS ECS, you may want to use S3 as Prefect Storage and Result backend. Therefore, it's practical to add S3 permissions to the task role. Here is how you can create a task role that will allow any action on specific S3 buckets.
# adjust it to include permissions needed by your flows
cat <<EOF >ecs_task_role_s3.json
{
  "Version": "2012-10-17",
  "Statement": [
    {
      "Effect": "Allow",
      "Action": [
        "s3:*"
      ],
      "Resource": "arn:aws:s3:::*prefect*"
    }
  ]
}
EOF
aws iam put-role-policy --role-name prefectTaskRole --policy-name prefectTaskRoleS3Policy --policy-document file://ecs_task_role_s3.jsonThe above policy grants access to perform any action on S3 buckets that contain the word “prefect” in its name — you can specify the exact S3 bucket name that you want to use with Prefect for improved security.
Create a CloudWatch log group
During execution, each ECS task sends container logs to a CloudWatch log stream. Log streams are grouped into log groups. In order for the ECS task to send those container logs, we need to create the log group and specify it in a task definition.
aws logs create-log-group --log-group-name $ECS_LOG_GROUP_NAME --region $AWS_REGIONRegister a task definition for the ECSAgent
We can finally register the task definition for our Prefect's ECSAgent process.
# search-replace the AWS_ACCOUNT_ID below with your AWS account ID. Also, replace or add ECS Agent labelscat <<EOF >prefect_ecs_agent_task_definition.json
{
"family": "$ECS_SERVICE_NAME",
"requiresCompatibilities": [
"FARGATE"
],
"networkMode": "awsvpc",
"cpu": "512",
"memory": "1024",
"taskRoleArn": "arn:aws:iam::AWS_ACCOUNT_ID:role/prefectTaskRole",
"executionRoleArn": "arn:aws:iam::AWS_ACCOUNT_ID:role/prefectECSAgentTaskExecutionRole",
"containerDefinitions": [
{
"name": "$ECS_SERVICE_NAME",
"image": "prefecthq/prefect:latest-python3.8",
"essential": true,
"command": [
"prefect",
"agent",
"ecs",
"start"
],
"environment": [
{
"name": "PREFECT__CLOUD__AGENT__LABELS",
"value": "['prod']"
},
{
"name": "PREFECT__CLOUD__AGENT__LEVEL",
"value": "INFO"
},
{
"name": "PREFECT__CLOUD__API",
"value": "https://api.prefect.io"
}
],
"logConfiguration": {
"logDriver": "awslogs",
"options": {
"awslogs-group": "$ECS_LOG_GROUP_NAME",
"awslogs-region": "$AWS_REGION",
"awslogs-stream-prefix": "ecs",
"awslogs-create-group": "true"
}
},
"secrets": [
{
"name": "PREFECT__CLOUD__API_KEY",
"valueFrom": "arn:aws:ssm:$AWS_REGION:AWS_ACCOUNT_ID:parameter/PREFECT__CLOUD__API_KEY"
}
]
}
]
}
EOF
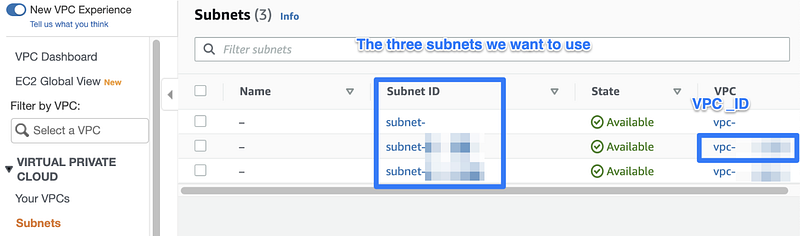
aws ecs register-task-definition --cli-input-json file://prefect_ecs_agent_task_definition.json --region $AWS_REGIONLook up your subnet IDs
To run this ECS task as a continuously running service, we must choose VPC and subnets in which this task should run. For this demo, we'll use the default VPC and its corresponding public subnets. Each region has its default VPC, so you don't have to create any new VPC unless you need it.
Here is how you can look up the IDs for your chosen region:
Alternatively, you can look up those IDs from AWS CLI:
aws ec2 describe-subnets --region $AWS_REGIONTo make it easier for you, here is how you can extract the IDs and export them as environment variables — we will use them in the next section:
export VPC=$(aws ec2 describe-vpcs --filters Name=is-default,Values=true)export VPC_ID=$(echo $VPC | jq -r '.Vpcs | .[0].VpcId')SUBNETS=$(aws ec2 describe-subnets --filters Name=vpc-id,Values=$VPC_ID --region $AWS_REGION)export SUBNET1=$(echo $SUBNETS | jq -r '.Subnets | .[0].SubnetId')
export SUBNET2=$(echo $SUBNETS | jq -r '.Subnets | .[1].SubnetId')
export SUBNET3=$(echo $SUBNETS | jq -r '.Subnets | .[2].SubnetId')Start a continuously running ECS Service for the ECSAgent
The benefit of this service is that the ECS control plane will ensure that this process will run at all times. If something goes wrong, ECS will create a new container for our Prefect agent.
aws ecs create-service \
--service-name $ECS_SERVICE_NAME\
--task-definition $ECS_SERVICE_NAME:1 \
--desired-count 1 \
--launch-type FARGATE \
--platform-version LATEST \
--cluster $ECS_CLUSTER_NAME \
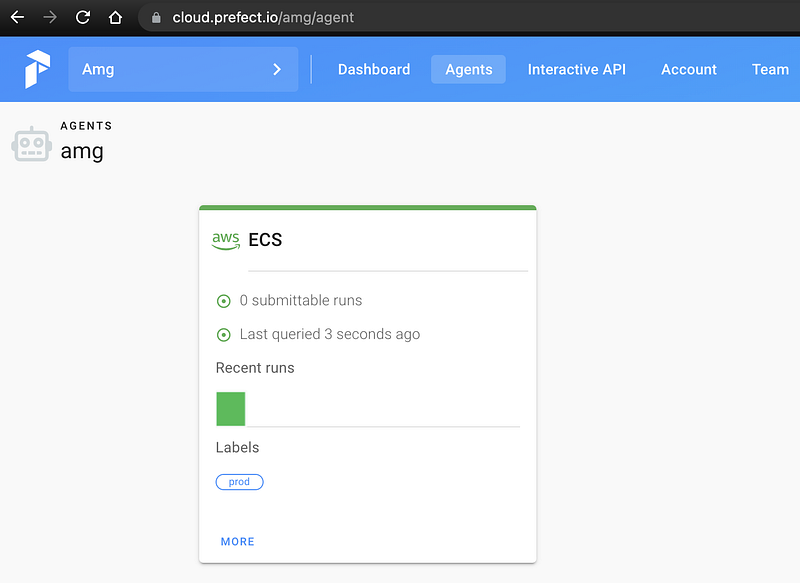
--network-configuration awsvpcConfiguration="{subnets=[$SUBNET1, $SUBNET2, $SUBNET3],assignPublicIp=ENABLED}" --region $AWS_REGIONValidate the agent setup in the Prefect UI
If everything worked as expected, we should see a new ECSAgent ready for deploying new flow runs.
Deploy an example Prefect flow
If you don't have any Prefect project yet, you can create it from the CLI:
prefect create project “ECS_Flows”Now you can deploy an example flow with ECSRun that will provide metadata for the ECS task, such as:
- a custom container
image, - ECS agent
labels, - custom AWS permissions for your flow, provided in the form of
task_role_arn, - as well as
cpuandmemory.
Note that within this Flow, we also specify S3 storage — this will upload the flow file to the specified S3 bucket.
Make sure to replace the 123456 with your AWS account ID.
Also, if you provide a custom ECR image to your ECSRun, make sure to also specify the execution_role_arn explicitly, otherwise, you’ll get a ClientException telling you that Fargate requires task definition to have execution role ARN to support ECR images. Here is how you could specify that:
RUN_CONFIG = ECSRun(
    labels=["prod"],
    task_role_arn="arn:aws:iam::XXX:role/prefectTaskRole",
    execution_role_arn="arn:aws:iam::XXX:role/prefectECSAgentTaskExecutionRole",
    run_task_kwargs=dict(cluster="prefectEcsCluster", launchType="FARGATE",),
    image="XXX.dkr.ecr.us-east-1.amazonaws.com/prefect-custom-image:latest"
)
Build a custom Docker image for your Prefect flows
If your flows need custom package dependencies, such as pandas or scikit-learn, it is considered best practice to create a custom container image that already contains those dependencies. Here is how you could accomplish that.
cat <<EOF >Dockerfile
FROM prefecthq/prefect:latest-python3.9
RUN pip install --upgrade pip \\
&& pip install pandas scikit-learn boto3
EOF
Then to build and push the Docker image to ECR, use:
export AWS_REGION=us-east-1
export AWS_ACCOUNT_ID=123456789
export IMAGE_NAME=prefect-custom-image
export IMAGE_TAG=latest

docker build -t $IMAGE_NAME .
aws ecr create-repository --repository-name $IMAGE_NAME --region $AWS_REGIONdocker tag "$IMAGE_NAME":"$IMAGE_TAG" "$AWS_ACCOUNT_ID.dkr.ecr.$AWS_REGION.amazonaws.com/$IMAGE_NAME":"$IMAGE_TAG"aws ecr get-login-password | docker login --username AWS --password-stdin $AWS_ACCOUNT_ID.dkr.ecr.$AWS_REGION.amazonaws.comdocker push "$AWS_ACCOUNT_ID.dkr.ecr.$AWS_REGION.amazonaws.com/$IMAGE_NAME":"$IMAGE_TAG"Now you could specify this image in your ECSRun run configuration (line 14 in the flow’s Gist).
Conclusion
In this article, we looked at how to set up AWS ECS Fargate as a Prefect agent. We investigated various capacity provider configurations to optimize costs, and we explained all the required steps to customize this setup to your needs.
Resources:
- https://aws.amazon.com/blogs/aws/aws-fargate-spot-now-generally-available/
- Fargate spot — cost savings demonstration: https://tomgregory.com/aws-fargate-spot-vs-fargate-price-comparison/
- Deep dive: https://aws.amazon.com/blogs/compute/deep-dive-into-fargate-spot-to-run-your-ecs-tasks-for-up-to-70-less/
- https://ecsworkshop.com/capacity_providers/fargate/


