
How to create your own custom AI Chatbot with a text editor & 28 lines of Javascript
Your custom GPT-3 chatbot, quick & dirty, in under 10 minutes
Requirements
What you need to get started:
- a text editor
- a browser
- an OpenAI API key (step-by-step guide on how to get it: here)
We will create two files, an HTML file, and a Javascript file. Make sure they are in the same directory.
chatbot.html
Open a text editor and create an HTML document with just these basic HTML tags and name it “chatbot.html”:
<html>
  <head>
  </head>
  <body>
  </body>
</html>
Inside the -tags we import jQuery.terminal, a Javascript library that will
a) give us the look of a terminal console & handle all the styling, and
b) let us create custom commands to which this terminal console will respond.
<html>
  <head>
    <script src="https://code.jquery.com/jquery-3.3.1.min.js"></script>
    <script src="https://cdn.jsdelivr.net/npm/jquery.terminal/js/jquery.terminal.min.js"></script>
    <link
      rel="stylesheet"
      href="https://cdn.jsdelivr.net/npm/jquery.terminal/css/jquery.terminal.min.css"
    />
  </head>
  <body>
  </body>
</html>
Inside the -tag we add a
<html>
  <head>
    <script src="https://code.jquery.com/jquery-3.3.1.min.js"></script>
    <script src="https://cdn.jsdelivr.net/npm/jquery.terminal/js/jquery.terminal.min.js"></script>
    <link
      rel="stylesheet"
      href="https://cdn.jsdelivr.net/npm/jquery.terminal/css/jquery.terminal.min.css"
    />
  </head>
  <body>
    <div id="terminal"></div>
  </body>
</html>
Lastly, in the -tag we use the STYLE attribute to change the background color to fit the upcoming black terminal screen and right after the
<html>
  <head>
    <script src="https://code.jquery.com/jquery-3.3.1.min.js"></script>
    <script src="https://cdn.jsdelivr.net/npm/jquery.terminal/js/jquery.terminal.min.js"></script>
    <link
      rel="stylesheet"
      href="https://cdn.jsdelivr.net/npm/jquery.terminal/css/jquery.terminal.min.css"
    />
  </head>
  <body style="background-color: black">
    <div id="terminal"></div>
    <script src="script.js"></script>
  </body>
</html>
chatbot.html is ready.
script.js
Now let’s create a new file in our text editor and call it “script.js”. Copy & paste this code:
$("#terminal").terminal(async function (command, terminal) {
    try {
        // command definitions will go here in the next step
        console.log("Completed!");
    } catch (err) { console.error(`Error: ${err}`) }
},
    {
        greetings: 'GPT-3 Chatbot',
        name: 'gpt3_demo',
        height: 400,
        width: 800,
        prompt: '> '
    });
What it does:
- the first line uses the previously imported jQuery.terminal library and looks for an HTML element with the ID “terminal” to create an empty terminal window inside of it.
- the first line also passes the variable “command”, which is the user input from the terminal. Try it, type something, and hit Enter: nothing happens, since we have not defined a response for any command.
- the terminal window you will see will be of the size defined in the lower part of the code and greet you accordingly
Here’s what we add inside the try/catch block to handle user commands:
  const prompt = `you are a helpful, knowledge sharing chatbot. I say: ${command}. You reply:`
  const response = await fetch(`https://api.openai.com/v1/completions`,
            {
                body: JSON.stringify({"model": "text-davinci-003", "prompt": prompt, "temperature": 0.86, "max_tokens": 256}),
                method: "POST",
                headers: {
                    "content-type": "application/json",
                    Authorization: "Bearer [YOUR API KEY]",
                },
                    }
        ).then((response) => {
            if (response.ok) {
                response.json().then((json) => {
                    terminal.echo(json.choices[0].text.trim());
                });
            }
        });
What it does:
- in the first line the user input stored in the command variable becomes part of a prompt that we will send over to OpenAI’s GPT-3 model
- second line sends a request to the OpenAI API endpoint where we can access the latest GPT-3 model “text-davinci-003” which is specified in the body of our request along the prompt, the temperature and the max amount of tokens we want to use.
- again, don’t forget to add you API KEY in the Authorization part without any brackets
- in the lower part handles the response from the API and pushes GPT-3’s reply into the terminal as a response
The complete javascript code in “script.js” should now look like this:
$("#terminal").terminal(async function (command, terminal) {
    try {
        const prompt = `you are a helpful, knowledge sharing chatbot. I say: ${command}. You reply:`
        const response = await fetch(
            `https://api.openai.com/v1/completions`,
            {
                body: JSON.stringify({"model": "text-davinci-003", "prompt": prompt, "temperature": 0.86, "max_tokens": 256}),
                method: "POST",
                headers: {
                    "content-type": "application/json",
                    Authorization: "Bearer [YOUR API KEY]",
                },
                    }
        ).then((response) => {
            if (response.ok) {
                response.json().then((json) => {
                    terminal.echo(json.choices[0].text.trim());
                });
            }
        });

        console.log("Completed!");
    } catch (err) { console.error(`Error: ${err}`) }
},
    {
        greetings: 'GPT-3 Chatbot v0.1',
        name: 'gpt3_demo',
        height: 400,
        width: 800,
        prompt: '> '
    });
We’re done.
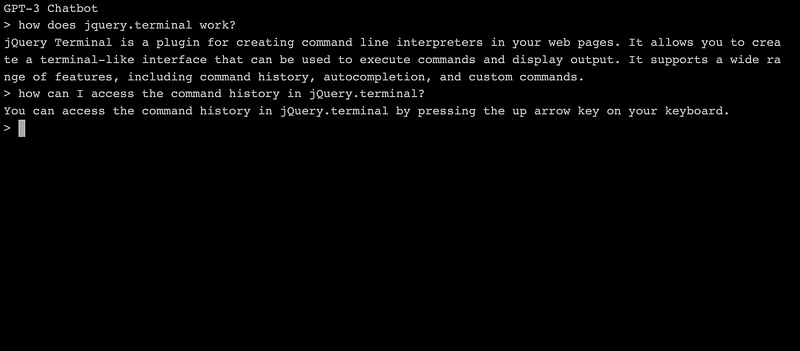
Start your browser and open “chatbot.html” (make sure that “script.js” is in the same directory). Your basic GPT-3 chatbot is ready, but it does not remember your chat history, so be specific when asking follow-up questions.
Have fun customizing the chatbot to your needs! For more articles about GPT-3, ChatGPT and Prompt Engineering, check out my reading list:


