How To Create QR Codes with Logos: Unique QR for Your Brand: Python Script included!
Hey there! I’m super stoked to share my latest passion project with you all: “How To Create QR Codes with Logos: Unique QR for Your Brand: Python Script included!” In this friggin’ fantastic article, I’m gonna spill the beans on how you can create your very own custom QR codes that not only work like a charm but also make your brand stand out from the crowd.

And because I’m such a generous Python enthusiast, I’ll also throw in the Python script that I personally crafted with love, care, and a pinch of humor. So buckle up, grab your favorite beverage, and let’s get this QR party started!
Workflow details
Alright, folks! Now that I’ve got your attention with that amazing introduction, let’s dive into the nitty-gritty of creating these snazzy QR codes with embedded logos. Here’s a little Python script I whipped up that you can use as-is or modify to suit your needs. I’ll guide you through the workflow so you can get a better understanding of what’s happening under the hood.
- Step 1: Importing the necessary libraries We kick things off by importing a few essential libraries:
qrcode,PySimpleGUI,PIL(Python Imaging Library),io,os, andtkinter. These bad boys will help us create the QR codes, build a simple GUI, and handle image processing. - Step 2: Define the
create_qr_codefunction Next up, we define a function calledcreate_qr_codethat takes a text, QR code color, background color, and an optional logo path. This function creates a QR code with the specified colors, and if a logo is provided, it embeds it right in the middle of the QR code. Fancy, huh? - Step 3: Define the
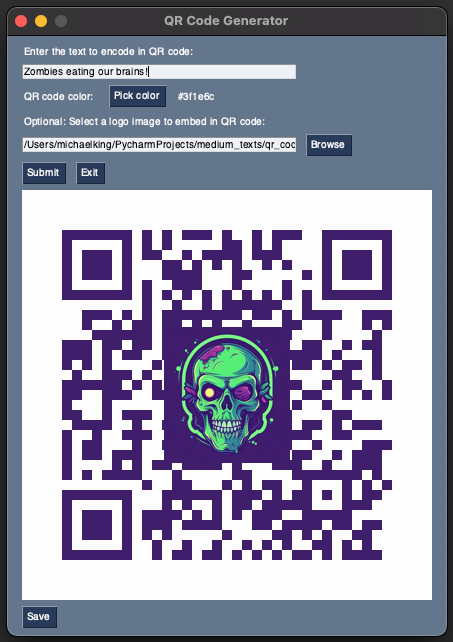
convert_to_bytesfunction This function takes an image and converts it to a byte array. We'll use it later when updating the GUI's image element. - Step 4: Set up the GUI layout We create a simple GUI layout using
PySimpleGUI. The layout includes input fields for text, QR code color, and logo, as well as buttons to generate, save, and exit the application. Plus, there's an image element to display the QR code. - Step 5: Create the main event loop The event loop is where the magic happens. It listens for button clicks and other events. When the “Pick color” button is clicked, it opens a color picker to choose a custom color for the QR code. When the “Submit” button is clicked, it calls the
create_qr_codefunction and updates the image element with the generated QR code. And finally, when the "Save" button is clicked, it saves the QR code as a PNG file. - Step 6: Close the window When the user clicks the “Exit” button or closes the window, the event loop breaks, and the window is closed.
Prerequisites
Before you can run this fun little script, you’ll need to make sure you’ve got all the required libraries installed. No worries, though! I’ve got you covered. Here’s a quick rundown of how to install the necessary libraries using pip.
First, make sure you have Python and pip installed on your machine. If you haven't, you can download Python from the official website (https://www.python.org/downloads/) and follow the instructions. The good news is that pip comes bundled with Python installations since version 3.4 for Python 3 and version 2.7.9 for Python 2.
Now, open your terminal or command prompt, and let’s get those libraries installed:
- qrcode: To install the
qrcodelibrary, simply run the following command:
pip install qrcode- PySimpleGUI: To install
PySimpleGUI, use the following command:
pip install PySimpleGUI- PIL (Python Imaging Library): The Python Imaging Library is now part of the
Pillowlibrary, so you'll need to installPillowinstead. Run the following command to do so:
pip install PillowThat’s it! With these libraries installed, you’re all set to run the script and create your very own QR codes with logos.
Python Script
import qrcode
import PySimpleGUI as sg
from PIL import Image
import io
import os
from tkinter import colorchooser

def create_qr_code(text, qr_color, back_color="white", logo_path=None):
    qr = qrcode.QRCode(
        version=1,
        error_correction=qrcode.constants.ERROR_CORRECT_H,
        box_size=10,
        border=4,
    )
    qr.add_data(text)
    qr.make(fit=True)

    img = qr.make_image(fill_color=qr_color, back_color=back_color).convert("RGBA")

    if logo_path and os.path.isfile(logo_path):
        logo = Image.open(logo_path).convert("RGBA")
        logo_width, logo_height = logo.size
        img_width, img_height = img.size
        scale_factor = min(img_width // 3, img_height // 3, logo_width, logo_height)
        logo.thumbnail((scale_factor, scale_factor))
        logo_pos = ((img_width - logo.width) // 2, (img_height - logo.height) // 2)

        logo_no_alpha = Image.new("RGB", logo.size, (255, 255, 255))
        logo_no_alpha.paste(logo, mask=logo.split()[3])

        img.paste(logo_no_alpha, logo_pos, mask=logo.split()[3])

    return img

def convert_to_bytes(img):
    with io.BytesIO() as bio:
        img.save(bio, format="PNG")
        return bio.getvalue()

layout = [
    [sg.Text("Enter the text to encode in QR code:")],
    [sg.InputText(key="INPUT_TEXT")],
    [sg.Text("QR code color: "), sg.Button("Pick color", key="PICK_COLOR"), sg.Text("black", key="QR_COLOR", size=(10, 1))],
    [sg.Text("Optional: Select a logo image to embed in QR code:")],
    [sg.InputText(key="LOGO_PATH"), sg.FileBrowse(file_types=(("Image Files", "*.png;*.jpg;*.jpeg;*.bmp;*.gif"),))],
    [sg.Button("Submit"), sg.Button("Exit")],
    [sg.Image(key="QR_IMAGE")],
    [sg.Button("Save"), sg.Text("QR code image not saved", key="SAVE_STATUS", text_color="red", visible=False)]
]

window = sg.Window("QR Code Generator", layout)
chosen_color = 'black'

while True:
    event, values = window.read()
    if event == sg.WIN_CLOSED or event == "Exit":
        break

    if event == "PICK_COLOR":
        chosen_color = colorchooser.askcolor()[1]
        if chosen_color:
            window["QR_COLOR"].update(chosen_color)

    if event == "Submit":
        text = values["INPUT_TEXT"]
        qr_color = chosen_color
        logo_path = values["LOGO_PATH"]
        img = create_qr_code(text, qr_color=qr_color, logo_path=logo_path)
        img_byte_array = convert_to_bytes(img)
        window["QR_IMAGE"].update(data=img_byte_array)
        window["SAVE_STATUS"].update(visible=False)

    if event == "Save":
        if "img" in locals():
            file_name = sg.popup_get_file("Save QR code image as", save_as=True, file_types=(("PNG Files", "*.png"),))
            if file_name:
                img.save(f'{file_name}.png')
                window["SAVE_STATUS"].update(f"QR code image saved as \n{file_name}.png", text_color="black", visible=True)
            else:
                window["SAVE_STATUS"].update("QR code image not saved", text_color="red", visible=True)
        else:
            sg.popup("No QR code to save. Please generate a QR code first.")

window.close()
So, there you have it, my fellow Python enthusiasts! We’ve ventured through the magical realm of custom QR codes with logos, learned how to install the necessary libraries, and shared a fantastic Python script that’ll surely leave your friends and colleagues in awe. I hope you’ve enjoyed this thrilling ride as much as I have!
But wait, there’s more! If you can’t get enough of my curious, funny, and oh-so-helpful Python adventures, then do yourself a favor and follow my channel! By subscribing, you’ll be the first to know when I drop new content and share even more of my Python wisdom. Trust me, you won’t want to miss out on all the exciting stuff I’ve got in store for you.
So, what are you waiting for? Click that “Follow” button, and let’s keep exploring the wonderful world of Python together! And as always, don’t hesitate to share your thoughts, questions, or wild Python escapades in the comments section. I love hearing from you!
Until next time, happy coding, and may your QR codes be as unique and fabulous as you are!