
How to Create LLaMa 2 Chatbot with Gradio and Hugging Face in Free Colab.
Thanks to Gradio, you build the chatbot UI in one line of code!

The landscape of open-source Large Language Models is fascinating.
At the time of writing this article, LLaMa 2 models get the most hype. So it’s worth learning how to chat with the models.
In this article, you’ll learn how to build a chatbot with Gradio ChatInterface and Hugging Face. And you’ll be able to run the code in the free Colab notebook!
Because we’ll go through every single step, this tutorial is beginner-friendly. But also experienced engineers will learn a lot, as we talk about cutting-edge technologies, such as Llama 2.
Workflow
In this step-by-step guide, we will go through the following steps:
- Installations: We’ll begin by setting up our environment with the required libraries.
- Prerequisites: Ensure we have access to the Llama-2 7B model on Hugging Face.
- Loading the Model & Tokenizer: Retrieve the model and tokenizer for our session.
- Creating the Llama Pipeline: Prepare our model for generating responses.
- Formatting the Prompt for Llama 2: Prepare messages to follow the right prompting structure.
- Generating Llama Responses: Create a function to get responses based on your chat history.
- Interacting with Llama through Gradio’s ChatInterface: Prompt the model for answers and explore its capabilities.
Note: At the end of this article, you’ll find all useful links, including a ready-to-go Colab notebook with the project described in this article (and a video version of this guide).
Let’s dive in and have some fun!
Prerequisites.
Before we move to the code, you’ll need to invest 2 minutes to go through these 3 necessary steps:
- Ensure you’ve switched your Colab runtime to GPU for optimal performance. In the menu on top go to
Runtime -> Change runtime typeand select “T4 GPU”. - Create an account on Hugging Face to access models. Register here.
- Access to Llama 2. Submit the form here (ensure to check the Code Llama checkbox). Important: The email you provide in the form MUST be exactly the same as the email for your Hugging Face account. Also important: it will take several minutes to get access to the model.
Now, you’re ready to rock!
Step 1: Install Required Libraries.
We’ll need the following Python libraries:
- Hugging Face Transformers: Provides us with a straightforward way to use pre-trained models.
- PyTorch: Serves as the backbone for deep learning operations.
- Accelerate: Optimizes PyTorch operations, especially on GPU.
To install them, run:
!pip install transformers torch accelerate
Then, we need the newest version of Gradio because we want to use the convenient ChatInterface Just run:
!pip install --upgrade gradio
Note: You may face problems installing gradio. If you get an error that says: NotImplementedError: A UTF-8 locale is required. Got ANSI_X3.4-1968 do the following:
- Run the code:
import locale
locale.setlocale(locale.LC_ALL, 'en_US.UTF-8')
2. Restart Runtime: Runtime -> Restart Runtime
Cool, let’s move on!
Step 2. Authenticate with Hugging Face
Authenticate your session to get permission to fetch the Llama-2 7B model.
!huggingface-cli login
That’s how you run the Hugging Face code as YOU.
Step 2A. Verify your Hugging Face Identity
Double-check your login status to make sure everything’s in order.
!huggingface-cli whoamiIn the output, you should see your Hugging Face username.
Step 3. Load the Model & Tokenizer
It’s time to bring in both the Llama model and its tokenizer.
from transformers import AutoTokenizer

model = "meta-llama/Llama-2-7b-chat-hf"
tokenizer = AutoTokenizer.from_pretrained(model, use_auth_token=True)
As a reminder, we’re using the 7B parameter version of Llama 2 fine-tuned for chatbots.
Step 4. Create the Llama Pipeline
Set up a simplified pipeline to generate text responses from your prompts.
from transformers import pipeline

llama_pipeline = pipeline(
    "text-generation",
    model=model,
    torch_dtype=torch.float16,
    device_map="auto",
)
Note: This is the step when we actually load the Llama 2 model. So this code will take a couple of minutes to complete.
We set 4 parameters in the pipeline, but the first two are crucial:
- “text-generation” is the task we want our pipeline to perform. Check out the complete list of tasks.
- “model” is the model we’re using. For us, it’s the previously defined 7B chat Llama 2.
Step 5. Format Prompts for Llama.
Before we dive into the code, we need to answer 1 question:
How to prompt Llama 2 the RIGHT way?
If you worked with OpenAI API, you prompted GPT models with a simple function call by adding the messages and the "role" parameter. And the API took care of everything else.
But prompting open-source models is more complex. And it requires developers to know how the particular model was fine-tuned. Then, they follow the exact structure to generate model responses.
Now, when we prompt Llama 2, we need to follow this structure:
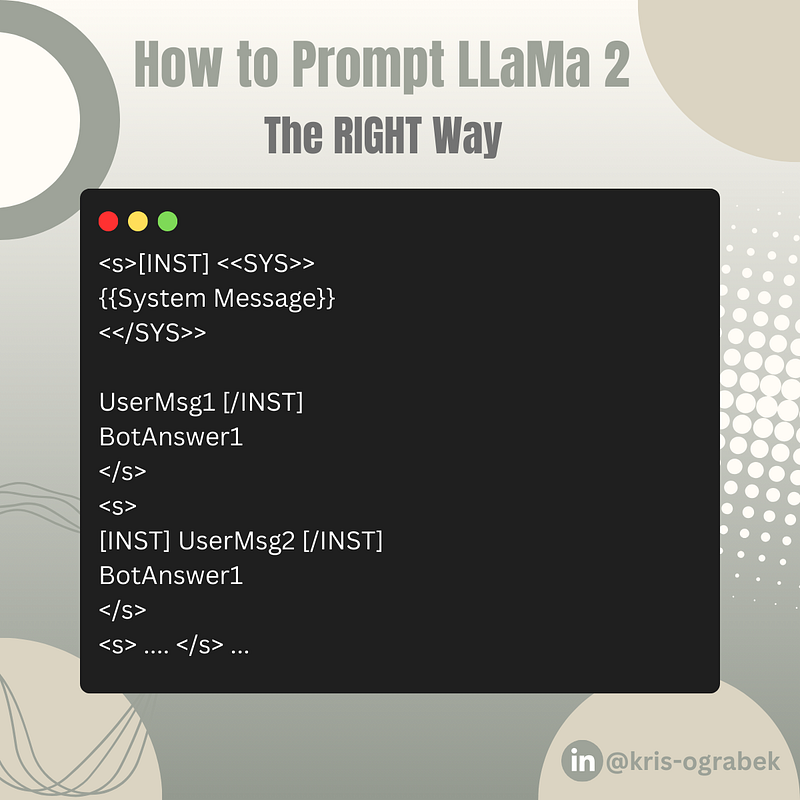
Let me give you an example:
Let’s break it down:
<s></s>are the “sentence” tokens. We use them to separate each exchange of the conversation. Think of them as a “turn” that contains a single user query and bot’s response.[INST][/INST]are tokens for the user instruction. We put each user query between the tags.<<SYS>><</SYS>>are tokens for the system prompt. We use it to give model the clear instructions on how it should behave. We pass the system prompt between the user instruction tokens in the first “turn” of the conversation.
So how does it look in the code? Here’s the format_message function that ensures we follow the structure you just learned:
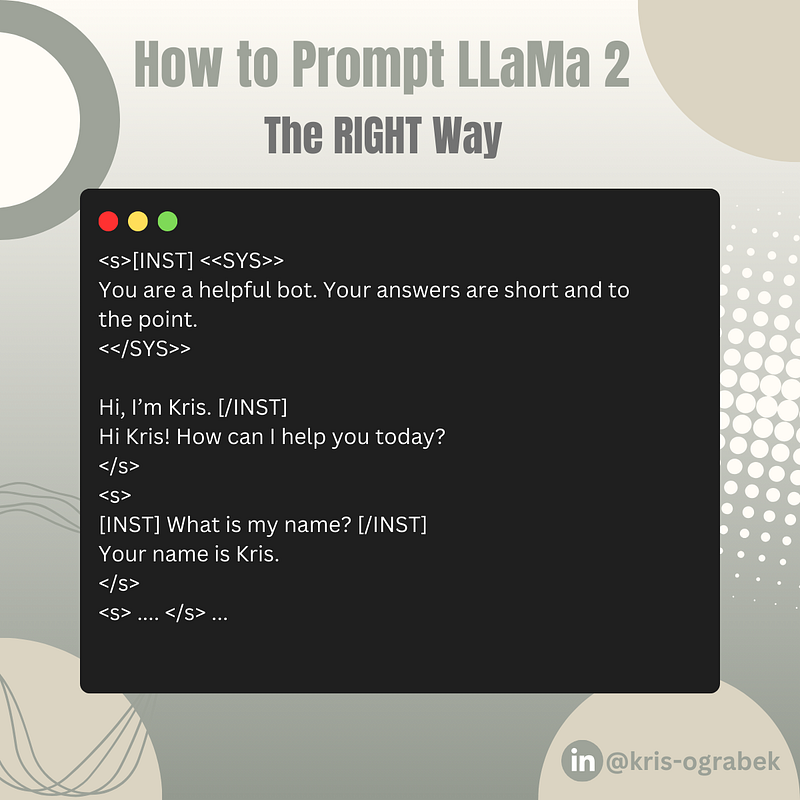
SYSTEM_PROMPT = """<s>[INST] <<SYS>>
You are a helpful bot. Your answers are clear and concise.
<</SYS>>

"""

# Formatting function for message and history
def format_message(message: str, history: list, memory_limit: int = 3) -> str:
    """
    Formats the message and history for the Llama model.

    Parameters:
        message (str): Current message to send.
        history (list): Past conversation history.
        memory_limit (int): Limit on how many past interactions to consider.

    Returns:
        str: Formatted message string
    """
    # always keep len(history) <= memory_limit
    if len(history) > memory_limit:
        history = history[-memory_limit:]

    if len(history) == 0:
        return SYSTEM_PROMPT + f"{message} [/INST]"

    formatted_message = SYSTEM_PROMPT + f"{history[0][0]} [/INST] {history[0][1]} </s>"

    # Handle conversation history
    for user_msg, model_answer in history[1:]:
        formatted_message += f"<s>[INST] {user_msg} [/INST] {model_answer} </s>"

    # Handle the current message
    formatted_message += f"<s>[INST] {message} [/INST]"

    return formatted_message
Let’s explain the function parameters we’ve used here:
message— user’s current message.history— the chat history of the current conversation.memory_limit— the number of last “turns” we pass to the model.
Also, on top of the code snippet, we’ve added our SYSTEM_PROMT to inform the model how it should behave. It starts with the <s>[INST]<<SYS>> line to ensure we follow the right prompting structure.
Note: h/t Abhishek Thakur for the function. Link to the source below.
OK, we’ve covered the hardest part! Let’s move on.
Step 6: Generate Responses from Llama 2.
It’s time to use our llama_pipeline() and let the Llama answer our prompts. Here’s the function:
# Generate a response from the Llama model
def get_llama_response(message: str, history: list) -> str:
    """
    Generates a conversational response from the Llama model.

    Parameters:
        message (str): User's input message.
        history (list): Past conversation history.

    Returns:
        str: Generated response from the Llama model.
    """
    query = format_message(message, history)
    response = ""

    sequences = llama_pipeline(
        query,
        do_sample=True,
        top_k=10,
        num_return_sequences=1,
        eos_token_id=tokenizer.eos_token_id,
        max_length=1024,
    )

    generated_text = sequences[0]['generated_text']
    response = generated_text[len(query):]  # Remove the prompt from the output

    print("Chatbot:", response.strip())
    return response.strip()
Important to know:
- We first format our prompt with the
format_messagefunction from the previous step. - the
messageandhistoryparameters come directly fromChatInterfacewe’ll show in the next step.
Awesome, let’s have some fun!
Step 7: Interact with Llama 2.
This is by far the easiest step to implement. Here’s how:
import gradio as gr

gr.ChatInterface(get_llama_response).launch()
This piece of code will result in a fully functional chatbot:
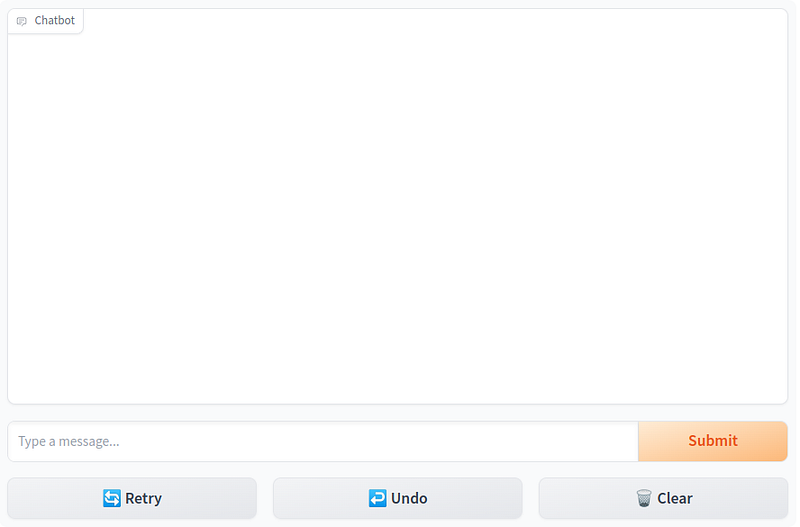
In the ChatInterface(get_llama_response) part, the only parameter is the function to generate answers. Gradio will pass the message and history automatically.
Final Words.
You’ve done it!
You can now chat with the Llama 2 7B model!
And you can run everything in a free Colab notebook.
As always, I highly encourage you to experiment!
Take the code and play with it:
- Change some parameters in the
llama_pipeline - Play with the system prompt
- Write your own prompts
That’s how you actually learn!
But before you go…
Did you like the article?
I create practical projects with Large Language Models. And I teach everything I learn along the way! If you want to see more content like this, give me a follow. Also, head to the comment section for this article to tell me what liked (or disliked).
Connect with me on LinkedIn.
References:
- Code in Colab for this project.
- Hugging Face Blog: “Llama 2 is here.”
- Llama 2 with Gradio by Abhishek Thakur.
- Chat with Llama 2 on Hugging Face Spaces.
- Build apps with Hugging Face & Gradio on DeepLearning.ai.
And last but not least, here’s the video version of this tutorial:


