
How to Create Cron Jobs in Your Next.js Project with Vercel — A Comprehensive Guide
From sending email notifications to backing up your database, cron jobs can make your life a lot easier

If you’ve ever wanted to perform scheduled tasks in your Next.js project, you’ve likely come across cron jobs. They’re an essential part of modern web development, allowing for repetitive tasks to be carried out at regular intervals. From sending email notifications to backing up your database, cron jobs can make your life a lot easier.
In this article, I’m going to share my personal experience implementing cron jobs in a Next.js project hosted on Vercel.
We’ll dive deep into the subject, exploring the tools and techniques that make the process smooth and efficient.
Understanding Cron Jobs
Before we jump into the implementation, let’s have a brief overview of what cron jobs are.
Essentially, they are scheduled tasks that run at specific intervals defined using a special syntax.
A cron expression is a string consisting of five or six fields, separated by white space, which represents a schedule.
Here’s a basic breakdown:
- Minute (0–59): This field represents the minute of the hour when the command will run.
- Hour (0–23): This field represents the hour of the day when the command will run.
- Day of the month (1–31): This field represents the day of the month when the command will run.
- Month (1–12): This field represents the month of the year when the command will run.
- Day of the week (0–7): This field represents the day of the week. Both 0 and 7 stand for Sunday.
Optional sixth field
- Year: This field represents the year when the command will run (optional and rarely used).
Example of a Cron Expression
Here’s an example:
* * * * * command-to-be-executed
This would run the command-to-be-executed every minute.
Here’s a more specific example:
30 14 1 * * command-to-be-executed
This would run the command-to-be-executed at 2:30 pm on the first day of every month.
Special Characters
You’ll also encounter some special characters in cron expressions:
- Asterisk (*): Represents ‘every’ value for that position.
- Comma (,): Specifies a list of values, e.g.,
2,4,6in the day-of-week field would mean Monday, Wednesday, and Friday. - Hyphen (-): Specifies a range of values, e.g.,
1-5in the day-of-week field would mean Monday to Friday. - Slash (/): Specifies step values, e.g.,
*/2in the day-of-month field would mean every two days.
Setting Up a Next.js Project with Vercel
First things first, let’s set up a new Next.js project. If you’re familiar with Next.js, feel free to skip this part.
If not, follow these simple steps:
Create a New Project
Open your terminal and run:
npx create-next-app my-nextjs-project
cd my-nextjs-project
Deploy to Vercel
Once your project is ready, you can deploy it to Vercel. Install Vercel CLI if you haven’t:
npm i -g vercel
vercel
Adding Cron Jobs to Your Next.js Project
In your Next.js project, you can create an API route to handle the cron job:
// /api/cron.js
export default (req, res) => {
  // Your cron job logic here
  res.status(200).send('Cron job executed successfully');
}
You’ll also need to create/update a vercel.json file:
{
  "crons": [{
    "path": "/api/cron",
    "schedule": "0 10 * * *"
  }]
}
Then, with Vercel, it’s possible to manage Cron Jobs directly from the dashboard.
Here’s how you can do it:
- Log in to Vercel: Navigate to Vercel’s website and log in to your account.
- Select Your Project: Choose the Next.js project you want to work with.
- Navigate to Settings: In the project dashboard, click on the “Settings” tab.
- Access Cron Jobs (Beta): Inside the settings menu, there should be a “Cron Jobs” option. Click on this to access the Cron Jobs settings.
- Enable Cron Jobs: You might need to enable it by clicking the toggle button.
And that’s all!
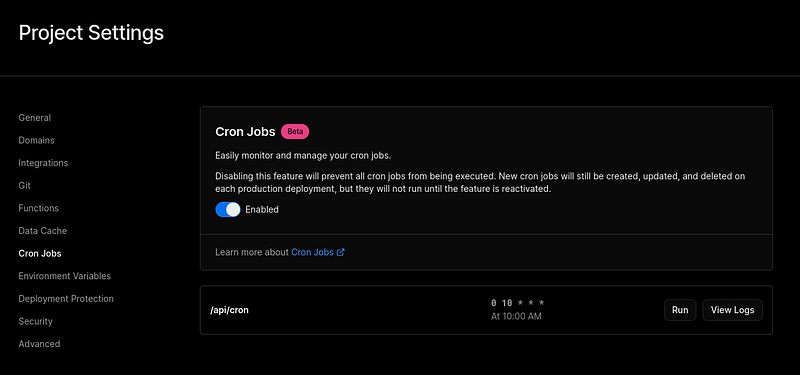
Please note that the exact options and layout might vary, especially if this feature is in beta.
Always refer to the official Vercel documentation or support if you encounter any issues or have specific questions.
By following these steps, you should be able to successfully add and manage Cron Jobs directly in your Vercel dashboard for a Next.js project.
- Vercel Dashboard: Login or signup to access your projects and manage Cron Jobs.
- Next.js Documentation: The official Next.js documentation is a comprehensive resource for all things related to Next.js.
- Vercel Documentation: While I don’t have a direct link to the specific section on Cron Jobs (as it might be a newer feature), you can explore the Vercel documentation for information on deployment, configuration, and other features.
- Cron Syntax: If you’re unfamiliar with Cron syntax, websites like Crontab Guru can be helpful in generating the correct expression for your desired schedule.
- Vercel Support: If you have specific questions or run into issues, Vercel’s support might be the best place to get assistance.
Enjoyed the read? For more on Web Development, JavaScript, Next.js, Cybersecurity, and Blockchain, check out my other articles here:
If you have questions or feedback, don’t hesitate to reach out at [email protected] or in the comments section.
[Disclosure: Every article I pen is a fusion of my ideas and the supportive capabilities of artificial intelligence. While AI assists in refining and elaborating, the core thoughts and concepts stem from my perspective and knowledge. To know more about my creative process, read this article.]
In Plain English 🚀
Thank you for being a part of the In Plain English community! Before you go:
- Be sure to clap and follow the writer ️👏️️
- Follow us: X | LinkedIn | YouTube | Discord | Newsletter
- Visit our other platforms: Stackademic | CoFeed | Venture | Cubed
- More content at PlainEnglish.io


