
How To Create An Impressive GitHub Profile README

What is GitHub profile README?
GitHub shows your profile README at the top of your profile page. You can share information about yourself with the community on GitHub by creating a profile README.
You decide what information to include in your profile README, so you have full control over how you present yourself on GitHub.
My GitHub profile looks this way:
https://github.com/Matrix278/Matrix278

Let’s create your own GitHub profile
First of all, to create a special repository, you will need to have a new repository with the name that matches your GitHub username, so go ahead and create it if you still don’t have it.

Then we will need to create a README file in it with the content you want. I have used some generator that helped me to fast get some readable casual style that looks good. Here it is https://github.com/rahuldkjain/github-profile-readme-generator.
With that, you can collect your summary, skills, social media easily. Add any of the add-ons you will love to have, like displaying top skills, visitors count, GitHub trophies, and other stats. Then, when you are ready, copy the generated content and push it into your README of the new repository.
Having this completed, you will have a new GitHub look.
Contribution grid snake
If you followed my profile to view README, you may have noticed how the snake crawls on my contribution grid. I will show you how to tune it. Thanks to https://github.com/Platane/snk.

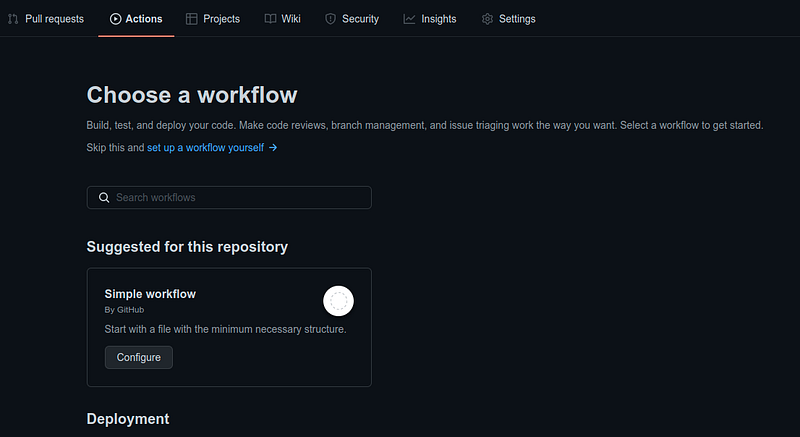
To create it, you will need to use GitHub Actions for that. Just head out to the Actions tab in your profile repository and create a new simple workflow file that will be suggested to you, we will change the content of it.
Take my workflow from yml file. This configuration will generate a contribution snake grid every 24 hours on a new branch called output, you can change it how you want it to generate for you. Don’t forget to change the github_user_name in the file as well to yours. Below you can see the yml file.
EDIT 29.03.2023: Updated yml file for new version as the maintainer provided comment that there is a new features.
EDIT 05.01.2024: Updated yml file to work with new changes.
# GitHub Action for generating a contribution graph with a snake eating your contributions.

name: Generate Snake

# Controls when the action will run. This action runs every 24 hours.

on:
  schedule:
    # every 24 hours
    - cron: "0 */24 * * *"

  # This command allows us to run the Action automatically from the Actions tab.
  workflow_dispatch:

# The sequence of runs in this workflow:
jobs:
  # This workflow contains a single job called "build"
  build:
    # The type of runner that the job will run on
    permissions:
      contents: write
    runs-on: ubuntu-latest
    timeout-minutes: 5

    # Steps represent a sequence of tasks that will be executed as part of the job
    steps:
      # Checks repo under $GITHUB_WORKSHOP, so your job can access it
      - uses: actions/checkout@v2

      # Generates a snake game from a github user (<github_user_name>) contributions graph, output a svg animation at <svg_out_path>
      - name: generate-snake-game-from-github-contribution-grid
        uses: Platane/snk@v3
        id: snake-gif
        with:
          github_user_name: {GITHUB_USER_NAME}
          outputs: |
            dist/github-snake.svg
            dist/github-snake-dark.svg?palette=github-dark
            dist/ocean.gif?color_snake=orange&color_dots=#bfd6f6,#8dbdff,#64a1f4,#4b91f1,#3c7dd9

      # show the status of the build. Makes it easier for debugging (if there's any issues).
      - run: git status

      # Push the changes
      - name: Push changes
        uses: ad-m/github-push-action@master
        with:
          github_token: ${{ secrets.GITHUB_TOKEN }}
          branch: master
          force: true

      - uses: crazy-max/[email protected]
        with:
          # the output branch we mentioned above
          target_branch: output
          build_dir: dist
        env:
          GITHUB_TOKEN: ${{ secrets.GITHUB_TOKEN }}
After committing and pushing workflow to your branch, you can go to your README again and add your snake grid gif to any place you want it to be. As an example, by adding this piece of code and replacing {GITHUB_USER_NAME} with your GitHub username:
EDIT 29.03.2023: I am using the ocean.gif here from above yml destination folder. If you have the same yml file, you can use for example github-snake.svg or github-snake-dark.svg
<p align="center">
  <img src="https://github.com/Matrix278/Matrix278/raw/output/ocean.gif" alt="snake">
</p>
With all that completed, now you should have all configured and the snake will be updating by itself within your written schedule configuration (my 24h).
That’s all on that, if you got that far, and it helped you don’t forget to clap and follow me if you liked it, and share your opinion in the comments.
If you are not a Medium member and would like to gain unlimited access to the platform, consider supporting me by signing up with my referral link. It will help me to get a tiny amount from your fees. It’s $5 a month as a regular Medium subscription, but you will support me. Thank you :)


