
How to Create an Angular Material Table with a Sticky Header and First Column
The Angular Material table can have a sticky header or first column with just a few lines of CSS or by using an angular directive. Either way is very simple, and I’ll show both methods, but I prefer the CSS method.
First we will create a wrapper around the table and give it max height and width so that scroll bars are forced, then we will set position: sticky on the appropriate elements. Here's the stick first column example that we will create in this demo:
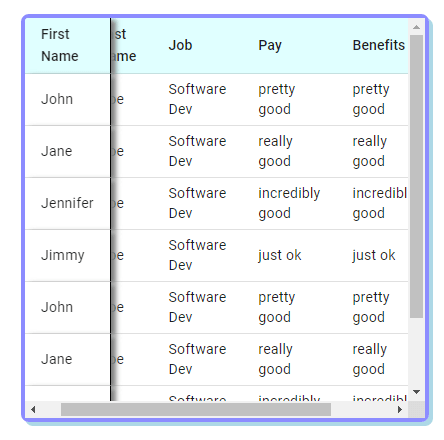
This tutorial starts with the table code that can be found in my Angular Material table styling tutorial. I didn’t want to repeat some of the data and HTML setup, so take a look at that post to get full code. In the sections below, I will show the code specific to creating sticky column and header.
How to Force Angular Material Table Vertical and Horizontal Scrollbars
An Angular Material table has two requirements for showing a vertical scrollbar:
- The table element needs to be wrapped in an element with a fixed height
- The table has enough content that its height exceeds the table wrapper height
The same is true for showing a horizontal scrollbar, except that the horizontal scrollbar requires the content of each row to be wider than the fixed width of the wrapper.
Here is a snippet of the html from my sticky table component:
This div will have a fixed height and width so that the scrollbars show if the child table is big enough.
Here is the CSS required to make the table container element a fixed size:
.table-container { max-height: 400px; max-width: 400px; overflow: scroll; }Notice that I also added overflow: scroll; to the table wrapper. This is required or else the table content overflowing the table container will be visible.
If we have a vertical scrollbar appearing on our table, there are two ways we can add a fixed header. First is to add the sticky directive to the tr element with the matHeaderRowDef attribute. The Angular Material docs describe the process. Here's the code:
However, this was not working for me. I didn’t see position: sticky applied anywhere in the DOM to the thead or tr elements. It might be failing because of my outer wrapper on my table.
Instead, I used the second method which is to add position: sticky using a CSS selector.
First we need to figure out which mat class to target. Take a look at the DOM screenshot below:

We want the header to be sticky, so we need to target either the thead element or the tr element. The thead does not have a class on it, so it's easier to target the tr.
Here’s the code to make the tr in the header sticky by selecting its class:
.mat-mdc-header-row { position: sticky; top: 0; background-color: lightcyan }Both the position: sticky and the top: 0 values are necessary for the header to stick to the 'top' of it's containing element. I added some background color just to make the header stand out better on scroll.

We can style Angular Material Tab headers as well.
How to Create a Sticky First Column in an Angular Material Table
If we have a horizontal scrollbar on our Angular Material table wrapping element, then we can create a fixed first column in the table element ( here’s a tutorial on setting first column width).
We can use the sticky directive mentioned in the Angular Material docs. Even though the sticky header directive did not work, the sticky column directive did work for me. Here's the code:
<ng-container matColumnDef="firstName" sticky> <th mat-header-cell *matHeaderCellDef> First Name </th> <td mat-cell *matCellDef="let person"> {{person.firstName}} </td> </ng-container>If we want to use pure CSS instead of using a directive, we can target the first column with a selector. I like this approach when I also want to add some other styling to the first column; it keeps everything in my control. The Angular Material table does not have apply a unique class to the first column, so we have to add our own:
<ng-container matColumnDef="firstName"> <th mat-header-cell *matHeaderCellDef class="first-column"> First Name </th> <td mat-cell *matCellDef="let person" class="first-column"> {{person.firstName}} </td> </ng-container>Notice that I added class=first-column to both the th and the td elements. Now we can target this class with our sticky CSS:
.first-column { position: sticky; left: 0; background-color: white; box-shadow: 5px 2px 5px grey; border-right: 1px solid black; }Just like with a sticky header, the sticky column needs both position: sticky and left: 0;. I also added some background and column styling. Now we have the table pictured in the intro section.
The code I showed in the Sticky Header section works perfectly if there is not a sticky first column, and the sticky first column code works if there is no sticky header. In order for them to work together, we need to set a z-index on both the header and the column:
.mat-mdc-header-row { z-index: 9999; } .first-column: { z-index: 9998; }Without this, the column has a higher z-index and the vertical scroll does not work with both.
Check out my tutorial on Angular Material Button color if you need to add some styled buttons to your table, and here’s how to add an Action column to the table.
Considering a Medium subscription?
If this article was helpful and you want to sign up for a Medium subscription, please consider doing so through my referral page. This supports me financially so that I can continue creating excellent dev articles.


