
How to create a Vue 2.7 component library powered by Vite, TypeScript, and Vitest.

Perhaps you’re wondering, “Why choose Vue 2 when it’s no longer maintained?” The answer is simple: you shouldn’t, unless you have a very specific case.
In my case, I faced a micro frontend architecture with six applications using a custom component library that extends Vuetify. This library relies on Vue Class Component, Vue Property Decorator, and other dependencies that make migration impractical due to time constraints.
To solve some specific simple problems without repeating code along the six projects, we needed a way to share code between all projects. So, I've started to explore how I could create this new "legacy project" using the most modern tools where it is possible.
1 — Starting the project
To create a Vue 2 project powered with Vite, make sure you have Node installed (I'm using v18.19.0) and run the command:
npm create vue@legacy component-lib

Now, as it is said in the output of the command, run:
cd component-lib
npm install
npm run lint
You don't have to run the "npm run dev" command now, as we have some work to do. Please open the "component-lib" folder with VS Code so we can start it.
2 — Create our first component
Open the file "src/components/HelloWorld.vue" and replace its contents with this:
<script setup lang="ts">
defineProps<{
  msg: string;
  subtitle?: string;
}>();
</script>

<template>
  <div class="wrapper">
    <h1>Hello World!</h1>
    <h2>{{ msg }}</h2>
    <h3>{{ subtitle }}</h3>
  </div>
</template>

<style scoped>
.wrapper {
  border: 1px solid #ccc;
  border-radius: 10px;
  padding: 10px 20px;
}
</style>
This simple component has a required and an optional prop, so it will be a good example for our future generated types.
Since we are in the "src/components" folder, delete the example files that we will not need:
- src/components/TheWelcome.vue
- src/components/WelcomeItem.vue
- src/components/icons (entire folder)
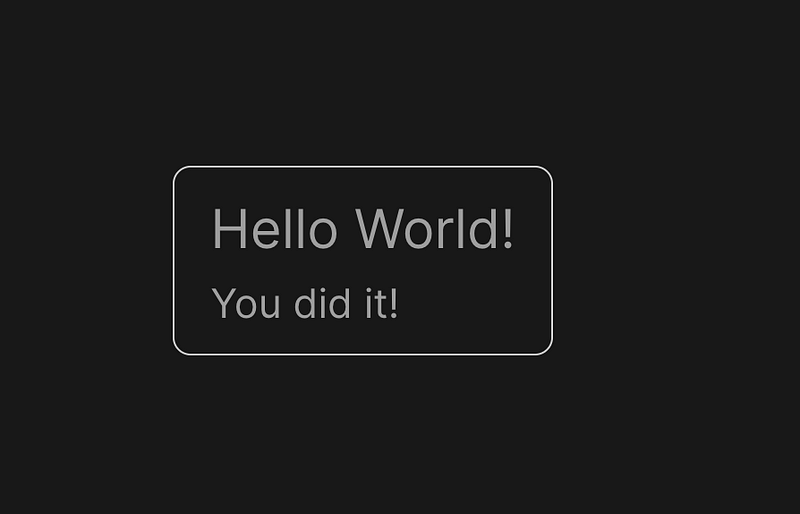
Now, replace the content of "src/App.vue" with this to make us able to see our HelloWorld component in action:
<script setup lang="ts">
import HelloWorld from "./components/HelloWorld.vue";
</script>

<template>
  <div id="app">
    <HelloWorld msg="You did it!" />
  </div>
</template>
3 — Create an export file
To expose our components to the user who will install the library, we need to export them from a file.
Create the file: "src/index.ts":
import HelloWorld from "./components/HelloWorld.vue";

// This is needed if the user want to install the library globally.
export default {
  install(Vue: Vue.VueConstructor) {
    Vue.component("HelloWorld", HelloWorld);
  },
};

// This is needed if the user want to import the components every time they want to use them.
export { HelloWorld };
4 — Install the necessary dependencies
I will install these two dependencies to make my life easier:
- vite-plugin-css-injected-by-js — this plugin takes the CSS and injects it into the component .js file. That means that we won't have to import any additional CSS files to use the components for the library.
- vite-plugin-dts — this plugin generates the TypeScript definitions of our components for the final bundle.
So, run the command:
npm i vite-plugin-css-injected-by-js vite-plugin-dts --save-dev5 — Enable Vite Library Mode
Vite provides a fast and easy way to create a component library bundle. To enable it, go to "/vite.config.ts" and replace the content with this:
import { fileURLToPath, URL } from "node:url";
import { resolve } from "path";
import { defineConfig } from "vite";
// Remove the legacy plugin, as we don't need suport for IE
// and it is does not support Vite Library Mode.
// import legacy from "@vitejs/plugin-legacy";
import vue2 from "@vitejs/plugin-vue2";
import dts from "vite-plugin-dts";
import cssInjectedByJsPlugin from "vite-plugin-css-injected-by-js";

// https://vitejs.dev/config/
export default defineConfig({
  plugins: [
    vue2(),
    dts(),
    cssInjectedByJsPlugin(),
    //     legacy({
    //       targets: ["ie >= 11"],
    //       additionalLegacyPolyfills: ["regenerator-runtime/runtime"],
    //    }),
  ],
  resolve: {
    alias: {
      "@": fileURLToPath(new URL("./src", import.meta.url)),
    },
  },
  build: {
    lib: {
      //Here, we set the entry file
      entry: resolve(__dirname, "src/index.ts"),
      //And the name of the library
      name: "component-lib",
    },
    rollupOptions: {
      //Here, we are externalizing Vue to prevent it to be bundled
      //with our library
      external: ["vue"],
      //Add this so the UMD build will recognize the global variables
      //of externalized dependencies
      output: {
        globals: {
          vue: "Vue",
        },
        exports: "named",
      },
    },
  },
});
Now, go to "/package.json" and modify its content:
{
  "name": "component-lib",
  "version": "0.0.0",
  "main": "./dist/component-lib.umd.cjs",
  "module": "./dist/component-lib.js",
  "typings": "./dist/index.d.ts",
  "type": "module",
  "scripts": {
    "dev": "vite",
    "build": "run-p type-check build-only",
    "preview": "vite preview --port 4173",
    "test:unit": "vitest --environment jsdom",
    "build-only": "vite build",
    "type-check": "vue-tsc --composite false",
    "lint": "eslint . --ext .vue,.js,.jsx,.cjs,.mjs,.ts,.tsx,.cts,.mts --fix --ignore-path .gitignore"
  },
  "dependencies": {
    "vue": "^2.7.7"
  },
  "devDependencies": {
    "@rushstack/eslint-patch": "^1.1.0",
    "@types/jsdom": "^16.2.14",
    "@types/node": "^16.11.45",
    "@vitejs/plugin-legacy": "^2.0.0",
    "@vitejs/plugin-vue2": "^1.1.2",
    "@vue/eslint-config-prettier": "^7.0.0",
    "@vue/eslint-config-typescript": "^11.0.0",
    "@vue/test-utils": "^1.3.0",
    "@vue/tsconfig": "^0.1.3",
    "eslint": "^8.5.0",
    "eslint-plugin-vue": "^9.0.0",
    "jsdom": "^20.0.0",
    "npm-run-all": "^4.1.5",
    "prettier": "^2.5.1",
    "terser": "^5.14.2",
    "typescript": "~4.7.4",
    "vite": "^3.0.2",
    "vite-plugin-css-injected-by-js": "^3.3.1",
    "vite-plugin-dts": "^3.7.1",
    "vitest": "^0.18.1",
    "vue-template-compiler": "^2.7.7",
    "vue-tsc": "^0.38.8"
  }
}
Here, I've added these entries:
- "main": the entry point of our library.
- "module": the entry point for more modern tools.
- "typings": the entry point of the TypeScript definitions.
- "type": used to make sure the project imports the ESM build of Vite.
And modified the "type-check" entry on "scripts" to align with the modifications in the tsconfig.json that I will make in the next step.
Now, to check if everything is working, we can run the dev command:
npm run dev

6 — Typing definitions
The Vue starter project with Vite extends the “tsconfig.json” from a dependency: “@vue/tsconfig.” While this isn’t necessarily a drawback, I find it to be a bit excessive for my specific needs. Additionally, some adjustments are required to correctly generate TypeScript definitions.
With that in mind, let's make our tsconfig.json
Please, delete the files:
- "/tsconfig.app.json"
- "/tsconfig.config.json"
- "/tsconfig.vitest.json"
And open "/tsconfig.json" and replace its contents with this:
{
  "compilerOptions": {
    //where our generate types will be placed
    "outDir": "./dist",
    //the JS is generated with Vite, but
    //our type definitions are generated with TS.
    //these two options make sure only the type definitions
    //are generated
    "declaration": true,
    "emitDeclarationOnly": true,
    //Recommended, because it enables a wide range of type checking
    "strict": true,
    //Forces consistency in casing of file names to not create
    //inconsistencies on filenames between platforms
    "forceConsistentCasingInFileNames": true,
    //We still have to put this here to be able to build
    //the types using modern Vite features like
    //dynamic `import()`s and `import.meta`
    "target": "ESNext",
    "module": "ESNext",
    //Makes typescript understand the imports on non .TS
    "moduleResolution": "Node",
    //let us import CommonJS libs more easily:
    // import moment from "moment";
    //instead of:
    // import * as moment from "moment";
    "esModuleInterop": true,
    //Avoids TS to stop compiling because of external
    //dependencies typings errors
    "skipLibCheck": true,
  },
  //includes on our generated types build:
  //the src/index.ts files and every .vue file inside /src
  "include": [
    "src/index.ts",
    "src/**/*.vue"
  ],
}
And that's it. We can now run the build command:
npm run build
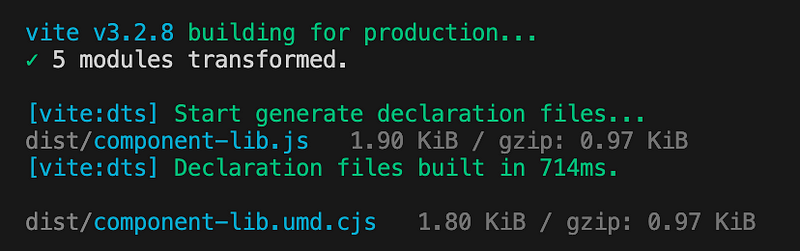
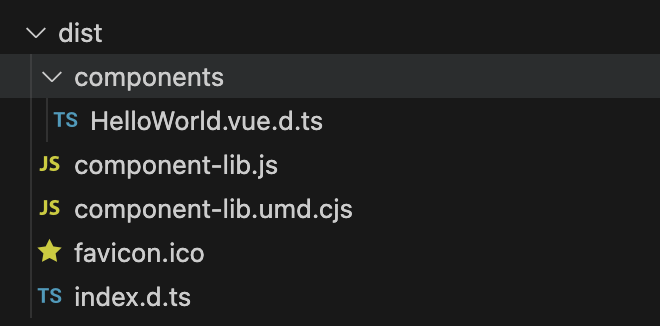
Our generated files should be in the "/dist" folder
7 — Installing the library on another project
Finally, we can see our component working on another project.
So we don't have to publish it to test, we can use the npm link command.
At the terminal, run:
npm link
Now, we will create another Vue simple project to be able to check if everything is working. To do this, in a different folder, run again:
npm create vue@legacy simple-project
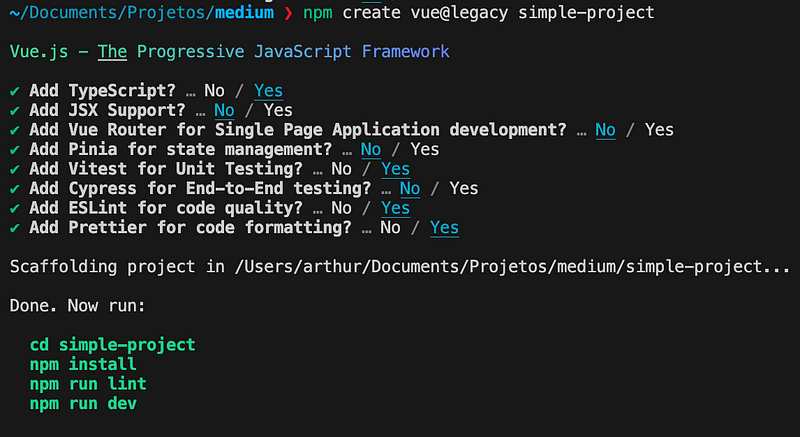
Again, run the commands as said on the output:
cd simple-project
npm install
npm run lint
Now, open the "simple-project" folder on another window of VS Code and run this command to install our component library on this project:
npm link component-libThis is the equivalent of "npm install component-lib", so after that, we should be already able to use our components. On our "simple-project", go to "src/App.vue" and replace its contents with this:
<script setup lang="ts">
import { HelloWorld } from "component-lib";
</script>

<template>
  <div id="app">
    <HelloWorld msg="I'm working (on another project)" />
  </div>
</template>
After that, run the command to see the component:
npm run dev

Open the URL, and we can see our component:

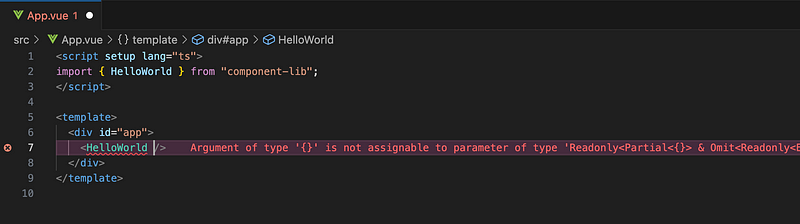
Going back to the source file "/src/App.vue", we can check if the types are being generated correctly.
If you remove the "msg" prop at line 7, TypeScript should complain about it:
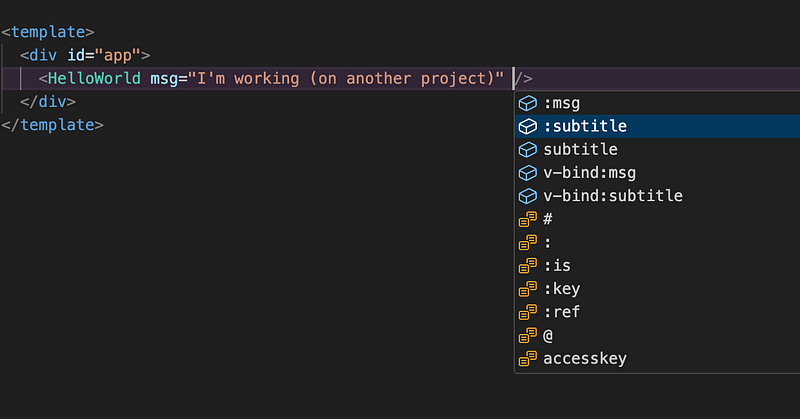
Also, you should get a suggestion of the name of the remaining prop when you use "Ctrl + Space".
That concludes this guide. Further, you can configure Storybook for a user-friendly interface to develop and test components, but that’s a topic for another guide.


