
How to Create a Signature Style for Your Article Images
Let readers know they haven’t seen the article before
Using Unsplash to find an image for your articles is easy. Click, type a keyword, and pick a picture.
The problem is that many other people who are writing on similar topics are doing the exact same thing.
People have visual memories. We’re much more likely to recognize an image we’ve seen before. This is because of the picture superiority effect for long-term recall.
So what happens if you’re using the same images as everyone else? Readers may mistakenly think they’ve already read your article.
Fortunately, there are three simple ways to create a signature image style.
The first method works if you (or someone you know) have artistic ability. The second and third will work for everyone.
Draw your own illustrations
When you draw your own illustrations, especially in a unique style, they leap out at the reader. If the reader has read and enjoyed your other work, they instantly want to read your new pieces.
An exceptional example of this is Philip Naudus. I love his writing style, and his articles are all custom illustrated by his wife. She’s a cartoonist. I see one of those koalas, and I don’t even have to read the article title. I’m already clicking on it.
Another author with unique artwork is Darius Foroux. He uses black and white line drawings with spot colors. His stoic philosophy articles use a common color palette of pastels. His other articles use bolder colors like blue, red, and green.
Also, much of his “art” consists of words, symbols, and basic stick people. That should reassure you that you don’t need to be a great artist to be able to illustrate your work.
You can also use photographs you’ve taken yourself. This is a popular solution for people who talk about gardening, cooking, or DIY projects. By taking a photograph, you give more information to the reader, as well as provide unique artwork.
Even if you can’t draw, you can combine clip-art backgrounds and characters. Use a free image manipulation tool such as GIMP. There are hundreds of thousands of free clip art images. If you mix and combine them to make your own image, you won’t confuse readers with repetitive stock images.
Manipulate a stock image
The second method of creating unique artwork is to manipulate a stock image. Anyone can manipulate a stock image, by using a free tool like Canva. You’ll need to download the image to your computer. Leave the stock image website open, because you’ll want to get the citation.
Then go to Canva. Start by clicking on “Create a design” and selecting an image size. You can either specify a custom size, or select one of their basic image sizes. Business card size of 3.5" x 2" is a good choice.
Select a template, and delete everything so you’re left with a blank background.
Then, upload the stock image you want to manipulate. You do that by clicking on Uploads, then the “Upload media” button. Click on “Device” and then select the name of the file you just downloaded from the dialogue box.
Once it has uploaded, drag the image to your blank background. If you touch the top of the image to the top of your background, it will automatically stretch to fill the space.
Change the focus of the image
One thing you can do to make your image different is to change the focus. Double click on the image and you will be able to stretch, shrink and move it as you like.
If you can’t see the edges of the image, adjust the slider at the bottom of the screen that shows the image resolution. It often defaults to around 300%, so you can see the most detail. You can drop that down to around 200% to stretch your image better.
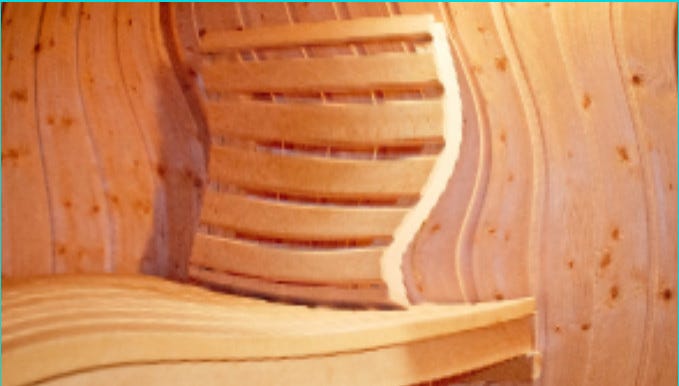
For example, here is an image of a sauna. I changed the focus so that only the bench was in my final image (the bright rectangle). You can see the bucket and ladle are grayed-out, beyond the active image area.
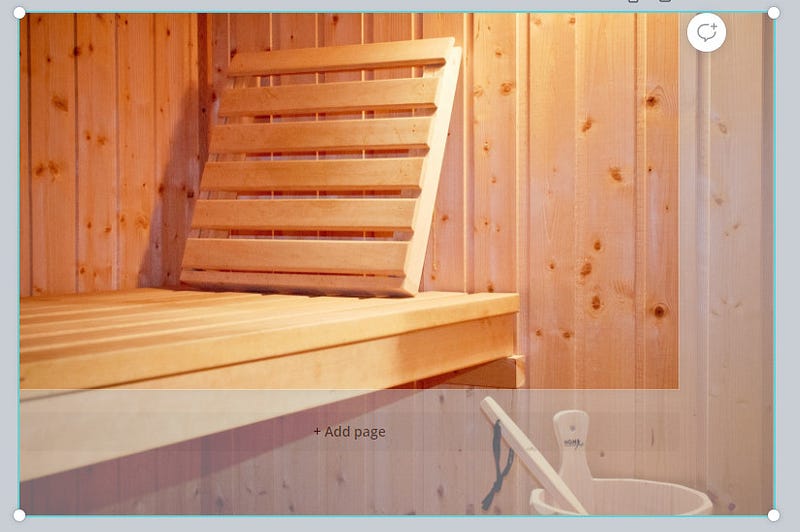
When you’re happy with your image refocus, click “Done”. It will then display only the active image area.
If you don’t like how it looks, you can always double-click on the image again. The entire image is saved, so you can keep adjusting what part of it you see.
Change the colors of the image
Another way you can make the image uniquely yours is to change the colors.
There are two ways to do this — effects and filters.
Filters are the simpler change. Click on Filter and then click on some of the displayed filter choices. They are all illustrated with how they will affect an image of a colorful balloon floating in the clouds.
The filter is like putting a color wash over your image. The default is a 50% wash, but you can turn the intensity up to 100% and down to 10%. (To turn it completely off, select None.) Filter is a great choice if you want all your images to have a similar color palette.
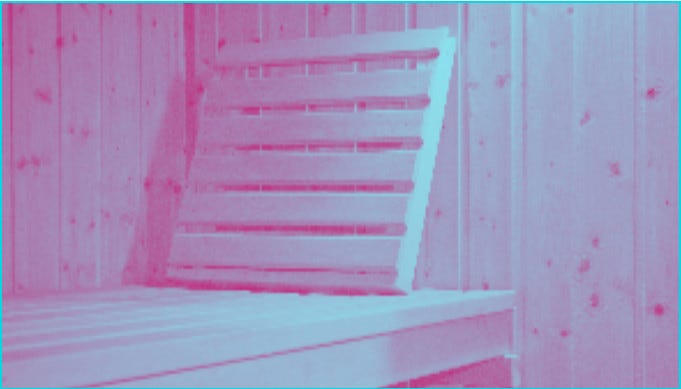
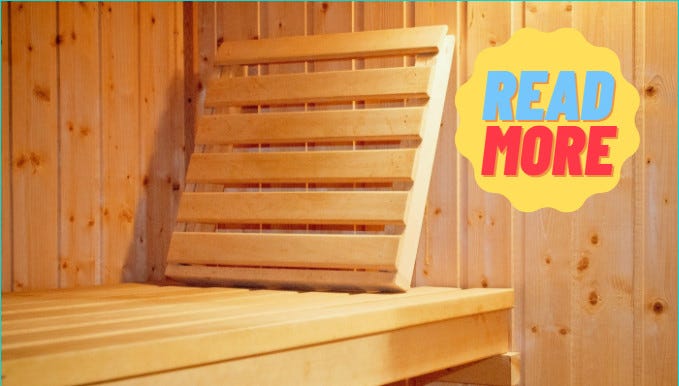
Here is how the image of the sauna looks with the Peony filter at 50%. It looks hotter already!

You can also use Effects for more dramatic color changes. To use effects, click on Effects. Then select the effect that you’d like to use. Some effects are not available to the free accounts. Those will be marked with a small crown. You can use any of the others for free.
As you did with the filters, to change the colors using an effect, click on the effect, then click on the color. When you get one you like, click the “Apply” button. Here are some examples of Duotone and Photogenic effects.
Make other changes to personalize it
Other effects are not restricted to colors. You can pixelate or liquify the image. Make it look like your RGB colors are not in alignment, or add noise. You can even put a frame around it.
There are also the standard image manipulation tools of cropping and flipping. Cropping lets some of the background color or pattern show through. Flipping lets you reverse the way the image is displayed. For example, if someone is shown walking right to left, and you want them to walk left to right, you’d flip them.
Here’s an example of the sauna image with the Wobble Liquify effect added. It looks like they were inhaling more than just steam in that sauna!
You really are only limited by your imagination for what you create.
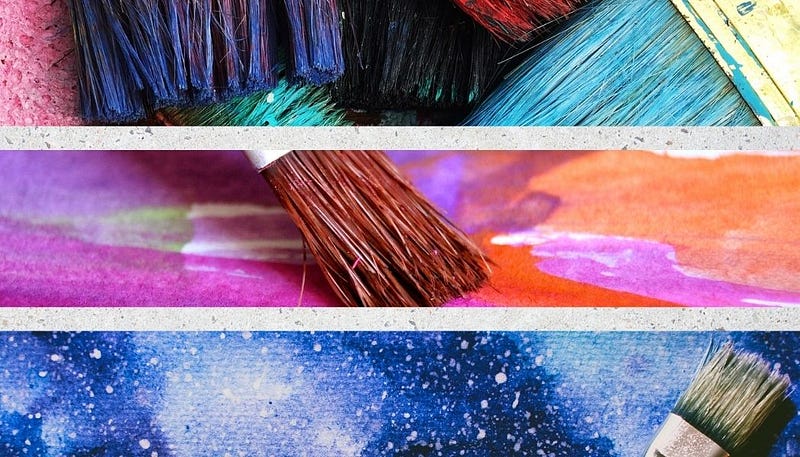
The cover image for this article was created in Canva using a Background of white stone. Then the Element of three horizontal frames in a Grid was added. I dragged and dropped three different Photos of paintbrushes onto the three frames.
That’s a far more unique image than if I’d simply used a single stock image of paintbrushes.
When your image looks the way you want it, click the download icon (a downward pointing arrow). Change the file type to JPG and click the Download button.
Create your own graphic template
The final choice for a signature graphic style is creating your own graphic template. I’ve done this on my publication, Getting Ready for the New Day. All images have the same crosshatched corners on them. That immediately identifies the article as belonging to that publication.
This is easy to do in Canva. Start with your first image, and add elements to it to customize it.
Add elements on top of your image
Click on Elements, on the far left hand side. This brings up a range of lines, shapes, graphics, frames, and grids that you can use.
When you add an element, you can change its color by clicking on the rainbow swirl box at the top menu bar.
That is also where you can send elements forward or backward, by clicking on Position. That’s sometimes needed if you’re working with elements on top of one another, and you need to get to the one in back. You can select the one in front, move it back, then work on the one that was in back. When you’re done, move that one back, and the one that used to be in front will be in front again.
You can also add text to your image, by clicking on Text. There are many different preset combinations of color and font you can choose from. Click any combination that you like, then click on it in the image to edit the words. Then drag and drop it or resize it.
Here’s an example of a frame, recolored yellow, with some text in the Free Delivery style. The text could be your name, or the name of your publication. Many publications specifically refuse images with text in them, so you probably only want to do this for articles you are self-publishing.
Add your image on top of a background
Another way you can create a graphic template is to use a background, and limit your stock image to one area. A circle, square, or other geometric figure in the center is a common method.
You can select a background for your template by clicking on Background on the far left hand side. If you don’t see an option for Background, click on More, then select Background.
Add elements such as shapes or frames to your background, as described above. Then put your stock image over the shape or frame. Use GIF stock images with invisible backgrounds, or crop the image to fit within the shape. If you used a frame, Canva will automatically crop the image to fit within the frame. Just drag it onto the frame.
If you want to be very creative with this, you may want to save the image with an empty shape or frame. Download it and import it into GIMP, where you can work with layers more easily. You can also change colors with more precision.
I created a background of a fence, with two circular elements in different colors in the center. Here’s an example of a standard stock photo, and the way it looks with the custom background.
Conclusion
If you want readers to recognize your articles as ones they haven’t read yet, you need custom artwork. Then your article image won’t look like everyone else’s.
There are three ways to create custom images.
The first is to create your own artwork. You can draw it, take photos, or use clipart.
The second is to use stock photos but manipulate them. You can change colors, change focus, or add other photo effects.
The third is to create a template for your images, then add images to a frame within that template.
Whichever way you choose, you’ll have unique and memorable images for your articles. Readers will know they haven’t read that article before.
Ready to have a better tomorrow?
I’ve created a guide to help you increase your confidence and improve your life. If you follow these tips, you will level up your life very quickly!


