
How to Create a Navigation Bar and Sidebar Using React
Hello everyone! Shmoji here! Today, I am going to teach you how to create a functioning navigation bar using React. The navbar I focus on will be a sidebar because I did not want to focus on a header this time. However, there will be a functioning header in the project just like you see in the picture below.
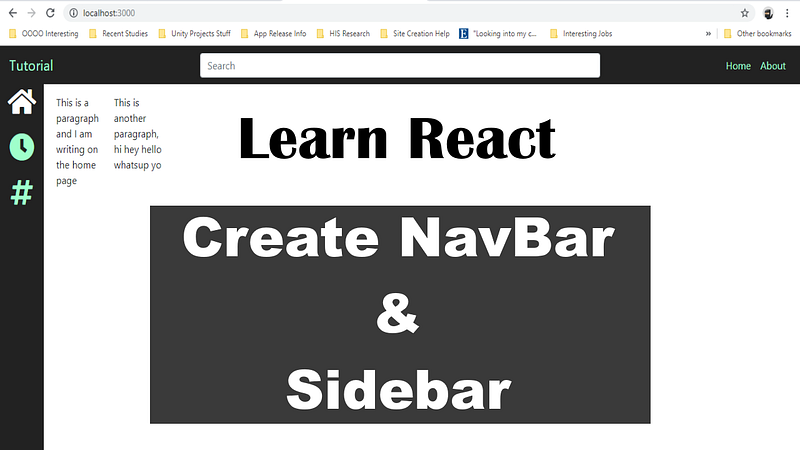
This tutorial follows my YouTube tutorial. If you just want the code, here is the GitHub repository and please follow if it helps.
First of all, you need to open the command line and make sure you have npm downloaded:
npm --versionYou can download npm here.
Now go into a folder where you would like to store your project. I keep mine in a ReactWorkspace folder:
cd ReactWorkspaceCreate your React app:
npm init react-app navbar-tutAfter that is done, you want to open your project in an IDE. I use Visual Studio Code (VSC) because it is amazing, but feel free to use whatever you like. If using VSC, open your project by typing:
cd navbar-tut
code .
So, we have this basic React app template. To run your web application and see what your current website looks like, type this in your terminal:
npm startThe browser appears showing it worked, yay. Time to set up some basic stuff.
Go into package.json and paste these dependencies in there:
"bootstrap": "^4.3.1",
"react": "^16.10.2",
"react-bootstrap": "^1.0.0-beta.14",
"react-dom": "^16.10.2",
"react-router-dom": "^5.0.1",
"react-scripts": "3.1.1",
"styled-components": "^4.3.2"
Now actually install these dependencies by opening a terminal and typing:
npm installCool. Paste this link in the <head> tag inside index.html. It is for Font Awesome icons:
<!-- Including Font Awesome -->
<link rel="stylesheet" href="https://use.fontawesome.com/releases/v5.7.2/css/all.css" integrity="sha384-fnmOCqbTlWIlj8LyTjo7mOUStjsKC4pOpQbqyi7RrhN7udi9RwhKkMHpvLbHG9Sr" crossorigin="anonymous">
Remember that header I talked about earlier? Let’s add the code for that. You don’t need a header, but it looks good with the sidebar we are making.
Right click on the src folder and create a folder called components.
Right click on the components folder and create a NavigationBar.js file. Paste this code:
import React from 'react';
import { Nav, Navbar, Form, FormControl } from 'react-bootstrap';
import styled from 'styled-components';
const Styles = styled.div`
.navbar { background-color: #222; }
a, .navbar-nav, .navbar-light .nav-link {
color: #9FFFCB;
&:hover { color: white; }
}
.navbar-brand {
font-size: 1.4em;
color: #9FFFCB;
&:hover { color: white; }
}
.form-center {
position: absolute !important;
left: 25%;
right: 25%;
}
`;export const NavigationBar = () => (
<Styles>
<Navbar expand="lg">
<Navbar.Brand href="/">Tutorial</Navbar.Brand>
<Navbar.Toggle aria-controls="basic-navbar-nav"/>
<Form className="form-center">
<FormControl type="text" placeholder="Search" className="" />
</Form>
<Navbar.Collapse id="basic-navbar-nav">
<Nav className="ml-auto">
<Nav.Item><Nav.Link href="/">Home</Nav.Link></Nav.Item>
<Nav.Item><Nav.Link href="/about">About</Nav.Link></Nav.Item>
</Nav>
</Navbar.Collapse>
</Navbar>
</Styles>
)Now go into App.js and add the appropriate imports:
import '../node_modules/bootstrap/dist/css/bootstrap.min.css';
import { BrowserRouter as Router, Route, Switch } from "react-router-dom";
import { NavigationBar } from './components/NavigationBar';
Delete everything out of the return and add this:
<React.Fragment>
  <Router>
    <NavigationBar />
  </Router>
</React.Fragment>
Save and check your browser to see if the header is there. If there is a header, but it looks different from the picture above, try redownloading dependencies. Always restart your server after using npm install.
Routing is how you get from page to page, so paste the code below inside
<Switch>
  <Route exact path="/" component={Home} />
  <Route path="/about" component={About} />
  <Route component={NoMatch} />
</Switch>
This currently breaks the app because we do not have these components. So, let’s add these pages to make sure navigation will work. The code inside these pages does not really matter, I just put some random stuff to make sure that we can see a difference in the different pages.
Inside of src, create Home.js and paste this inside:
import React from 'react';
import styled from 'styled-components';
const GridWrapper = styled.div`
display: grid;
grid-gap: 10px;
margin-top: 1em;
margin-left: 6em;
margin-right: 6em;
grid-template-columns: repeat(12, 1fr);
grid-auto-rows: minmax(25px, auto);
`;export const Home = (props) => (
<GridWrapper>
<p>This is a paragraph and I am writing on the home page</p>
<p>This is another paragraph, hi hey hello whatsup yo</p>
</GridWrapper>
)Create About.js and paste this inside:
import React from 'react';
import styled from 'styled-components';
const GridWrapper = styled.div`
display: grid;
grid-gap: 10px;
margin-top: 1em;
margin-left: 6em;
margin-right: 6em;
grid-template-columns: repeat(12, 1fr);
grid-auto-rows: minmax(25px, auto);
`; export const About = () => (
<GridWrapper>
<h2>About Page</h2>
<p>State at ceiling lay on arms while you're using the keyboard so this human feeds me.</p>
<p>I am a kitty cat, sup, feed me, no cares in the world</p>
<p>Meow meow, I tell my human purr for no reason but to chase after</p>
</GridWrapper>
)Create NoMatch.js and paste this inside:
import React from 'react';
import styled from 'styled-components';
const Wrapper = styled.div`
margin-top: 1em;
margin-left: 6em;
margin-right: 6em;
`;export const NoMatch = () => (
<Wrapper>
<h2>No Match</h2>
</Wrapper>
)Now go into App.js, import these pages, and the routing Gods will be happy.
import { Home } from './Home';
import { About } from './About';
import { NoMatch } from './NoMatch';
Go to your browser and click the links on your header to see routing works!
Alright, we can actually create the sidebar now. I will try to explain this code in more detail, instead of just pasting it in and leaving you to figure it out.
Inside of components, create Sidebar.js
We know that we want to create a Sidebar component and export it for use inside of App.js. Put this inside Sidebar.js:
import React from 'react';export default class Sidebar extends React.Component {
render() {
  return (

  );
}
}This basically says: please export this as the default React component and whatever we put inside of return will be rendered.
Paste the code below into return:
<SideNav></SideNav>This is a SideNav component that has not been created. Let’s create it. Above the Sidebar class, paste this:
class SideNav extends React.Component {}
This basically says: create a new component. Sometimes you will hear it called as a React component or ES6 class or just class component.
Add render and return inside SideNav:
render() {
return (
);
}So, what do we want our SideNav to look like? WELL, we want a black bar to go down the screen. That means we are getting into the HTML and CSS area.
I should let you know that I like to use styled-components for styling in React. It is completely different from inline styles, so I recommend you to follow along and not use your own styling.
First, let’s import styled-components. It lets you make tags that control their own CSS. Now create a StyledSideNav:
import styled from "styled-components";/* This defines the actual bar going down the screen */
const StyledSideNav = styled.div`
position: fixed; /* Fixed Sidebar (stay in place on scroll and position relative to viewport) */
height: 100%;
width: 75px; /* Set the width of the sidebar */
z-index: 1; /* Stay on top of everything */
top: 3.4em; /* Stay at the top */
background-color: #222; /* Black */
overflow-x: hidden; /* Disable horizontal scroll */
padding-top: 10px;
`;This tutorial isn’t about CSS, so just read my comments or Google if confused.
Now place
<StyledSideNav></StyledSideNav>In order to see this in the browser, import it into App.js:
import Sidebar from './components/Sidebar';Place
<Sidebar />Sweet, we have a sidebar!
Now let’s add some clickable icons.
The way that I would like to do this is to have a NavItem div, which holds a NavIcon div. There may be a better way, but I will do it this way.
This may not make sense at first, but bare with me, it will come together.
So, create a NavItem component like so:
class NavItem extends React.Component {
  render() {
return ( );
}
}Inside of render, but above return, type:
const { active } = this.props;This gets the active variable out of NavItem’s props. If you do not know what props are, you better go Google it friend.
In order to use navigation, import the stuff needed:
import { BrowserRouter as Router, Route, Link } from "react-router-dom";Inside NavItem’s return, add this:
<StyledNavItem active={active}>
  <Link to={this.props.path} className={this.props.css} onClick={this.handleClick}>
    <NavIcon></NavIcon>
  </Link>
</StyledNavItem>
If you look at the props on <Link>, to is the path to go to, className passes in the CSS for the Font Awesome icon, and onClick will call the handleClick() method. Let’s create that method. Put it above render:
handleClick = () => {
  const { path, onItemClick } = this.props;
  onItemClick(path);
}
This arrow function gets path and onItemClick from NavItem’s props and then calls onItemClick().
Awesome. So, this will currently not work, so let’s do some more work. Add NavIcon. I am leaving it blank, but add any CSS you need:
const NavIcon = styled.div``;
Create StyledNavItem. The <Link> tag uses an anchor, so, the anchor selector is used. The only confusing part about the CSS is the part that uses props. It says: using the active prop, decide which of the colors to choose. So, if the home page is active, make the home page icon white:
const StyledNavItem = styled.div`
  height: 70px;
  width: 75px; /* width must be same size as NavBar to center */
  text-align: center; /* Aligns <a> inside of NavIcon div */
  margin-bottom: 0;   /* Puts space between NavItems */
  a {
    font-size: 2.7em;
    color: ${(props) => props.active ? "white" : "#9FFFCB"};
    :hover {
      opacity: 0.7;
      text-decoration: none; /* Gets rid of underlining of icons */
    }
  }
`;
So…where is our NavItem getting all these props from? Well, we have not done that part yet…so let’s do it!
Go into SideNav. We want SideNav to be a stateful component. This is because it needs to store what the current path is and based on that decide which icon should be selected and colored white.
Create a constructor. In there, create a state that holds the activePath, which we will set to the home path for now, and items that holds the information for our selectable icons:
constructor(props) {
  super(props);
  this.state = {
    activePath: '/',
    items: [
      {
        path: '/', /* path is used as id to check which NavItem is active basically */
        name: 'Home',
        css: 'fa fa-fw fa-home',
        key: 1 /* Key is required, else console throws error. Does this please you Mr. Browser?! */
      },
      {
        path: '/about',
        name: 'About',
        css: 'fa fa-fw fa-clock',
        key: 2
      },
      {
        path: '/NoMatch',
        name: 'NoMatch',
        css: 'fas fa-hashtag',
        key: 3
      },
    ]
  }
}
So, do you remember earlier how we needed an onItemClick() function to be passed into NavItem as a prop? Let’s create that now under our constructor:
onItemClick = (path) => {
  this.setState({ activePath: path }); /* Sets activePath which causes rerender which causes CSS to change */
}
All this code says is change the activePath by setting the state. If you do not know, whenever you call setState(), React will rerender your component, which will render the change to show you selected a different icon.
One last thing and life should be good. I generally recommend not going this long without checking for errors, but here I am doing just that.
Change your render to look like this:
render() {
  const { items, activePath } = this.state;
  return (
    <StyledSideNav>
      {
        /* items = just array AND map() loops thru that array AND item is param of that loop */
        items.map((item) => {
          /* Return however many NavItems in array to be rendered */
          return (
            <NavItem path={item.path} name={item.name} css={item.css} onItemClick={this.onItemClick} /* Simply passed an entire function to onClick prop */ active={item.path === activePath} key={item.key}/>
          )
        })
      }
    </StyledSideNav>
  );
}
Before return, items and activePath are retrieved from the state. In order to render out all NavItems, we loop through all of the items using map().
WAM, you should now have a sidebar with nice-looking navigation.
However…there is still one issue. If you open any page in your web application, it always defaults to the home icon. For example, if you type the /about route in the URL and search, the home icon would still be selected.

So, we need to change the activePath in the constructor to the current path. Since Sidebar is not inside of a
Inside Sidebar.js, import withRouter():
import { BrowserRouter as Router, Route, Link, withRouter } from "react-router-dom";Create a component underneath SideNav that wraps SideNav:
const RouterSideNav = withRouter(SideNav);Now use
Now, you have access to props.location.pathname. Only children of
activePath: props.location.pathname,Save it and you should be all done. Cool beans!
With a basic knowledge of HTML and CSS you can also add text underneath your icons like the picture below, but to keep it brief I will not do that:

I hope I was able to help you out today. If so, feel free to clap, share, or follow. If you have any questions, please comment below and I will see what I can do.
Shmoji out!
🐱👤 Follow my social media to keep up-to-date:


