
How to Create a Lesson Plan for a Training Session
Lessons Plans are ideal for longer courses delivered by multiple trainers

It’s a truth universally acknowledged that any training session must be in want of a lesson plan.
OK, enough with the Jane Austen plagiarism, though it has reminded me that I haven’t read Pride and Prejudice for a while, so it’s due for a re-read.
Back to the topic, the poor old lesson plan has taken a dive in popularity over the last decade, with leaders and trainers preferring to use notes in PowerPoint.
A quick and dirty method is OK for a short presentation, but you need a lesson plan for sessions over a couple of hours.
Why?
A lesson plan means that other people can deliver your session, your training is structured correctly, and if you have a large gap between delivery and the session, you have a detailed record of what you created.
If they know the topic, any trainer can pick up a lesson plan and quickly learn how to deliver the session.
TL;DR: Get a free lesson plan template here.
What is a lesson plan?
A lesson plan is a written plan of what you’ll deliver in the training and includes:
- Objectives of the session
- Equipment required
- Timings
- What you will do
- What the trainees will do
- Learning styles
- The structure of the training
- What resources you will need for each part of the training
The Front Page of Your Lesson Plan
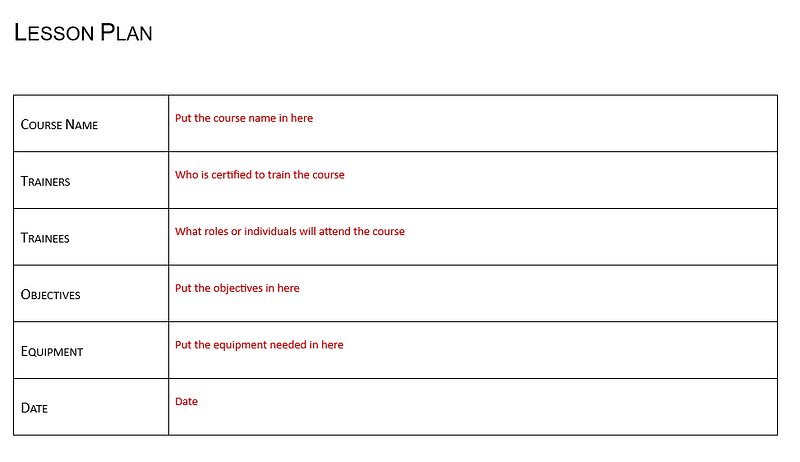
The first page of your lesson plan includes the course name, who will run the course, course objectives, who will attend, and what equipment you need.
Most of the content is self-explanatory, and the most useful box is the equipment needed.
Draw up the list once and getting everything ready on the day — or preferably the day before — of the training will be a breeze.
Include everything you’ll need: water, glasses, biscuits, lunch, pens, whiteboard, flip charts, PowerPoint presentations, wi-fi, TV screen, learning resources, feedback sheets, and data sticks.
You never know when you’ll have to change venues; the list will help you check whether the new training room is suitable.
Subsequent Pages of Your Lesson Plan
Use the other pages of the lesson plan to design your session.

Time column
The time column is for two things: the time each section starts and the duration of the section.
Break up the training into sections that make sense, and don’t make them too long. It helps if you change the pace or have a different activity every 8 minutes, or your trainees will get bored.
Remember to put in time for housekeeping, ground rules, breaks, an assessment, a wrap-up, and questions at the end.
As the training progresses, you can monitor whether you are holding to time. You can adapt the lesson plan if you consistently go over or under time in certain sections.
Trainer column

The trainer column states what the trainer will be doing and could be:
- Welcoming the trainees
- Explaining Ground Rules
- Asking questions
- Presenting Powerpoint slides
- Leading and explaining activities
- Brainstorms
- Role plays
- Handing out workbooks, assessments
- Demonstrations
- Listening
- Playing videos or audio
- Writing on flip charts or whiteboards
- Keeping an eye on people doing assessments or coursework
As well as what you are physically doing, include the main points you want to cover for each section; that way, you will remember everything.
If you are co-presenting, you can indicate who is delivering which part of the session in this column.
Trainee Column
The trainee column states what your trainees will be doing and could be:
- Listening
- Answering questions
- Writing on the flip chart or whiteboard
- Completing questions in workbooks
- Working in groups
- Doing activities
- Role plays
- Case studies
- Sharing expertise
- Watching videos
- Doing assessments and exams
Knowing what your trainees will be doing helps you assess how long they are doing each activity and what type of activity they are doing.
As you design each session, you can adapt the timings if your trainees are doing one activity for too long. You want the trainees to remain engaged, so switch between various types of activity.
No one wants to listen to a PowerPoint for 30 minutes or do role-plays for three hours.
VARK Column
The VARK column ensures you’ve covered all the learning styles to engage everyone in the room.
Vark stands for:
- Visual
- Audio
- Read/Write
- Kinesthetic
and describes the way we learn.
Visual learners learn via charts, graphs, flow charts, and schematics.
Audio learners learn by hearing information, for example, lectures, podcasts, radio, and TED Talks.
Read/Write learners use reading and writing and learn by writing bullet points and making lists.
Kinesthetic learners learn by doing.
We all have a mix of learning styles, and it’s essential to include them all in a training session to make the session effective for everyone.
It’s tempting to write a training session that appeals to our preferred learning style, so make sure you check all the styles in the session.
I am primarily a read/write learner. When I create the first draft of a lesson plan, it has plenty of activities that would appeal to a read/write, audio, and kinesthetic learner, but I need more for visual learners.
Even though I know this and include some activities for visual learners, I still have to go back and put more in.
If you put your VARK letters in the column to indicate the learning style of each section, you can monitor the balance of learning styles and adjust if necessary.
Learn more about learning styles here.
ITRA Column
The ITRA column is another handy little tool where you can ensure the flow of your training makes sense.
I — Introduction
T — Training
R — Review
A — Assess
This column is where you split up the sessions into the
- Introduction (tell them what you are going to tell them)
- Training (tell them)
- Review (tell them what you’ve told them)
- Assess (find out if they can tell you it back)
It’s pretty basic stuff, but you’d be surprised how many times I’ve seen someone dive straight into a topic without outlining what the topic is and why it’s important.
You can combine the review with questions; the assessment can be as simple as asking questions or taking a quiz.
Resources Column

The resources column is where you write what resources you need, such as:
- Attendance forms
- Workbooks
- Handouts
- Equipment for Exercises & Activities
- Case Studies
- Feedback Forms
- PowerPoint Slides (a small image of the slide is helpful)
- Pens, Whiteboard, Flipcharts
- Laminates, photos, flashcards
- Logins and Passwords
- Access to eLearning portals or LMS
- Prizes such as chocolate, sweets, small trophies
- Laptops and tablets
- Technical equipment such as radios or cameras
- Certificates
For a two-hour training session, you won’t need this number of resources, but for a three-day course, it’s a good idea to keep things interesting with many varied activities.
Summary
A well-planned training session is more likely to be effective than a jumbled message that varies from course to course.
Sure, a short session doesn’t always require a plan, as there is less to get confused about, fewer objectives, handouts, slides, exercises, and much less information.
For a longer course, writing the lesson plan helps you structure the course as you design it.
It’s unrealistic to think you’ll write everything in one session. I usually move between the lesson plan, the slide deck, and the workbook to stay energized.
If you are designing a course that will be delivered many times, by different people and over a long period of time, it pays to create a lesson plan.
Thanks for reading and have a great day :-)
If you found this article useful and you’d like a free lesson plan template, click here.