
How To Create A CRUD Desktop App With Golang, Fyne, and MongoDB
Here is an example that shows you how to create a data entry desktop app capable of CRUD operations using the Go language, the Fyne GUI toolkit, and the MongoDB database server.

In this article, I will show you how to create a small desktop app in which you can enter, view, update and delete contact information. I will program this app in the Go language (Golang) and use the Fyne GUI toolkit to create the user interface. The contact information will be stored in a MongoDB database collection.
Furthermore, this article is a continuation of my previous articles on Fyne and MongoDB. You’ll see concepts described in those articles and some new ideas. If you experience difficulty following the concepts of this article, then you may want to read the previous ones first.
These articles result from my conclusions based on my explorations of the Go language.
Pre-Requisites
Ensure that you have installed the Fyne package and the MongoDB drivers for Go. To build Go programs that use Fyne, you also need to have GCC installed. In addition, you’ll need to have the MongoDB server installed.
I have also found it helpful to install the MongoDB Compass app for troubleshooting.
The Basic Struct
We’ll need a data structure to represent the contacts that we wish to save in our desktop app.
This is essentially an ordinary struct, but with added annotations for BSON. BSON is a binary version of JSON used by MongoDB. You read more about using structs with BSON annotations here.
In line 2, we create a particular property called ID that will hold the unique identifier _id given by MongoDB when we create and insert a document into a collection. Hence, we have added this key in the BSON annotation. We have also supplied the property ID with the type primitive.ObjectID. This is a particular type defined for the MongoDB identifiers.
For more information on the use of BSON, read here.
The CRUD Functions
Given that at least one of the CRUD functions needed to be called multiple times, I decided to implement them in individual functions outside the main() program's function. In addition, this will make it easier to restructure the program in the future.
First, we ‘package’ the context and the MongoDB contact collection into one data structure called ContactCollection. This structure can be created easily using the NewContactCollection() constructor.
Then, we implement the 4 CRUD functions:
- Create is implemented by
CreateContact() - Read is implemented by
GetAll() - Update is implemented by
UpdateContact() - Delete is implemented by
DeleteContact()
These functions use the context and contact collection, which is why we packaged these in the struct.
Building The Fyne GUI
Below you can find the skeleton of the main() function.
Some parts have been left out in the above code snippet; you can find them under the other subheadings below.
Essentially the above code creates a Fyne window of size 1000px wide by 600px high in the center of the screen. This window is set to the master window. This means that all other windows will also be closed when this window is closed. In this example, this is, in fact, less important, as there are no other windows.
In addition, the content of the window is set according to various layout functions. You can find a screenshot below of what the resulting window will look like.
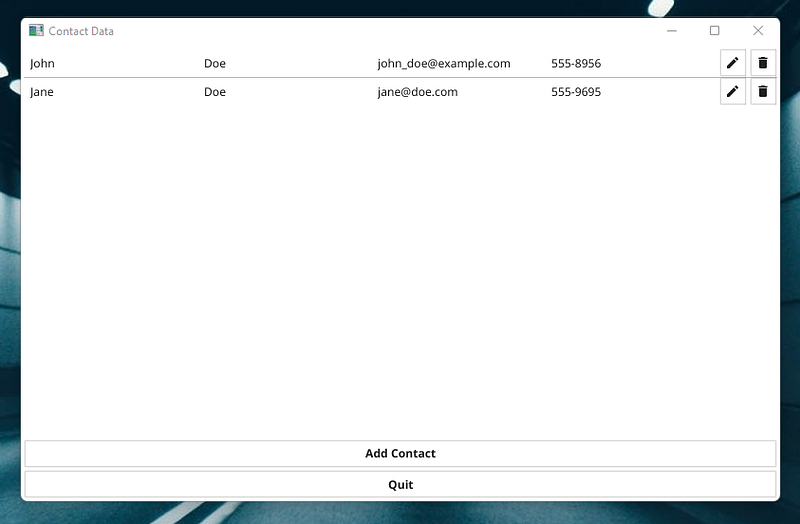
Note that, in the above screenshot, two contacts have been added.
Setting up the MongoDB client, the collection, and getting all docs.
In lines 3–9, we create a basic context with context.TODO() and connect to the MongoDB server that’s running on localhost:27017.
In lines 10–12, we ping the database server to make sure that we have established a connection.
In line 13, disconnecting from the database is deferred. This means that the disconnect statement will be executed after all the other statements of the main() function.
In line 17, we connect to the contacts collection in the contactdb database. If these do not exist, then they will be created.
In line 18, a ContactCollection struct is created using the function called NewContactCollection(). This struct, called cc, will hold the context and a link to the collection as described under the previous heading.
In line 20, we use the GetAll() function to get all the contacts from the database collection. These contacts are saved in a slice called loadedData that was defined in line 1.
Implementing the list widget
In the above code snippet, the list widget is created using the NewList() function. If you are not familiar with the list widget from Fyne, you may want to take a quick look at the documentation.
In line 2, we supply the first argument to the function. This argument is the length of the loadedData slice. Essentially, this is the number of contacts in the database.
In lines 3–13, we create the layout of each line in the list widget. Such a line contains the following graphical elements (widgets):
- A label for the first name of a specific contact
- A label for the last name of a specific contact
- A label for the email address of a specific contact
- A label for the phone number of a specific contact
- A button for editing a specific contact
- A button for deleting a specific contact
These elements are added to a CanvasObject using NewHBox() , NewGridWithColumns() and NewBorder() depending on where we want them positioned. Read more about layouts here.
In lines 14–105, the data from the loadedData slice is extracted for a given contact (based on the ListItemID) and entered into the graphical elements set up in the previous lines.
In lines 17–26, the actual graphic elements are retrieved from the CanvasObject.
In line 28, we get the ID of the current contact.
In lines 30–33, the text properties of the labels are set with the data from the current contact.
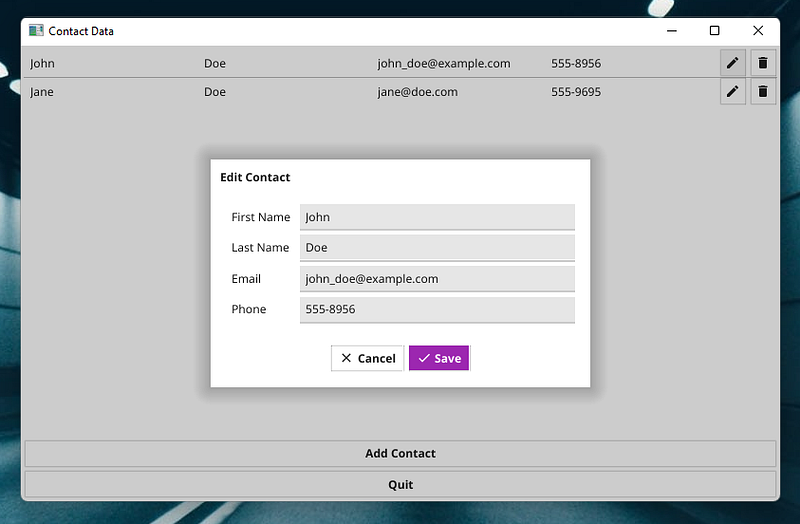
In lines 35–78, we implement the functionality of the edit button. When the edit button is clicked (or ‘tapped’), a dialog box is opened. This dialog box contains a form where the fields have been filled in with the existing data of the contact.
When you click the ‘save’ button on the dialog box, the new data is saved to a Contact struct called contact. The contact is sent to the UpdateContact() function, which makes sure that the database is updated.
After this, the loadedData is updated using GetAll() and the list widget is refreshed.
Below, you can see a screenshot of the dialog box in action.
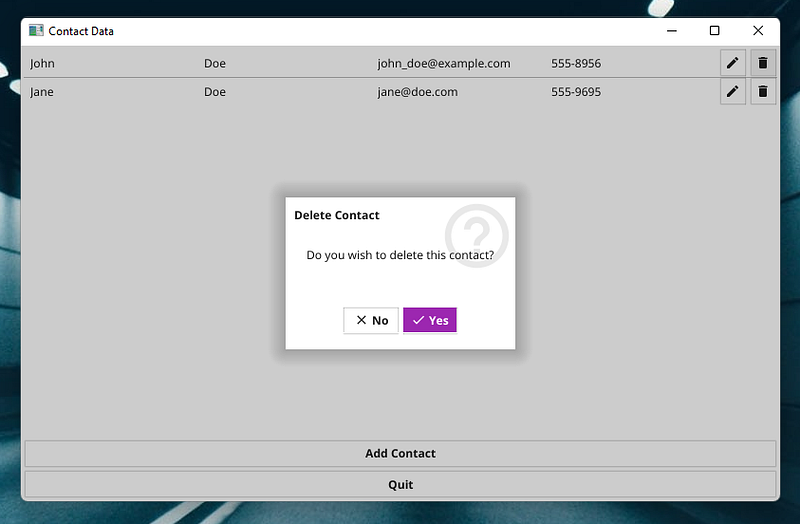
In lines 80–103, we implement the functionality of the delete button. When the delete button is clicked, a dialog box is opened. This dialog box contains the question, “Do you wish to delete this contact?”.
Now you can click either ‘Yes’ or ‘No.’ If you click ‘Yes,’ the current contact will be deleted. The contactID is sent to the DeleteContact() function, which deletes the contact from the database.
Finally, the loadedData is updated using GetAll() and the list widget is refreshed.
Below, you can see a screenshot of the delete dialog box in action.
Implementing the ‘Add Contact’ button
The functionality of the ‘Add Contact’ button is almost analogous to the ‘edit’ button.
When we click the ‘Add Contact’ button, a dialog box is opened. This dialog box contains a form with empty fields for the four properties of a contact.
When the ‘add’ button on the dialog box is clicked, the new data is saved to a Contact struct called c. The contact is sent to the CreateContact() function, which makes sure that the contact c is added to the database.
Again, the loadedData is updated using GetAll() and the list widget is refreshed.
Below, you can see a screenshot of this dialog box.

The Complete Code
Comments And Further Work
In this example, all the code has been put in one file. This is not a recommended coding practice for production code.
The CRUD functions could be implemented for different database servers and JSON or YAML files.
The code from this article could form the basis of a CRM system.


