
How to create a clean architecture Angular app (in 5 minutes)

Today I’m going to show you 3 steps to create an Angular app with an amazing clean architecture.
I’m not talking about outdated structural guidance written by an Uncle Bob some 20 years ago. Today we’re diving into practical knowledge specific to helping you build clean Angular apps.
By learning how to create and build Angular apps with a clean architecture you save time and improve the quality of our work. And of course, your boss and the investors will love you more for it. Take it from someone who’s worked with Angular for over 8 years now.
Of course there isn’t a one-size fits all approach.
Why?
Because learning how to structure your Angular app in a clean way is important to becoming an Angular professional.
This isn’t about hacks or tricks. Just proven Angular architecture that has served me well and I want to share it with you. Here’s why I believe that clean Angular architecture matters:
- You’ll have more confidence in your code base.
- Clean code > Spaghetti code
- Clean architecture > Messy architecture
- This is the type of skill that will earn you more money (Of course, I’m not kidding).
So let’s discuss how to build a well-structured Angular app. We’ll be doing this in 3 steps.
- Generate the Angular App
- Configure our Tools
- The Clean Angular Architecture
Here’s how we’re going to create a clean Angular app. Let’s dive in.

Step 1. Generate The Angular App
We’ll start by using the Angular CLI to generate a new Angular app.
If you’re building a smaller, single Angular app then use the new command to create our Angular workspace.
ng new awesome-angular-appHowever, if your working on a larger Angular app with multiple domains, for example, then it’d be good to take a different approach.
Again, this is where your developer instinct needs to kick in, evaluate your options and decide what is best for your situation.
That said, here’s how we’d split out our workspace.
We’ll start by creating an empty Angular workspace.
ng new my-awesome-app --create-application falseAnd now with our empty workspace initialized we’ll enter the folder with this command.
cd my-awesome-appAnd then we’ll create our new apps with this command.
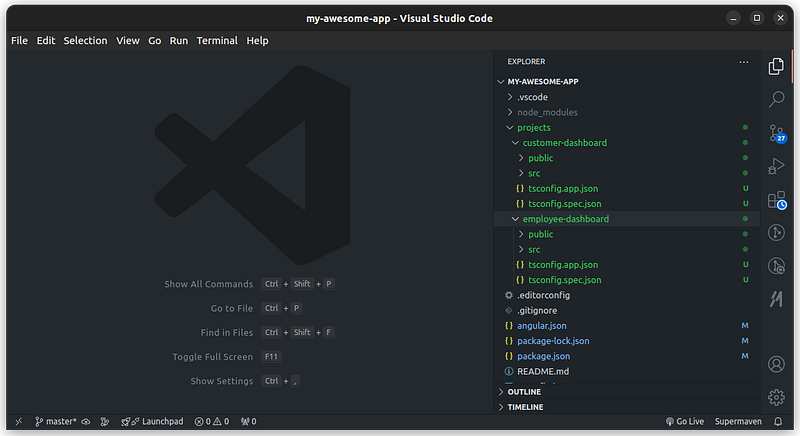
ng generate application customer-dashboard --prefix org-name-cdSay we have two domains.
- Customer dashboard
- Employee dashboard
We would generate an app for each specific domain.
ng generate application customer-dashboard --prefix org-name-cdAnd.
ng generate application employee-dashboard --prefix org-name-edWith this result.
Step 2. Configure Our Tools
Now that our workspace has been created we need to set up some tools.
The most important tooling for a clean Angular architecture is automated code formatting. With automated code formatting we can enforce a consistent code style across the entire Angular workspace.
We’ll start by installing prettier.
npm install --save-dev prettierOnce installed we’ll create a file in the root of our workspace named .prettierrc with these options.
{
    "useTabs": true,
    "printWidth": 100,
    "tabWidth": 2,
    "singleQuote": true,
    "trailingComma": "all",
    "semi": true
}
And now we’ll need to add a script to the package.json to automatically format our code for us.
scripts: {
    "format": "prettier \"projects/**/*.{ts,html,scss,css}\" --write"
}
Now we can automatically format the entire workspace into a consistent code style with one simple command.
npm run formatBonus Tip: You can use Husky and set up commit hooks to do this automatically every time a new commit is made.
Step 3. The Clean Angular Architecture
Now that we’ve created our app and have our tools set up let’s discuss how we’re going to structure our Angular app.
There are many ways to do this, and no single way is necessarily right or wrong. It often depends on the size of your app, features and team.
But here’s how I’d recommend you consider structuring your Angular app.
We’ll be placing our features inside of the src/app folder by their specific name. Let's take an eCommerce app for example.
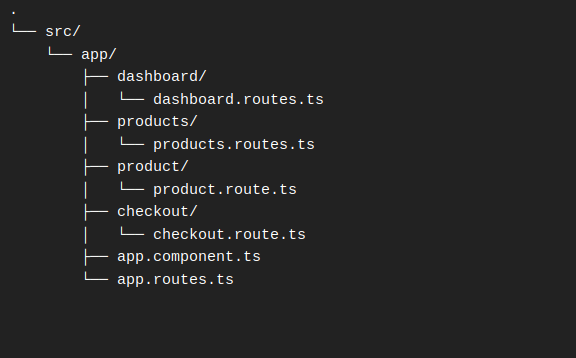
What we’re doing is creating a new folder for each feature of our Angular app.
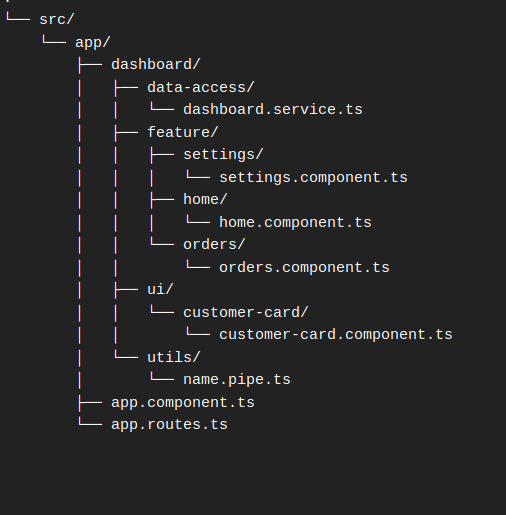
And then within each feature we’ll have 4 different folder types.
Now, depending on our app we might not always need all four of these folder types in every single one of our features.
So let’s break down how this works and why we would do it this way.
The feature folder is responsible for holding our routed components for that particular feature. In other words, this where the components that are activated by going to a particular route will be stored. These components are going to be smart components.
Smart components are responsible for handling complex logic, injecting services, setting up observable streams and things like that. Keep in mind that our feature folder might just hold one smart or routed component. For example we just have one component in here but if there are multiple routes for a particular feature we can add many smart components here. Dumb components
The UI folder is responsible for holding our dumb components — also known as presentation components.
The smart components are the container component for a page that is routed to our dumb components. These will generally make up everything within that page meaning things like a list or perhaps a section with author information or maybe a map or other things.
Unlike a smart component a dumb component shouldn’t have to know anything about the structure of the application or what’s going on.
It should generally just receive everything it needs to from an @Input() from its smart component parent and anything it needs to communicate with the app it can do with an @Output().
Of course, this isn’t always strictly true but it’s the general idea. And the smart/dumb component pattern is a common pattern in large enterprise applications.
The data access folder is just going to hold everything related to accessing data. Usually this is things like services and stores.
So the general flow is that our smart components are going to be pulling in information from the data access folder. And then the smart components will pass it to a dummy UI component to do the actually displaying.
And finally, the utils folder is where any sort of simple help functions could be placed.
But why do it this way?
The great thing about structuring your application this way is that all of the related code is co-located.
In this example, everything that powers the dashboard feature is right here within the dashboard feature folder and it is all clearly organized making it very easy to see what’s going on.
The Bottom Line
I believe there isn’t a one perfect solution for every Angular app.
So I’m not at all suggesting that if you don’t follow everything written here that your project will be a failure.
Steal what you find useful and let me know how it goes.
And that’s all for today.
Now, it’s time for you to take a look at your Angular apps and take what you’ve learned to build clean Angular apps that you’re proud of.
Want to learn even more?
If you want to learn more about best practices and Angular project structure you can get my short, actionable course “Angular Project Structure (Best Practices) Training” here.
It’s the kind of training I couldn’t find back when I was trying to improve my Angular skills and learn how to build professional Angular apps.
And I’ve decided to offer a limited 20% discount. Just use the code ANGULARPRO at checkout.
If you found this article useful please smash that 👏 👏 👏 button! 💥
Follow Me: GitHub, Medium, Personal Blog, X
Originally published at https://danielk.tech.


