
How to Convert SQL Query Results to a Pandas Dataframe
Using Python to read in SQL queries in your Jupyter Notebook to create your pandas dataframe

Table of Contents
- Introduction
- Tools
- Example
- Summary
- References
Introduction
As a data scientist, you may oftentimes have to pull data from a database table. This first step in gathering your dataset in the modeling process is commonly acquired from the results of SQL code. SQL is not usually the main language required to be a data scientist; however, it is important to practice and utilize for obtaining your dataset in some scenarios. There are some problems, though — going back and forth with your Python code, SQL, and sometimes, Jupyter Notebook, can be aggravating. There is a very simple process that helps to solve this issue. The solution is to write your SQL query in your Jupyter Notebook, then save that output by converting it to a pandas dataframe. Below, I will supply code and an example that displays this easy and beneficial process.
Tools

There are several key tools that make up this process. First, you will use the SQL query that you already originally had, then, using Python, will reference the pandas library for converting the output into a dataframe, all in your Jupyter Notebook.
SQL — Structured query language, most data analysts and data warehouse/database engineers use this language to pull data for reports and dataset development.
--return all columns from table
SELECT * FROM TABLE
Python — one of the main programming languages used by data scientists.
# display text
print('Hello, world!')
Pandas — a popular library used by data scientists to read in data from various sources. Static data can be read in as a CSV file. A live SQL connection can also be connected using pandas that will then be converted in a dataframe from its output. It is explained below in the example.
# creating and renaming a new a pandas dataframe column
df['new_column_name'] = df['original_column_name']
Jupyter Notebook — a platform/environment to run your Python code (as well as SQL) for your data science model.
Example
In this example, I will be using a mock database to serve as a storage environment that a SQL query will reference.
First, import the pandas library and if you desire, create an alias ‘pd’ for shorthand notation. Next, create a credentials variable that stores:
- database/SQL environment — PostgreSQL
- username:password
- data warehouse: database URL (IP address)
- port number
- database name
This variable will be a long string that is wrapped in quotation marks. The next cell in your Jupyter Notebook will be the SQL query itself. Pandas will be utilized to execute the query while also converting the output into a dataframe. The query is formatted by containing the statement with triple quotation marks. After the last quotation, a comma will be followed by the connection parameter that will equal your credentials variable.
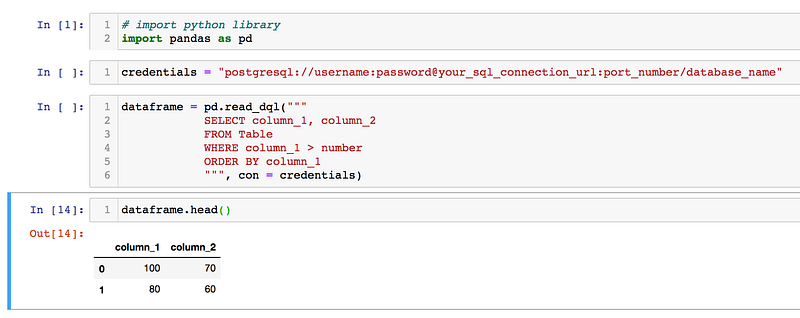
Here is the code for this example (you will have to use your own credentials):
# import python library
import pandas as pd
# assign a variable that contains a string of your credentials
credentials = "postgresql://username:password@your_sql_connection_url:port_number/database_name"# read in your SQL query results using pandas
dataframe = pd.read_sql("""
SELECT column_1, column_2
FROM Table
WHERE column_1 > number
ORDER BY column_1
""", con = credentials)# return your first five rows
dataframe.head()A closer look at how the code looks like in your Jupyter Notebook:
For more documentation on this pandas function, click here [4]. You can find more beneficial information regarding parameters there as well.
Summary
When creating a dataframe that will be used as your dataset, there are plenty of options to gather that data. Sometimes a CSV is read in, while a dataframe can be made by defining columns and values. However, in this case, we saw that you can query using SQL from your database and return those results as your data that is ultimately read in as your new dataframe. From there, you can follow your normal process in data science now that you have your dataframe. I hope you found this article helpful, thank you for reading!
References
[1] Photo by Tobias Fischer on Unsplash, (2017)
[2] Photo by Chris Ried on Unsplash, (2018)
[3] M.Przybyla, Jupyter Notebook screenshot, (2020)
[4] Pandas, pandas.read_sql, (2008–2014)


