
How to configure, build, and publish your Python projects to PyPI
Learn to publish your Python projects in a modern way
When you want to share your Python project, either for private, open-source, or commercial purposes, you need to publish it to PyPI or other package repositories to make it available for other developers. In this post, the common settings and procedures for publishing a Python project to PyPI will be introduced in detail.

To begin this tutorial, the first tool you need is pip, which will be used to install other tools required for configuring, building, and publishing Python projects. To install and/or upgrade pip on your computer, run:
$ python3 -m pip install -U pipIn this post, we will use setuptools to configure our projects and make them ready for publishing. setuptools is the modern and official tool for packaging Python projects. It is a collection of enhancements to the Python distutils package that allows developers to more easily build and distribute Python packages. setuptools is a built-in library for Python versions newer than 3.4. However, it’s better to upgrade it to the latest version in order to use the latest features. Actually, many tutorials online are based on outdated versions of setuptools and use deprecated features. For this tutorial, it is highly recommended to upgrade setuptools to its latest version in order to use the modern and more convenient features.
$ pip install -U setuptoolsNow we can start to configure our project for publishing.
For demonstration purposes, we will publish simple projects as a module and as a package, respectively. In the first project, there is a module div_mod.py that defines a custom divide function that returns the quotient and remainder of a dividend and a divisor:
To configure our project for publishing, we need to create a special file called pyproject.toml, which is the new unified Python project settings file that replaces the traditional setup.py used in many old projects. For more technical details about pyproject.toml, please refer to PEP 518.
In pyproject.toml, we need to specify which build tools are required to build your project. In most common cases, pyproject.toml will have the following content:
We specify that setuptools and wheel will be used to build our project. setuptools will be used to build the source distribution, namely the tar file as we will see soon, andwheel will be used to build a so-called “wheel”, which is a pre-built package that can be installed without the requirement to go through the “build” process. It is faster to install a package from a “wheel” than from the source distribution. Therefore, in most cases, we will create both the source distribution and a wheel.
The second configuration file is the setup file or metadata file. It has been a tradition to use setup.py as the metadata file. However, it’s being deprecated now and we should start to use the new style setup.cfg which is more concise and more convenient to read and use. setup.cfg and setup.py have equivalent settings can be very easily translated from one to another. In this post, we will focus on setup.cfg, but will also give a link for the old style setup.py for your reference. In order to use setup.cfg and all its latest features, you should upgrade pip and setuptools to their latest versions as shown above.
We will first try to publish our project as a module. For this purpose, setup.cfg can be:
In the metadata category, we need to specify some metadata for the project. The most important metadata is the name of the project. It must be unique in the whole PyPI package index. So, in order for it to work in your case, remember to change the suffix 1234 to a different random number. In practice, when you want to publish your real project, you would need to give it a meaningful and descriptive name, preferably catchy and easy to remember.
The version is also very important in the metadata because the user can choose to install different versions of a package with pip. There are some rules for naming the versions, please check PEP 440 for the details. One common version scheme is the 3-part MAJOR.MINOR.MAINTENANCE numbering scheme (such as Python 3.9.7), where MAJOR version (3) means breaking or incompatible changes, MINOR version (9) means backward-compatible features are added, and MAINTENANCE version (7) means backward-compatible bug fixes are made.
Other metadata keys should be fairly straightforward to understand and use. It should be noted that the long_description key uses the file: directive to read the content from README.md directly. In the traditional setup.py, you would need to read in README.md and store the content in a variable, which is obviously not as convenient as the file: directive.
This GitHub project gives a very detailed introduction for every key used in setup.py. Even though this project uses the old style setup.py for configuration, it can be helpful to understand the meaning of each key, which is exactly the same as in setup.cfg.
Finally, in the options category, we define the configurations for the project. We specify that our project only supports Python version ≥3.6 and that our project only contains single-file Python modules that aren’t part of a package. The value for py_module is a list because we can specify multiple standalone Python modules here. Please check this link for how to specify different types of values in setup.cfg. It should be noted that we should not specify the .py extension for the modules otherwise it won’t work.
Before we start to build and publish the project, don’t forget to create the README.md file mentioned above. You can give it any content that is descriptive for your own project. An example README.md can be found in the GitHub repo of this post. Besides, it is important to specify a LICENSE file for your project so that other users can use your package with no legal issues. You can refer to this link about how to choose a proper license for your project. A common license is the MIT license which is very permissive and is used in many open-source projects. You can technically do anything you want to the target project with the MIT license.
Now we can start to build our project and generate the distribution archives. For this purpose, we need to install the build tool:
$ python3 -m pip install --upgrade buildIf you follow this post step by step or have cloned the GitHub repo for this project, you should be in the by_modules folder and have a project structure like this:
by_modules/
├── div_mod.py
├── LICENSE
├── pyproject.toml
├── README.md
└── setup.cfg
You can use the tree command in Linux to get the tree structure of the folder and files in it.
Make sure you are in the directory where pyproject.toml is located, and then run the build command:
$ python3 -m buildAfter the build procedure finishes, you should see a message like:
Successfully built div_mod_1234-0.0.1.tar.gz and div_mod_1234-0.0.1-py3-none-any.whlAnd you can see the distribution archives created in the dist folder in the current directory:
dist/
├── div_mod_1234-0.0.1-py3-none-any.whl
└── div_mod_1234-0.0.1.tar.gz
The tar.gz file is the source distribution archive and the .whl file is the built “wheel” distribution as mentioned at the beginning of this post.
Now we can upload the distribution archives to the Python Package Index (PyPI).
For testing and learning purposes, it is recommended to us TestPyPI, rather than PyPI. You can create and publish any distributions to TestPyPI with no impact on the community. The operations on TestPyPI and PyPI are almost the same, with the exception that we need to specify the --reposiroty option when we upload the archives and the --index-url option when installing the package with pip, as we will see soon.
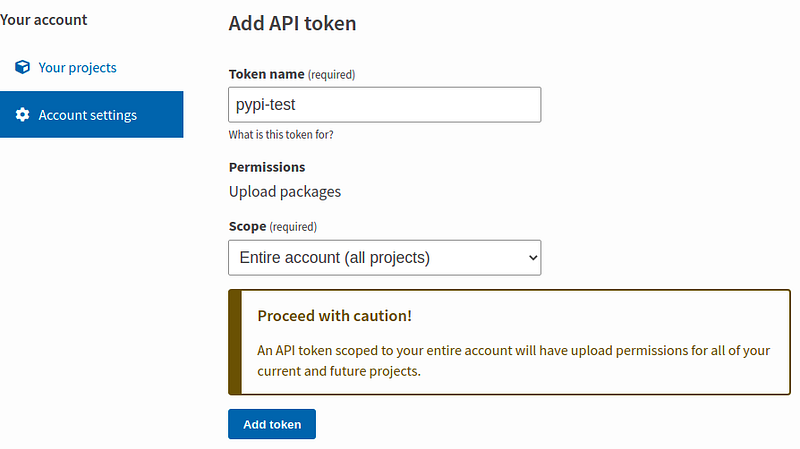
If you don’t already have an account on TestPyPI, go ahead to TestPyPI and create one now. The registration and validation process should just take minutes. After the account is created and validated, you need to generate an API token which will be required when you upload the archives. Go to this link and create a new token. You need to give a name and specify a scope. For this tutorial, you can choose the “Entire account (all projects)” scope.
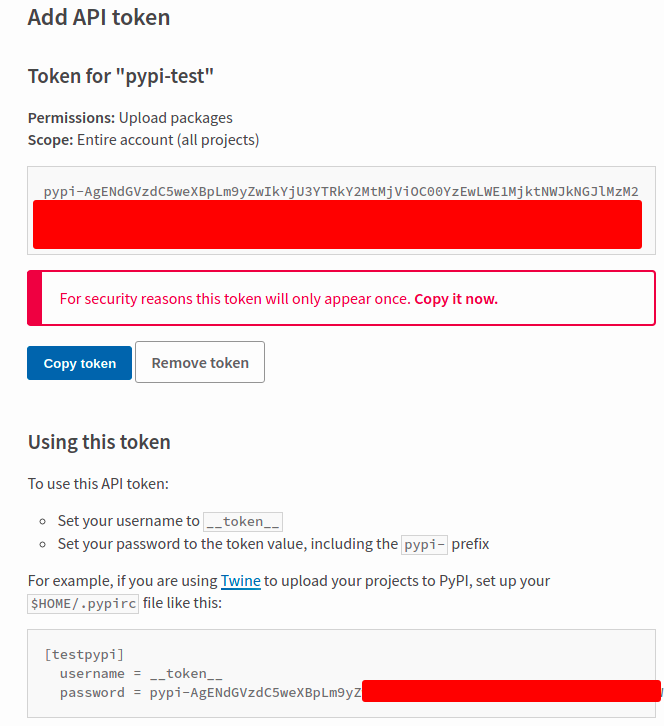
Remember to copy the token before you close the window. It’s better not to close the window before you have finished this tutorial. If you have to upload archives frequently, you may want to add the token to $HOME/.pypirc so you don’t need to specify the token every time. The procedures for adding the token are shown on the page after the token is created.
Then we need to install twine to upload the archives to PyPI or TestPyPI:
$ python3 -m pip install --upgrade twineAfter twine is installed, we can upload the archives to PyPI or TestPyPI:
$ python3 -m twine upload --repository testpypi dist/*Note that if you are uploading to PyPI rather than TestPyPI, you need to remove the --repository testpypi option.
You will be prompted to enter your username and password by Twine. For the username, use __token__. The password is the token you just copied.
You can see a link like https://test.pypi.org/project/div-mod-1234/0.0.1/ in the console when the upload process is finished. Open this link and you will see the project you just published, cheers!
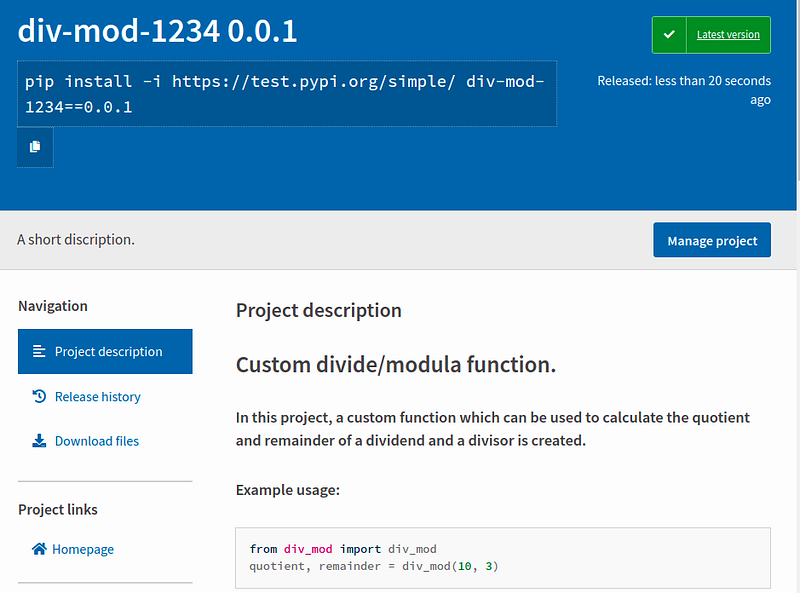
You can add more metadata and observe how each key is displayed on the project page.
After the project is published to PyPI or TestPyPI, you can install it and verify that it works. For the purpose of package dependency, it’s recommended to create a virtual environment to install and test packages.
$ python3 -m pip install --upgrade virtualenv$ python3 -m venv venv-test-pypi
$ virtualenv venv-test-pypi (Try this one if the above one doesn't work)$ source venv-test-pypi/bin/activate$ pip install -i https://test.pypi.org/simple/ div-mod-1234==0.0.1$python
>>> from div_mod import div_mod>>> help(div_mod)
div_mod(dividend: int, divisor: int) -> Tuple[int, int]
Get the quotient and remainder of the dividend and divisor. :param dividend: the dividend, must be an integer.
:param divisor: the divisor, must a non-zero integer.
:return: the quotient and remainder of the dividend and divisor.>>> div_mod(10, 3)
(3, 1)It proves that the custom div_mod module is successfully installed and works as expected.
If your project also just has standalone modules, you can start to create an account at PyPI and publish your project now. The procedures are the same as shown above. However, in many cases, your project will be more complex and you would need to configure your project as packages. This is what the last part of the post will cover.
Before we start to create a new setup.cfg for package settings, let’s reorganize our files and make a dummy package for this new project. The new files can be found in the by_packages folder of the GitHub repo of this post.
by_packages/
├── LICENSE
├── pyproject.toml
├── README.md
├── setup.cfg
└── src
    └── div_mod_pkg
        ├── div_mod.py
        ├── div_mod_script.py
        └── __init__.py
By convention, the source code for our packages should be put in the src (source) folder. Under the src folder, there exists a package that is marked by the existence of __init__.py. Our custom module and script are also in this package. div_mod.py is the same as the one introduced above. div_mod_script.py is a script that can be run on the command line. We will also add it to our package so after the package is installed by pip, this script can be run on the command line directly. Besides, for ease of import, the two functions div_mod and div_mod_example are added to __init__.py. Please note that we should add the package name to the imports otherwise it won’t work when the package is installed by pip!
from div_mod_pkg.div_mod import div_mod
from div_mod_pkg.div_mod_script import div_mod_example
Now let’s create a setup.cfg for this new project, it’s slightly more complex:
The corresponding traditional setup.py can be found here. Note that we must change the version to a different one otherwise, the archives cannot be built and uploaded. The package settings can look strange at first sight.
packagesspecifies a list of packages that should be included in this project. You can hard-code the package names as a list here, or you can use thefind:directive to specify that the packages will be found automatically in the specified directory, which is in turn set byoptions.packages.find. Thefind:directive has the same function as the traditionalsetuptools.find_packages()method used insetup.py.package_diris a mapping between package names and directories. The “bizarre” empty package name represents the root package, which contains all the source code for the packages. In this example, we specify that all the source code for the packages is stored in thesrcfolder, and our packages can be found there.scriptsspecifies the scripts that will be shipped with the project. Note that the path to scripts should be relative paths relative topyproject.toml. These scripts can be run directly after the package is installed withpip, but may not be cross-platform compatible. For cross-platform compatibility, it is recommended to use theconsole_scriptsoption introduced below.console_scripts is specified under theoptions.entry_pointssub-category. It specifies some cross-platform scripts that can be run after the package is installed withpip. Note that this key only allows Python functions or methods to be directly registered as console commands which can be run directly and across platforms. However, we cannot specify regular scripts in this way and they must be specified with thescriptskey in theoptionscategory as shown above.
You can download the project files from the GitHub Repo of this tutorial.
Now we need to go through the same build and upload procedures as shown previously for publishing by modules.
$ python3 -m build
$ python3 -m twine upload --repository testpypi dist/*
You need to use the API token again for the upload. In case you have not copied the API token, you can create a new one in your account settings of PyPI or TestPyPI.
Please note that if some changes are made to your source code, you need to specify a different version in setup.cfg and rebuild the archives. You may also need to delete the old dist folder if the build fails.
After the package has been successfully uploaded to PyPI or TestPyPI, you can upgrade it like any other third-party library in your virtual environment:
$ pip install -i https://test.pypi.org/simple/ -U div-mod-1234==0.0.2$ python
>>> from div_mod_pkg import div_mod, div_mod_example>>> div_mod_example()
Example usage:
1. As a function:
from div_mod_pkg import div_mod
quotient, remainder = div_mod(10, 3)2. As a script:
div_mod_script.py 10 3>>> div_mod(10,3)
(3, 1)As a package, div_mod_pkg work as expected. Now let’s test the scripts:
$ div-mod-example
Example usage:
1. As a function:
from div_mod_pkg import div_mod
quotient, remainder = div_mod(10, 3)2. As a script:
div_mod_script.py 10 3$ div_mod_script.py 10 3
10 = 3 x 3 + 1The scripts work as expected as well, cheers! In case you are interested in where these scripts are created, you can use the which command to locate them in Linux or macOS.
I highly recommend that you try to build and publish the example projects by yourself. If you encounter some problems and managed to solve them by yourself based on the knowledge and instructions of this post, you will learn much more than just reading the texts.
In this post, the basic concepts and procedures of configuring, building, and publishing Python projects are introduced in a step-by-step manner. I hope you have learned a lot and can start to publish your own projects now. However, if you want to become a master, there is still quite a lot to learn, such as data files, namespaces, package dependencies, etc. After you have mastered the basics in this post, it should be fairly easy to pick up other features by yourself.
Related articles:


