
How to Collect Text Information from Images with Python & Tesseract
A script that automatically collects room sizes from apartment floorplans… or at least it tries
If you have an analytical mindset, and ever went on a virtual apartment-hunting trip, you have probably run into the issue I have personally always found infuriating: you can almost never search by property size, let alone by individual room sizes. However, this information is quite often available in the form of a floorplan image. It’s just a lot of zooming and manual typing to gather the data…
Well, I figured this would be an excellent opportunity to practice image recognition skills and create a script that can turn an image into a nice and clean data table. After all, as every overly ambitious project starts:
How difficult can it be?
As it turns out, quite difficult. I’m actually not sure it is a problem that can be solved with 100% accuracy. I think I sufficiently explored the possibilities and made good progress, but please note that this project is not going to be a complete success. Even after significant tweaking and fine-tuning, a particularly tricky or bad quality image can trip up the algorithm.
However, I think it’s a valuable lesson to anyone starting a similar project with naive expectations like I did.
Summary
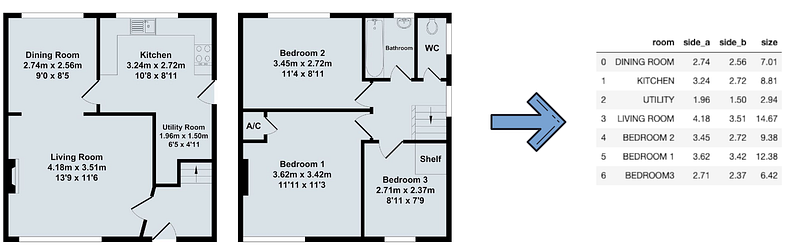
In the end, we want to convert the floorplan into a table that shows the rooms and the size of the rooms. We are working with metres, but it should be pretty straightforward to tweak the code so it can recognise measurements in feet as well.
We are going to use pytesseract, a Python wrapper of Google’s Tesseract OCR.
The code for the project is on my GitHub.
- If you simply want to try it yourself, you are going to need the floorplan_reader script. You will need to install the packages and Tesseract, plus you might have to tweak its location in the script. The main Jupyter Notebook shows how to use the code. Good luck!
- If you want to follow along, proceed to the next section where we set up the environment.
Environment
Tesseract
First off, we will need the Tesseract package itself, even if we are not working with it directly. The installing process is not straightforward, you can find more info on its official GitHub page as well, but I found this summary to be more useful.
On a Mac, installing is quite simple with Homebrew:
brew install tesseractYou will also need Tesseract’s location, I followed this Stack Overflow thread, and the installation location for me was:
/usr/local/bin/tesseract(Of course, the location varies across different systems.)
Python Packages
There are two “non-standard” packages we will need: Pillow and pytesseract:
pip install Pillowpip install pytesseractPillow is a package that handles images, a fork of an old package called PIL, we are going to use the Image object from it:
from PIL import Image(Yes, the library is still called PIL inside the project, that does not mean that we use the outdated PIL package.)
For pytesseract, we need to connect to Tesseract’s location:
import pytesseract
pytesseract.pytesseract.tesseract_cmd = r'/usr/local/bin/tesseract'
Learning from Mistakes
I’m going to walk you through four amateur mistakes I did when I started working with pytesseract. If you are more of an “It’s the destination, not the journey.” kind of person, skip this bit, we start looking at the actual code in the next section.
Filepath vs. Image
If you start with pytesseract, the first thing you try out is probably going to be the image_to_string function. It does exactly what the name suggests.
You can pass on an image or a file path as an argument. However, in my experience, it’s always better to process the image first. Use Pillow, open the picture with it, and pass the Image object. Consider this floorplan example:
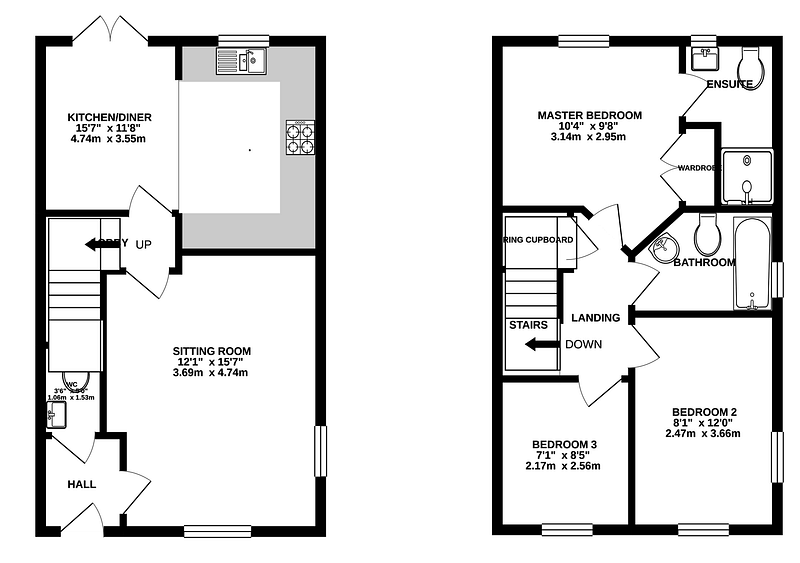
If we open directly with pytesseract:
pytesseract.image_to_string(‘plans/floorplan_02.png’)
This is what we get:
'KITCHENIDINER — MASTER BEDROOM\ngo" xis" Tatra hou" xara\nPi\n\n3.14m x 2.95m\n\nSITTING ROOM\n12\'1" x 15\'7"\n3.69m x 4.74m\n\nBEDROOM 2\n8\'1" x 12\'0"\n2.47m x 3.66m\nBEDROOM 3\n71" x 85"\n2.17m x 2.56m\n\n \n\x0c'Whereas if we open with Pillow first:
pytesseract.image_to_string(Image.open('plans/floorplan_02.png'))This is what we get:
'KITCHEN/DINER\n15°7" x 11\'8"\n4.74m x 3.55m\n\nSITTING ROOM\n12\'1" x 15\'7"\n3.69m x 4.74m\n\n \n\n \n\n \n\n \n\n \n\n \n\nMASTER BEDROOM\n10\'4" x 9\'8"\n3.14m x 2.95m\n\nBEDROOM 2\n8\'1" x 12\'0"\n2.47m x 3.66m\n\nBEDROOM 3\n71" x 85"\n2.17m x 2.56m\n\n \n\x0c'Yes, your eyes are not deceiving you, that’s a full extra line! That will come in handy later.
Lesson №1.: Always use an image processing package like Pillow before passing anything on to pytesseract. Pass on an image object as an argument, and not a filepath.
Resizing Matters
The next surprising bit is about resizing. Consider the image below (blurry, yes, that’s going to be the point.):
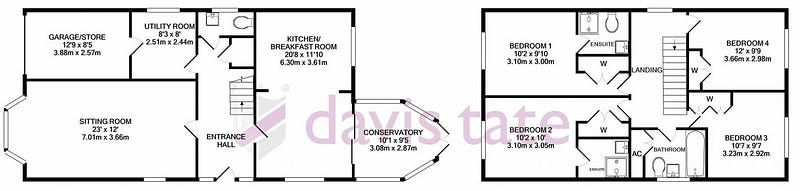
If you simply read it in as a Pillow Image and pass it on to image_to_string, this is what you get:
' \n    \n   \n\nUTILITY ROOM\n\n  \n  \n  \n\n  \n \n\n  \n\n       \n   \n    \n\n
...
However, if you resize the image first, to let’s say 5 times its original width and height:
image = image.resize((image.size[0] * 5, image.size[1] * 5))The result:
'UTILITY ROOM\nR\' i\nSe 2.51m x 2.44m\n3.88m x ?2.57m\nSITTING ROOM
...
I did not copy the whole result, the point is that without rescaling, the smaller text under UTILITY ROOM is not read in.
You can learn more about image processing in Pillow here. I personally did not have luck with adjusting either the brightness or the contrast of the image. Only rescaling seemed to work well. I have no idea why this is the case.
Lesson №2.: Utilise the image processing capabilities of Pillow. If you resize the image, adjust the brightness or the contrast, Tesseract will read in your image differently. However, the change is not always positive! For example, you might notice that scaling above a certain threshold lowers the accuracy.
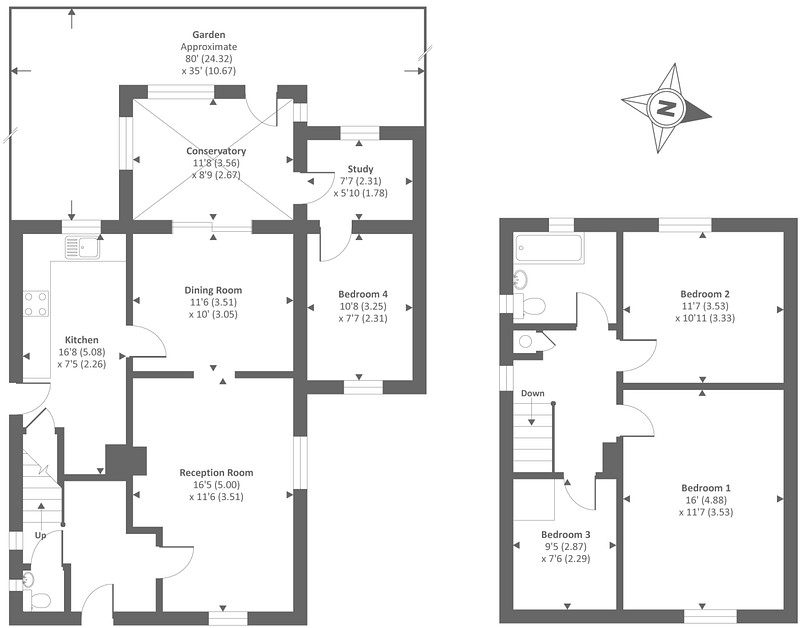
Cropping also Matters…
…and while we are at it, probably anything else you do with the image will matter!
I actually pulled a little sneaky on ya, and if you actually read in the image above, the first side of the UTILITY ROOM, 2.51, will be read in as 2.91. The reason? I cropped the main info from the original picture. Did not scale, or adjust in any way, just excluded some empty areas. Without cropping, the number is read correctly.
It is at this point that I first started contemplating accepting failure…
Lesson №3.: Literally anything can change results. You can never be certain that characters are read in correctly, even if they are written in nice, consistent fonts, and seem OK to your human eyes. Tesseract’s algorithm does not work perfectly for every case.
Better a Nice Organised Table than a Messy Chunk of Text
For the longest time, I tried to force the project to work with the image_to_string method. If you have a look at some of the examples above, you might be able to see the problem I did not.
The issue is that image_to_string will scan the document left to right, up to down, in lines. (How it determines where the \n’s are is anyone’s guess.) I was pretty sure that I can make the following logic work:
loop over the string
search for matches of pre-defined room names from a set
if there is a match:
    put the room name in a dictionary
    delete the corresponding room from the set and the string
    look for the next bit that looks like the two sides
    when found, save the sides in the dictionary
    delete the sides from the string
repeat the process with the shortened room name set and main string, until there is no new room foundThe idea is that the rooms can be close to each other, but the first number after the first room name left to right and up to down must be the one corresponding to the room in question... Yes, I know, but in my defence, it worked for a surprisingly long time.
And then I finally met my nemesis:
I don’t know why I did not think about this possibility before, but putting the metres in two different lines completely messes up my previous approach. Not to mention any other floorplan structure I have not encountered yet.
I think it’s impossible to determine which size belong to which room just by reading the continuous text produced by image_to_string. However, by using the image_to_data method (plus some additional tweaking, as we will see in the next section), we get a nice and organised table:

Lesson №4.: Unless you have a trivial problem, you will want to use
image_to_datainstead ofimage_to_string. Just make sure you set theoutput_typeargument to ‘data.frame’ to get a pandas DataFrame, and not an even messier and larger chunk of text.
Walk Through the Code
In this section, I am going to walk us through the code. Please note that I won’t copy the script in its entirety, we just discuss the main points.
Open the Image
First, we need a method to open the image itself, this is what I ended up using:
def process_image(filepath, resize_factor = 1): image = Image.open(filepath)
image = image.resize(
(image.size[0] * resize_factor, image.size[1] * resize_factor)) return imageI spent a lot of time trying to figure out an optimal resize_factor. One would assume it has something to do with the pixel size of the pictures, but apparently, that’s not the case. I ended up abstracting away the responsibility and made it an argument. I guess you could repeat the process for different resize_factors and check if you get the same results.
Read in the Image with Tesseract
This is technically the image recognition part of the whole code. As mentioned earlier, we want to use image_to_data. This is how you can convert it into a nice and readable table:
def convert_floorplan_pic_to_df(filepath, resize_factor = 1): image = process_image(filepath, resize_factor) df = pytesseract.image_to_data(image, output_type='data.frame')
df = df[df['conf'] != -1]
df['text'] = df['text'].apply(lambda x: x.strip())
df = df[df['text']!=""]
df['text'] = df['text'].apply(lambda x: x.upper()) return dfScroll up a bit to see how this DataFrame should look like.
We are going to use about half of those columns. The column conf shows how certain the model is in its solution, -1’s are these weird extra rows, not sure why they are there, but we definitely won’t need them. There are also a lot of whitespaces read in, which we also don’t need.
Identify the Text Parts
We have a DataFrame with the text on the image, but we are far from done, there is a lot of processing before it is usable.
We utilise the other two functions and convert the image to a DataFrame containing the text information:
def process_floorplan(
    filepath, rooms_set = default_rooms_set, resize_factor = 1):
df = convert_floorplan_pic_to_df(filepath, resize_factor)We want to go through this DataFrame line by line and decide whether that string was a room name, a size, or something else.
The rooms are going to be recognised from a set of room name strings, by default it looks like this:
default_rooms_set = {"DINING ROOM", "KITCHEN", "LIVING ROOM",
   ...
}
The sizes on the other hand are recognised using a regular expression. We basically want to consider every float number, which is quite simple to do:
room_side_regex = r'[0-9]+[.][0-9]+'If we have a look at the df object, we immediately see an issue: some room names might be split into multiple rows. (And henceforth we assume that we never want to search for a room name with more than two parts.)
The way I solved this problem is by creating another text column called text_2row, which is a concatenation of two rows worth of text.
shifted_text_col = list(df['text'].iloc[1:])
shifted_text_col.append("")
df['text_2row'] = df['text'] + " " + shifted_text_col
Now we can do the loop. Not going to copy the code here, once again, please refer to my GitHub. The logic is as follows:
for each row in the DataFrame:
  if the text_2rows matches one of the rooms
    the current row gets a room id
    go to next in loop, skip an extra line
  if not match so far
    if text column matches one of the rooms
      current row gets a room id
      go to next in loop
  if no match so far
    if text column matches the size regex
      current row gets a room_side id
      go to next in loop
  if still no match
    current row gets no id
    go to next in loop
There is an assumption in the size matching: we always take the first float number if there are multiple in the row. So if the length of this list is > 0:
regex_list = re.findall(room_side_regex,df[‘text’].iloc[i])We take the first element:
df['side_number'].iloc[i] = float(regex_list[0])After some clean-up, I separate the DataFrame into two smaller ones. Both contain the left, the top, and the value columns of the rows that were determined to be room or room_side. This is what we have for rooms:
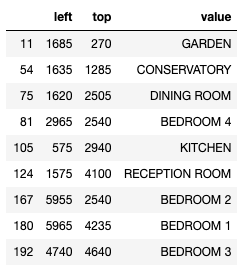
And we have a similar table for the sides, with numbers in the value column.
Match Rooms with Sides
We have all the info we need from the text, we just need to match them now.
There are many different ways you could approach this. Note that when we create the original DataFrame with image_to_data, pytesseract puts in a bunch of info that could be useful. For example, we have a block column that arranges the text into clusters.
I ended up using the left and top columns, which should be the position of the box encompassing the piece of text, counted from the top left corner of the image. We are going to calculate the euclidean distances of these top left corners, and for each room, pick the two closest numbers. There are some drawbacks to this method, we’ll get back to it shortly.
We are going to use the distance_matrix method from scipy:
from scipy.spatial import distance_matrixdist = distance_matrix(
df_rooms[['left', 'top']],
df_sides[['left', 'top']])And then it’s just an exercise of picking the two closest points for each room. We are relying on numpy’s argpartition method, once more, code is in my GitHub.
Finalise
After some formatting, we are finally at our end product:
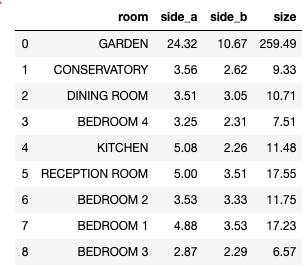
Did it Work?
Kinda, I think. If you have a look at the table above, I think there is only one tiny mistake. Plus Study is not found…
But that is just one example of course. The biggest challenge is reading floorplans of previously unseen formatting. I believe if you focus on floorplan’s from a certain agency, and finetune the image processing on that, it can be made reliable on a larger scale.
I definitely learned a ton about image text processing. Mostly about its limitations, but hey, that still counts! I hope you also learned something new by reading this.
Possible Improvements
I have a few ideas on how to make the process better:
- Focus on certain room types, don’t try to process them all, as I did. The issue is that it’s very difficult to ascertain whether a room has its measurements on the floorplan at all. I imagine a utility room would be shown without exact sizes a lot.
- I abandoned the idea of adjusting the contrast and brightness of the maps, the results seemed to be unreliable, but perhaps it would be worth the time to investigate how that changes pytesseract’s results.
- The room to side matching is a bit simplistic. There could be additional checks there, for example, we could check if certain elements are roughly under each other, which would indicate a closer relationship.


