
How to build the perfect Deep Learning Computer and save thousands of dollars
Updated 12/11/2019
You already know that building your own Deep Learning Computer is 10x cheaper than using AWS. But picking the right parts is not trivial, so let’s take a detailed look at things you should consider, the pros and cons of my build, assembly instructions, and how you’re saving as compared to buying.
This is part 2 of 3 in the Deep Learning Computer Series. Part 1 is ‘Why building is 10x cheaper than renting from AWS’ and Part 3 is ‘Performance and benchmarks’. See new photos and updates: Follow me on Medium and Twitter! Leave thoughts and questions in comments below.
Picking the 4 most important parts: CPU, GPU, Storage and Memory.
There are only 8 components to a build: GPU, CPU, Storage, Memory, CPU Cooler, Motherboard, Power, Case. The first 4 are the most important. When training, data flows from storage to memory to the GPU, while the CPU helps along the way (manipulates batches, etc). So, you want to make sure:
- Your CPU can support all your GPUs
- Your GPU is fast enough and can fit the model and data batch in memory
- Memory is DDR4 and big enough to float most datasets uncompressed
- Storage is M.2 PCIe and big enough
Make your computer expandable to 4 GPUs with the right CPU
It’s hard to know how many GPUs you’ll need because some models take 10s of hours to train (Vision CNNs, Natural Language Processing LSTMs, Capsule Auto Encoders, etc). So, one of the best ideas is to start with 1 or 2 GPUs and add more GPUs as you go along.
Each GPU requires at least 8x PCIe lanes (it’s 16x officially, but there’s data for which 8x is good enough if you’re not running cross-GPU experiments). You will need 4x PCIe lanes for the M.2 SSD (which plugs right in and is 5x faster than SATA3), and another 4x PCIe lanes for Gigabit ethernet. That’s a total of 40 PCIe lanes and will restrict your CPU choices quite a bit. Your CPU will dictate the motherboard you need. (For example: AMD Threadripper CPU = X399 chipset motherboard, Intel 7900X CPU = X299 chipset motherboard, etc).
You’ll want a CPU with 8+ cores / 16+ threads and 40+ PCIe lanes since this allows 4 experiments per GPU (16 experiments if you have 4 GPUs). Typically models take up at least a couple gigabytes of GPU memory so it’s rare you can run more than 4 experiments per GPU. Finally, make sure the PCIe lanes are actually getting routed to the expansion slots.
AMD CPUs offer better value than Intel
As of December 2019, AMD offers more performance for less money. AMD’s 1920X with 12 Cores/24 Threads/60 PCIe lanes is only $199! Intel’s 7900X with 10 Cores/20 Threads/44 PCIe lanes is $1000. Benchmarks show comparable performance, so AMD seems like a no-brainer. AMD’s second generation 2920x is only $400. (Disclosure: I’m long AMD stock.)
Your GPU needs to have enough memory and be fast enough
GPU memory works differently than computer RAM, so if you don’t have enough memory to fit your model you won’t be able to train (as opposed to train slowly). Once in a while I have a model that requires 10GB+ to run, so if in doubt, choose one with more memory.
Nvidia GPUs are easier to use than other platforms because they have the most community support for tools (Tensorflow, PyTorch, etc). Buy cards that have ‘blower style’ fans instead of the large double fans because if you have multiple GPUs you need to vent air outside of the box. (eg 1080 Ti Founder Edition, or 2080 Ti Asus Turbo)
Your choices are basically:
- Super High-end: Titan RTX (24GB / 4608 Cores / 576 Tensor Cores / $2,500) You can only fit one of these on the bottom slot because Titans don’t use blower fans.
- High-end: 2080 Ti (11GB / 4352 Cores / 544 Tensor Cores /$1149), 1080 Ti (11GB / 3584 Cores / $500 used), 2080 Super (8GB / 3072 Cores / 384 Tensor Cores / $730)
- Mid-tier: 2070 Super (8GB / 2560 Cores / 320 Tensor Cores / $530)
- Low-end (Best Value): 2060 Super (8GB / 2176 Cores / 272 Tensor Cores / $410)
- GPU inventory is very limited, so you may have to hunt around for inventory
The Titan RTX is a monster card and ~55% faster than 1080 Ti on 32 bit training and 135% faster in half precision mode because of the additional Tensor Cores and extra memory which allows for much larger batch sizes. 2080 Ti is ~40% faster than 1080 Ti on 32 bit training and ~65% faster when used in half precision mode. From there, speed performance is linear to the number of CUDA cores so expect 1080 Ti to be ~40% faster than 1080 and 1080 to be 33% faster than 1070.
Storage and Memory need to be as fast as possible
Because you’ll be moving lots of data around from storage to memory then to the GPUs, you want that pipeline to be as fast as possible. Use M.2 SSD NVMe, which plugs right into the motherboard and DDR4 memory.
Important tradeoffs of my build and common pitfalls
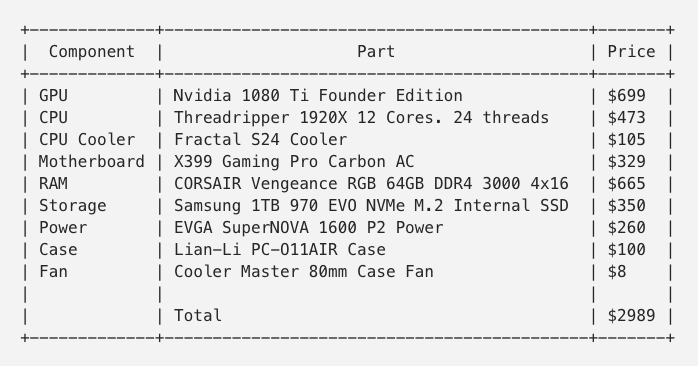
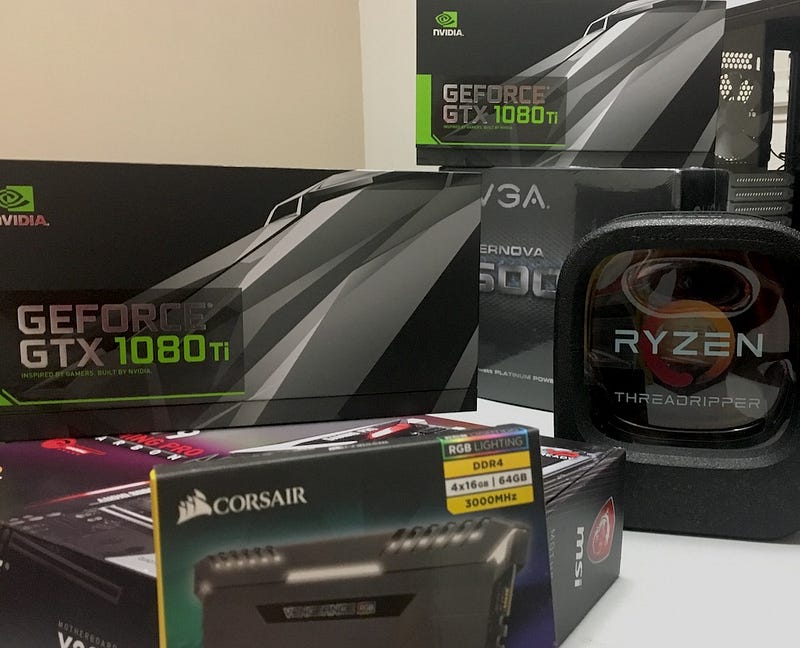
Here is my parts list with updated pricing and inventory.
GPU: I picked the 1080 Ti intially because a 40% speed gain versus 1080 is significant when you’re talking about 10-hour train times, and the extra 3GB of memory is important when working with large models or increasing training speed with larger batch sizes. 1080 Tis are hard to find now, so check eBay. I later added a 2080 Ti and a Titan RTX in the bottom slot. As of 2020, the 2060 Super is the best value for a starter card.
CPU: AMD’s 1920X has 12 cores and 38MB cache and is $150 more expensive vs. 1900X’s 8 cores and 20 MB cache. Earmarking 2 cores / 4 threads per GPU and the fact I might want the machine to double as a staging server later, 1920X gives me a little more breathing room.
Storage: I used a single 1TB M.2 SSD, I don’t like having stuff on different drives and 500GB seems small considering datasets are often tens of gigabytes. I might add a super large spinning hard drive for ‘cold’ storage later.
Memory: Quad channel memory is used because 1920X runs faster with quad than dual channel memory. 4 x 16GB is chosen because maximum supported memory is 128GB so it’s an easy upgrade path without needing to remove chips later. 3000Mhz is the fastest memory compatible with the motherboard (it’s overclocked from base 2667Mhz).
Power Supply: 1600W P2 is enough to cover 4x250W GPUs + 180W CPU + 150W for everything else and a little bit of headroom for overclocking. You don’t want to max out your power supply because fans kick in like crazy when it’s running at high utilization.
Case: Lian-Li PC-O11AIR because I need a case with 8 expansion slots (most mid-tower cases have 7, which means you cannot fit 4 double-wide GPUs). Between this case and the Corsair Air, this case looks nicer and comes with dust filters.
Avoid these 7 Common Pitfalls
Run through this list to make sure your build checks out.
- GPUs overheat my computer: Make sure you get the blower-style GPUs (The 2080 Ti version is called Turbo by Asus) because they vent out the back of the case. The ‘Overclock’ ‘OC’ type cards will have 2 large fans that blow into the computer, which will overheat. You also need a fan that delivers cold air directly onto the GPUs’ intake. You can fit one Titan RTX in the bottom slot if your case has a vent on the bottom like the O11AIR .
- Not enough PCIe lanes: You need at least 8x PCIe lanes / GPU (16x is better). If you have 4 GPUs, with a M.2 drive and Gigabyte ethernet, it’s 40 PCIe lanes at a minimum.
- My model doesn’t fit in my GPU memory: large Convolutional Networks and LSTMs use a lot of GPU memory, 8GB vs. 11GB is a big difference.
- Motherboard doesn’t fit 4 GPUs: Your motherboard needs to have slots for up to 4 GPUs and they must have space between them to use all 4. Best way is to check is a visual inspection on Google Images or search for people who have done it.
- Case doesn’t fit 4 GPUs: most mid tower-cases only have 7 expansion slots, so you will not be able to put a 4th double-wide GPU in the bottom slot. I’ve only found Lian Li and Corsair as options.
- Power Supply doesn’t have enough power / is too loud: You need to account for GPU (~250W each), CPU (~180W), Other (~150W, Motherboard, fans, etc). Overclocking draws a lot of power as well. Some power supplies are loud, read reviews online for quietness info. Typically the 80+ Platinum rated ones are quieter.
- My CPU cooler blocks the first GPU slot: Big air coolers such as Noctua sometimes will block the first GPU slot. Search for others who have used the combo.
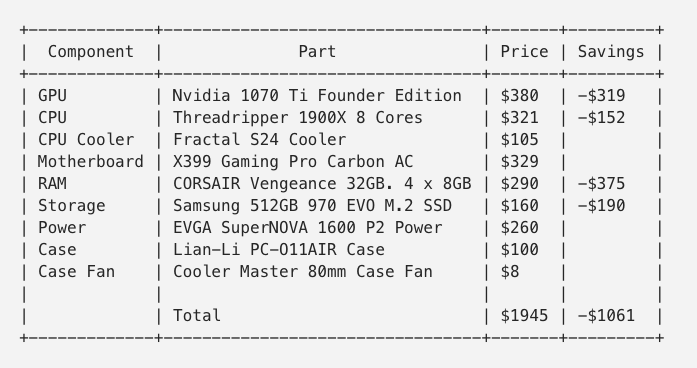
A budget expandable Deep Learning Computer at $2k
Knowing all this, you can see how the following is a budget expandable Deep Learning Computer that costs $2k and is also expandable to 4 GPUs.
Save a thousand dollars as compared to buying
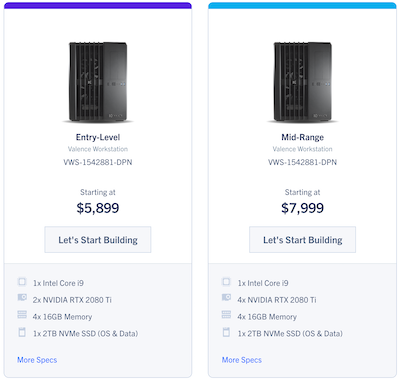
If you are considering buying a system instead of building one, you can get a 4x2080 Ti system from Exxact for $7,999, which is the best deal I’ve found. The 2x2080 Ti system goes for $5,899. Building your own 4 GPU system in 2020 is a total of $6,600: $3,000 + $500 (upgrade to 2080 Ti) + 3 x $1,200 (3 more 2080 Ti) - $500 (NVMe and RAM are cheaper in 2020). So that’s $1,400 (~20%) cheaper to build.
There are benefits to buying a pre-built though, such as a 3-year warranty, support, and pre-installed software. If you’re a busy individual or buying for academia/a company and want to simplify your life, it’s worth considering.
Ordering and putting parts together
Design your build on PCPartPicker.com
PCPartPicker is very useful because it lets you select parts and tells you if there are incompatibilities, it also gives you the best price across several reputable sellers.
Bandh, Adorama, Newegg, and Amazon are all reputable resellers. If in doubt, check Reseller Ratings.
Putting parts together takes a few hours
Assembly breaks down into the following 4 steps: 1) Case prep 2) Motherboard prep 3) Mount Motherboard 4) Install Memory, GPU and wrap up.
Here is a short video of me assembling my computer:
I also watched this build video for X399/Threadripper, you can probably find a similar video for your parts list.
Install software with online scripts and tutorials
If you follow tutorials, it’s relatively easy to get the stack up. If you don’t use tutorials or the wrong one, then it will be very frustrating!
I installed Ubuntu 16.04 and used this tutorial for the CUDA/CuDNN/Tensorflow install. I think there’s a prebuilt for Tensorflow now so you don’t have to compile it from scratch.
Expanding to more GPUs
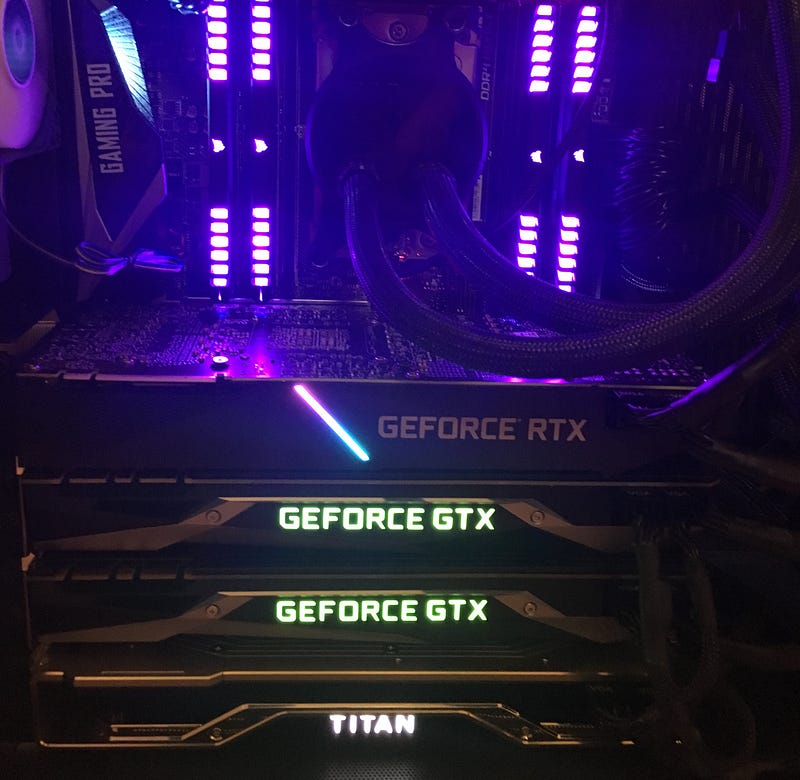
I added a Titan RTX, a 2080 Ti, and another 1080 Ti and it was really straight forward. You will have to upgrade your Nvidia driver to nvidia-410 to run the 2080 Ti.
Benchmarking your Deep Learning Computer
Continue to the next post: Why your personal Deep Learning Computer can be faster than AWS to learn what drives Deep Learning Performance and how your computer will stack up against the cloud.
See new photos and updates: Follow me on Medium and Twitter!
FAQ
Why is expandability important in a Deep Learning Computer? If you don’t know how much GPU power you’ll need, the best idea is to build a computer for Deep Learning with 1 GPU and add more GPUs as you go along.
Will you help me build one? Happy to help with questions via comments / email. I also run the www.HomebrewAIClub.com, some of our members may be interested in helping.
How can I learn this stuff? Stanford is giving away a lot of their CS curriculum. So look there. There are also great articles on more cutting edge research here.
What models can I train? You can train any model provided you have data, GPUs are most useful for Deep Neural Nets such as CNNs, RNNs, LSTMs, GANs. Some examples w/ code & datasets are listed on my website thisisjeffchen.com.
Vision and photo enhancement is really good now, which makes the new iPhone 11 amazing.
More FAQ: is located at the bottom of the page here.
I got a lot of help from other articles while researching the build, if you’re interested in reading further I’ve listed them here: Michael Reibel Boesen’s post, Gokkulnath T S’s post, Yusaku Sako’s post, Tim Dettmer’s blog, Vincent Chu’s post, Puget System’s PCIe 16x vs. 8x post, QuantStart’s rent vs. buy analysis, Tom’s Hardware’s article.
Thank you to my friends Evan Darke, Eva Glasrud, James Zhang, and Jordan Sill for reading drafts of this.