
How To Build and Deploy a Machine Learning Model with FastAPI
Deploy your first model in just 10 minutes — guaranteed
Building a machine learning model is just one part of the picture. To be of any use in the real world, it must be accessible to users and developers. The easiest and most widely used method for deploying machine learning models is to wrap them inside a REST API. That’s just what we’ll do today, with a trending library — FastAPI.

So, what is FastAPI? According to the official documentation, it’s a modern and fast web framework for building APIs with Python 3.6+. Performance-wise, it’s up there with NodeJS and Go, and that tells you something. It is also easy enough to learn and comes with automatic interactive documentation, but more on that later.
This article aims to cover just enough of the library to get you started, model deployment wise. It isn’t a definite guide, as that would require multiple articles on more advanced topics like asynchronous programming. After reading, you’ll know how to deploy a machine learning model and use it to make predictions either from Python, command line, or other programming languages.
The article is structured as follows:
- FastAPI installation and building the first API
- Interactive documentation exploration
- Training a machine learning model
- Building a complete REST API
- Testing
- Conclusion
FastAPI installation and building the first API
To start, you’ll have to install the library along with an ASGI server — both Uvicorn and Hypercorn are fine. Executing this line from the Terminal does the trick:
pip install fastapi uvicornYou can now create a folder for the API and open it in your favorite code editor. To proceed, create a Python script called app.py. Feel free to name yours differently, but I’ll be referring to this file as app.py throughout the article.
Here’s a list of things you have to do in order to make a simple API with two endpoints:
- Import the libraries — both FastAPI and Uvicorn
- Create an instance of the FastAPI class
- Declare the first route — returns a simple JSON object on the index page (http://127.0.0.1:8000 — this is configured in step 5)
- Declare the second route — returns a simple JSON object containing a personalized message. The name parameter comes directly from the URL (e.g., http://127.0.0.1:8000/John
- Run the API with Uvicorn
The following code snippet demonstrates how to implement these five steps:
That’s it! Let’s now run our API. To do so, open a Terminal window right where the app.py is. Now type in the following:
uvicorn app:app --reloadAnd hit Enter. Let’s demystify this statement before proceeding. The first app refers to the name of your Python file without the extension. The second app must be identical to how you named your FastAPI instance (see step 2 in the above list or comment 2 in the code snippet). The -reload indicates that you want the API to automatically refresh as you save the file without restarting the entire thing.
Now open your browser of choice and go to http://127.0.0.1:8000 — you should see the following output:

The first endpoint works as advertised. Let’s now check the other one. Go to the following URL: http://127.0.0.1:8000/John — this message should appear:

You can enter any name instead of John, and everything will still work.
You now know how to create a simple API with FastAPI — let’s see what else is included before jumping into machine learning. Don’t close the Terminal window just yet.
Interactive documentation exploration
Here’s a feature (or two) that makes FastAPI a king of API libraries — built-in interactive documentation. Here’s what I mean. Open up the following URL: http://127.0.0.1:8000/docs — you are immediately presented with a documentation page for your API! Here’s how it should look:
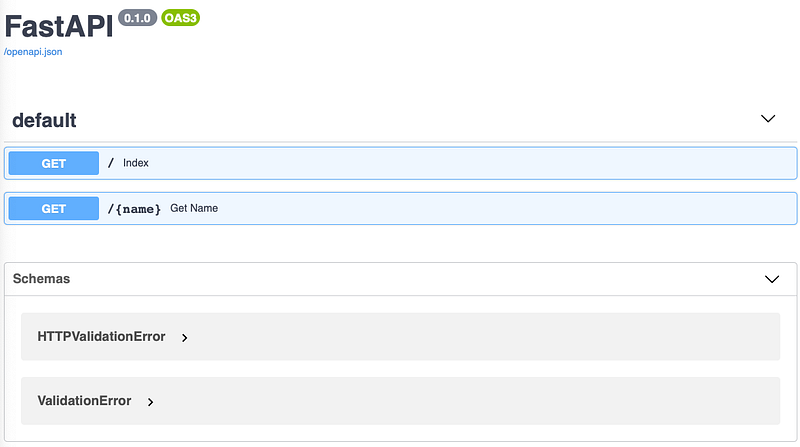
You can click on any of the endpoints to further explore it or even perform live, in-browser tests. Here’s how:

Isn’t this amazing? You can also use this documentation page to, well, document your API endpoints. That’s done by placing documentation strings right below the function declaration. The following code snippet demonstrates how:
Your API documentation now looks like this:
In case you don’t like the looks and feels of the Swagger UI (what you’ve seen so far), there’s another built-in option. To explore, open up the following URL: http://127.0.0.1:8000/redoc — and this page will appear:
Now you know how to build and explore API documentation. Let’s focus on a machine learning API next.
Training a machine learning model
This article is getting pretty long as is, so let’s not waste time in this section. We will train a simple model without any data preparation and exploration. These aren’t the core of today’s topic and are irrelevant to model deployment. The process of deploying a model based on the Iris dataset is the same as the one based on neural networks.
And we’ll do just that — download the Iris dataset and train the model. Well, it won’t be that easy. To start, create a file called Model.py. In it, you’ll perform the following steps:
- Imports — you’ll need
pandas,RandomForecastClassifierfromscikit-learn,BaseModelfrompydantic(you’ll see why in the next step), andjoblib– for saving and loading models - Declare a class
IrisSpecieswhich inherits fromBaseModel. This class contains only fields which are used to predict a single flower species (more on that in the next section) - Declare a class
IrisModel– used for model training and for making predictions - Inside
IrisModel, declare a method called_train_model. It is used to perform the model training with the Random Forests algorithm. The method returns the trained model - Inside
IrisModel, declare a method calledpredict_species. It is used to make a prediction from 4 input parameters (flower measurements). The method returns the prediction (flower species) and the prediction probability - Inside
IrisModel, modify the constructor, so it loads the Iris dataset and trains the model if it doesn’t exist in the folder. This addresses the issue of training a new model every time. Thejobliblibrary is used to save and load models.
Here’s the complete code:
This was quite a bit of code to write, but I hope the above list and the comments made it easy to understand. Let’s now create a REST API based on this model and expose its prediction functionality.
Building a complete REST API
Let’s get back to the app.py file and delete everything. We should start again with a blank file, although the boilerplate will be more or less identical to what you had before.
This time, you’ll declare only one endpoint — used to predict the flower species. This endpoint performs the prediction by calling the IrisModel.predict_species() method, declared in the previous section. The other significant change is the request type. POST is what you want with machine learning APIs, as it’s considered better practice to send parameters in JSON rather than in URL.
If you are a data scientist, the above paragraph probably sounded like gibberish, but that’s okay. A proficient understanding of REST APIs and HTTP requests isn’t required to build and deploy models.
The todo list for app.py is quite short:
- Imports — you’ll need
uvicorn,FastAPI,IrisModel, andIrisSpeciesfrom the previously writtenModel.pyfile - Make an instance of
FastAPIand of theIrisModel - Declare a function for making predictions, located on
http://127.0.0.1:8000/predict. The function takes in an object of typeIrisSpecies, converts it to a dictionary, and passes it to theIrisModel.predict_species()method. The predicted class and predicted probability is returned - Run the API using
uvicorn
Once again, here’s the complete code for this file with the comments:
And that’s all you have to do. Let’s test the API in the next section.
Testing
To run the API, once again enter the following text in the Terminal:
uvicorn app:app --reloadThe documentation page looks like this:
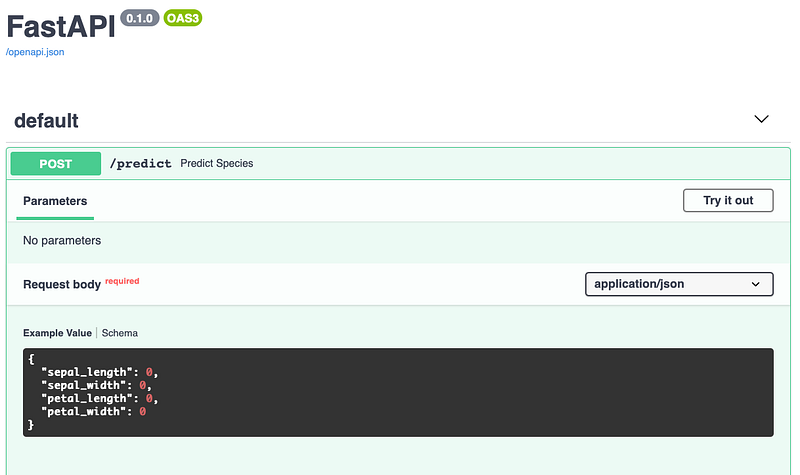
Once again, we can test the API straight in the browser:
Doesn’t that make testing easy? You can do the same from the Terminal:
Or even through any programming language (Python example):
And this does it for today. Let’s wrap things up in the next section.
Parting words
Today you’ve learned what FastAPI is and how to use it — both through a toy API example and through a toy machine learning example. Further, you’ve learned how to write and explore documentation for your API and how to test it. That’s a lot for a single article, so don’t get frustrated if it takes a couple of readings to digest fully.
There’s so much more to cover with FastAPI — like its asynchronous functionality, but that’s a topic for another day.
What do you think of FastAPI? Do you prefer it over Flask, and why? Let me know in the comment section.
Join my private email list for more helpful insights.
Loved the article? Become a Medium member to continue learning without limits. I’ll receive a portion of your membership fee if you use the following link, with no extra cost to you.
Originally published at https://betterdatascience.com on October 28, 2020.


