
How to Build a Totally Free Website in 2 Hours on Mailchimp, by a Complete Novice

Making a personal website to highlight my writing
Full disclosure, it was about 2 hours of work, interspersed with another 4 hours of flailing trying to make the thing do what I wanted it to do. Which it wouldn’t (did I mention it was FREE? Including a custom domain?). I’m going to save you that four hours of flailing and let you know how the website builder is structured and what it’s limitations are. My vanity project resulted in the following creation, brianewish.com:
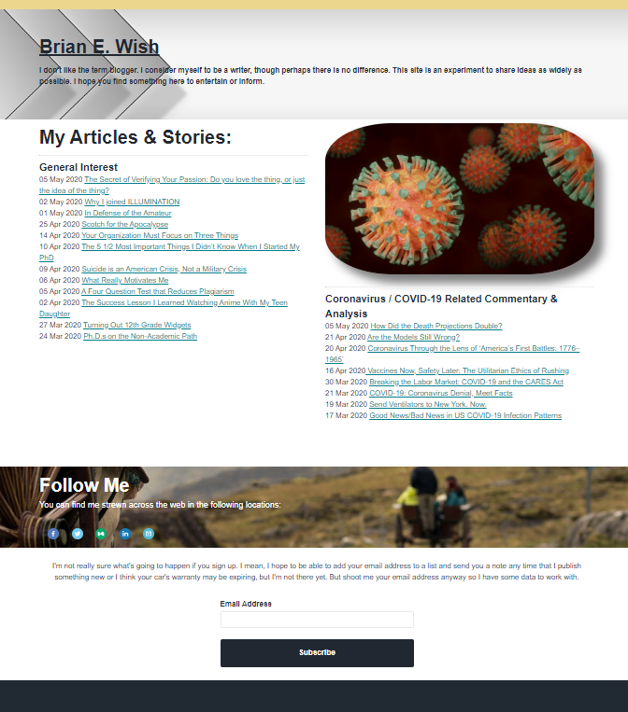
I can’t tell you that this is the best website in the world, or that it will do a whole lot at this point, but it is a lot more impressive than what I had before, which is zilch.
Deciding to take the plunge
I’m as computer savvy as the next guy, maybe even a little above average, but until now I’ve never published a website. Why would I want to? I finally dove in for three reasons:
- Convenience. I shared a few of my articles with friends at work, and they asked if I’d written anything else. Like most companies, the occasional personal email is OK, but I can’t turn my work email into a marketing channel. I also maintain a professional relationship with my college students; I’d like them to have the opportunity to read what I write, but it wouldn’t be ethical to push it on them. I don’t put everything on my personal Facebook account or LinkedIn because that’s a little spammy. Telling them to find me on Medium.com just gets blank looks, and Twitter is a crapshoot. Sending them to my personally branded website, even if it’s a bit basic, is a vast improvement.
- Search Engine Optimization (SEO). I’m not really sure how this works. I have been told by folks who seem to know that ‘the Googles’ adds weight in its algorithms for backlinks from other websites. An article of mine that was picked up by RealClearMarkets gets traffic from Bing, Yahoo, and DuckDuckGo. I don’t know if that will apply in exactly this case with the way my MailChimp website is constructed, but this is a step in the right direction and it can’t hurt.
- Email List. Everybody on the Interwebs’ says that you need an email list to be successful, so it must be true, right? After a few weeks it’s going to gush money like a busted fire hydrant! Or maybe a busted sprinkler head. Or a slightly drippy faucet. In 24 hours my list has grown 100%, from just my email to my email plus my wife’s. I don’t believe that the dozens of people that read my work will throng to sign up, but maybe a few will? Then instead of my work showing up at random in the “From your network” section, these fearless minions will have an email to delete as well.
Sign up and claim a domain
The free website was the main reason that I went with Mailchimp. I’m new to Medium, so my main goal is to make enough money every month to cover expenses. Covering the five dollars per month to cover the subscription is not very hard, but covering a monthly fee for web hosting seemed like too big a leap for something I’ve been doing less than two months.
Mailchimp recently launched its free website as an adjunct to its email business. The service offers a variety of plans, and you have to choose one to build a website. The one in my price bracket, free, lets you have up to 2K email subscribers.
When you go to Mailchimp.com, at least at the moment, there are two separate green buttons. One says “Get Your Free Custom Domain” and the other one says “Sign Up Free.” Either one of these will take you to a signup page for their email plan, which you have to do first.
After choosing the free email plan, my next step was to get a custom domain name. Mailchimp provides easy and detailed instructions, so I’m just going to give you the context and main points to remember.
First, click on “Brand” on the menu, then select “Manage Domains” on the drop-down. Scroll down to the “Purchase a New Domain” section, then hit the button labeled “Find Domain.” It will look something like this:
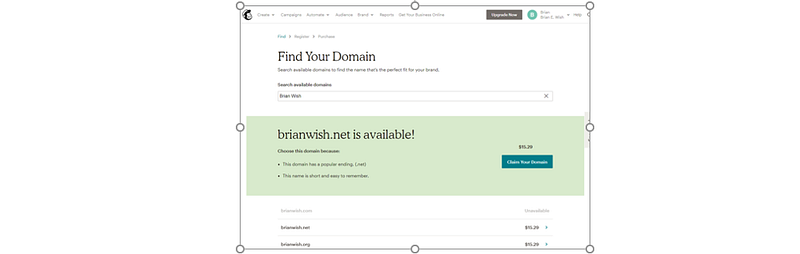
I was confused at first. Why wasn’t brianwish.com available? It turns out typing brianwish.com into my browser takes me to a site for Bryan Wish; he purchased the domain with the alternate spelling. I really wanted a .com instead of .net or something else, so I searched on Brian E. Wish instead.
You’ll notice the prices. The domain is free from Mailchimp.com by way of $25 rebate every year for five years. After that, you will be automatically billed every year, as long as you actually publish a website.
This is why you have to provide payment information. You can’t use Mailchimp just to hold a domain name for free; if you don’t publish something, you will get charged.
The signup process went fast; you can do it in just a few minutes. Then it’s time to design a website, and things get real.
Making the website
From the ribbon menu, pick ‘Brand’ and then ‘Manage Website.’ Here you will be able to create or edit your pages.
Planning your sections
The Mailchimp solution has one and only one template. This template is divided into sections, with sections for the Header, Featured, About, Contact, Product, Testimonials, Subscribe, and a Footer. You can turn each section off or on, but you can’t add any more.
On my website, I deleted the ‘About’ section and the ‘Testimonial’ sections, though they can be turned back on later. Figuring out how sections worked was one of the more confusing parts, so I’ve added labels to the right of each section for this illustration.
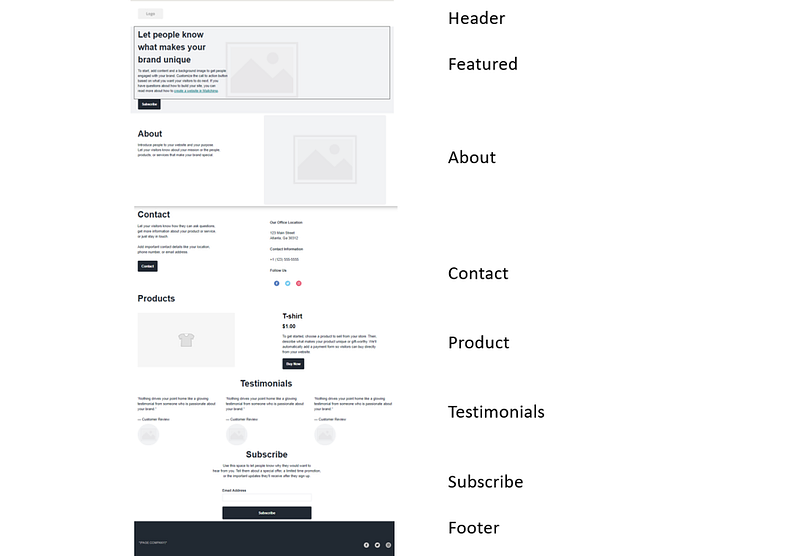
My best trick was to color code the background of each section to understand the layout better. Then I decided what I wanted to keep. Below is the same page with the background of each section set to a different color.
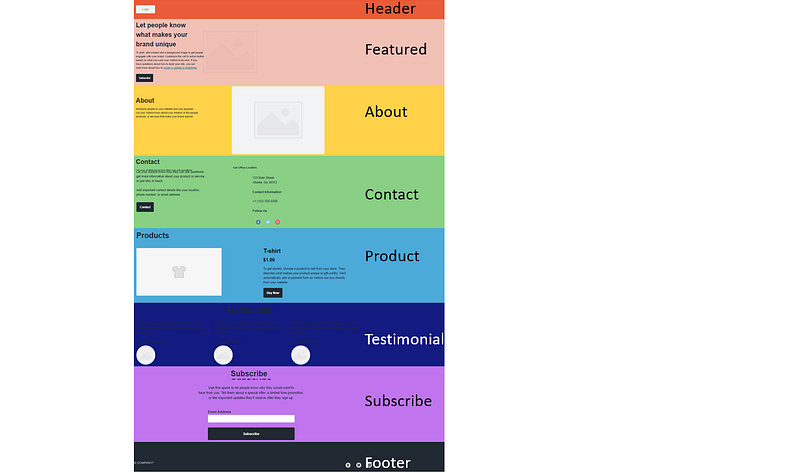
Instead of changing the background color of a section, you can also upload a picture to serve as a section background as I’ve done on my website. Sections will automatically expand vertically as the content is added, or you can manually expand or shrink them.
Adding content blocks
After you have your sections planned, you can start adding content. You can click on the content blocks already in the template to edit them with your text, add pictures, or delete them. You can also add additional content blocks above or below existing ones. In the picture below, I’m dragging a new picture block to insert into the ‘About’ section.
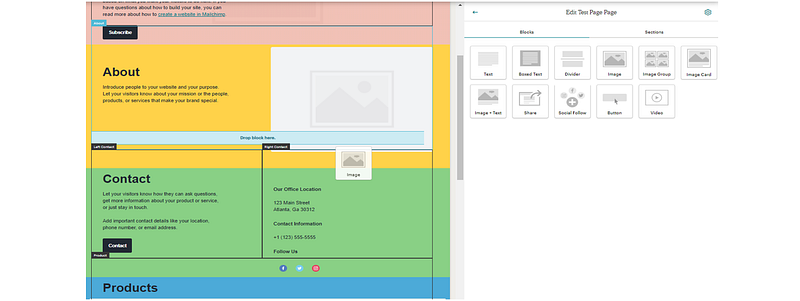
The most frustrating part of the process was figuring out that content blocks can only be added vertically, EXCEPT for the ‘Contact’ section as seen above. It has right and left containers. Yes, this is spelled out in the instructions, but it’s not obvious and took close reading to find.
Since I wanted my article links to form two columns, I had to use the ‘Contact’ section for the article links. I put the social media links into a section immediately below in the sections hard-wired as ‘Products.’
The most important point here is that you do not have to follow the section labels for your content. The section names are internal to the website builder. Put content in whatever order or sections that make sense for you, remembering that only the middle section has two containers inside.
Populate your content
When you are ready to populate your content blocks with data, click on them, and use the editing window at the right of the screen. In this shot, I added links to my various stories and hyperlinked them as you would in a word document or email.
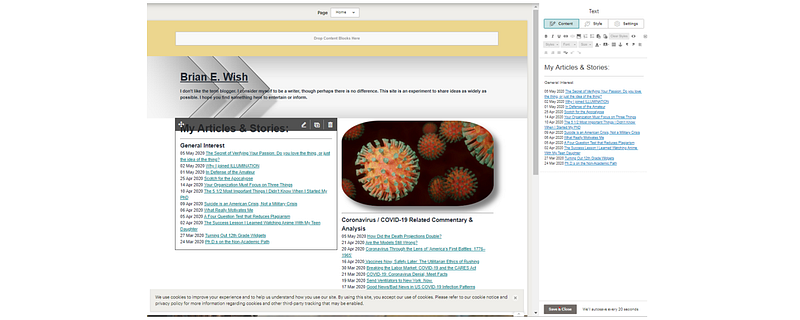
You can also add pictures to picture content blocks, as I did with the Coronavirus picture above.
Another frustrating experience was learning to hit the “Save and Close” box to get out of content block editing. You can select another block to edit, but if you want to get back to the previous menu, hit the button. It sounds dumb now, but I spent 30 minutes trying to figure out how to get back to the block and section menus.
Publish
Publishing is the easiest part. You can just hit the “Publish” button at the top right of the screen. Poof, your website is live on the internet for all to see.
I have to admit, it is a thrill to go to a web browser, type in brianewish.com, and see my work displayed to the world.
Things to remember
All in all, I rate my experience as a success. The website is truly free and meets my immediate needs to display some basic information. It gives readers an easy way to access my material. There are some areas that I can still develop, but there are also some limitations that I hope Mailchimp will continue to develop.
What I may try next
- You can integrate your Mailchimp site with Square to enable purchases directly from your web page. I don’t have anything to sell, but maybe I’ll come up with a coffee mug or T-Shirt someday.
- The email capture list, as one would expect, is a seamless integration into your Mailchimp account.
Limitations
- You can’t embed an RSS feed. Mailchimp allows RSS embeds to its emails, which use virtually the same interface, so maybe they will add that sometime in the future. I do have the RSS feed from my Flipboard magazine embedded into a Mailchimp email, so every time I update Flipboard with another story, an email will go out to my subscribers.
- The domain service does not support email. You can’t send an email to an address ending “@brianewish.com,” so you have to have alternate email support.
- The website does not generate an outgoing RSS feed. There are tools available on the internet that will convert most websites to an RSS feed, but nothing native to Mailchimp.
- Once you purchase your domain name through Mailchimp, it is stuck for 60 days. I’m not ready to move on to something more advanced, so that’s fine for me.
Sign up at brianewish.com for updates whenever I publish something new.
Brian E. Wish works as a quality engineer in the aerospace industry. He has spent 29 years active and reserve in the US Air Force, where he holds the rank of Colonel. He has a bachelor’s from the US Air Force Academy, a master’s from Bowie State, and a Ph.D. in Public and Urban Administration from UT Arlington. The opinions expressed here are his own.


