
How to Build a Slack Bot in 2020
Using Node.js, Botkit, Botkit CMS, and LUIS to build a Slack bot

Ever since I heard the computer W.O.P.R. ask Matthew Broderick if he wants to play a game, I have been fascinated by talking to computers. W.O.P.R. was the United States military supercomputer from the movie Wargames.
I remember trying to create a program in BASIC on my Commodore 64. This program simulated W.O.P.R. It read a string from the command-line and generated a response in the text on the screen. I was as proud as a peacock.
Fast forward almost 40 years. Currently, it has never been easier to develop an application that lets you talk to your computer.
In this article, I’ll explain how to create an advanced Slack Bot in Node.js with Botkit, Botkit C.M.S., and L.U.I.S.
I will start with a simple request-response bot. Then add conversations with Botkit CMS, and finally integrate machine learning using L.U.I.S.
The Use Case, Reporting Work Hours
I work in a scrum team of around eight people. We use stories and story points to distribute work and track progress.
To track actual time per story, we use a commercial Slack Bot called Standuply. This bot asks each developer once a day how many hours they worked on which story.
Standuply generates a report that we use during the retrospective. The report contains the estimate and actual time per story.
I have no problem with the bot, but sometimes I just forget to answer. Also, the information is digitally available via our scrum board. I just read the new edition of The Pragmatic Programmer in which Andrew Thomas and Andy Hunt state:
A great way to ensure both consistency and accuracy is to automate everything the team does.
So, I want to automate reporting my hours to Standuply. I intend to do this by creating a personal Slack Bot that automatically answers Standuply. It should react to the questions from Standuply by reporting the information from our digital scrum board.
Creating and Configuring the Slack Bot
You can build a Slack Bot from scratch, but it is far easier to use a Bot Development Kit. I use the open-source Botkit framework. You can use Botkit to create bots on various platforms, such as Slack and Facebook.
The easiest way to start is to install the Botkit starter kit and Yeoman using the following command.
npm install -g yo generator-botkit
You then use Yeoman to generate a standard bot using the following command.
yo botkit
Yeoman asks various questions about the name and type of bot you want to create. I choose a Slack Bot.
If you did not create a Slack App before starting the Yeoman, you can’t answer all the questions. This is not a problem because you can add this information later using the .env file.
Creating the Slack App
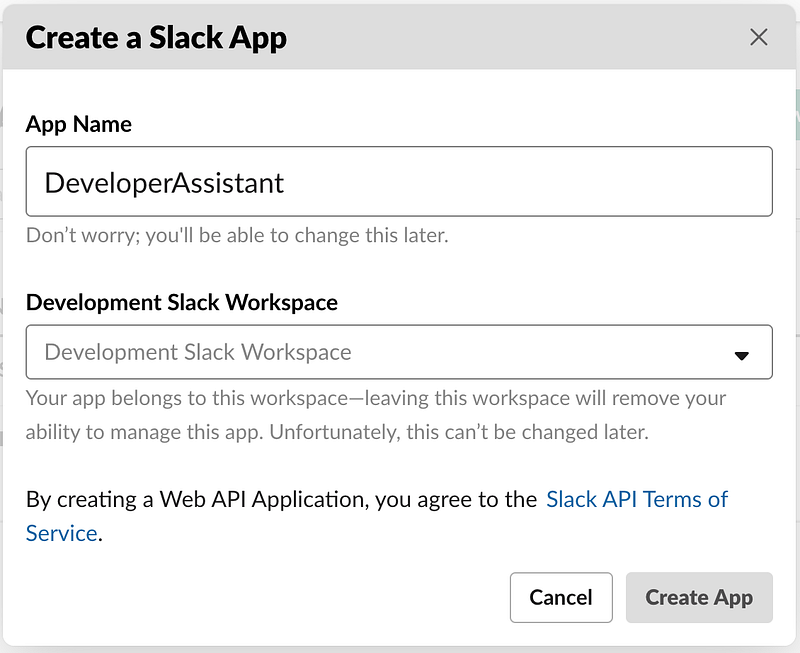
To be able to connect the Slack Bot to Slack, we need to create a Slack App via the Slack website. Go to the Slack API site and create a new app. The site shows a dialog where you can enter the name of the Slack Bot and connect it to a Workspace.
After the Slack App is created, we can configure the Slack Bot.
Configuring the Slack Bot
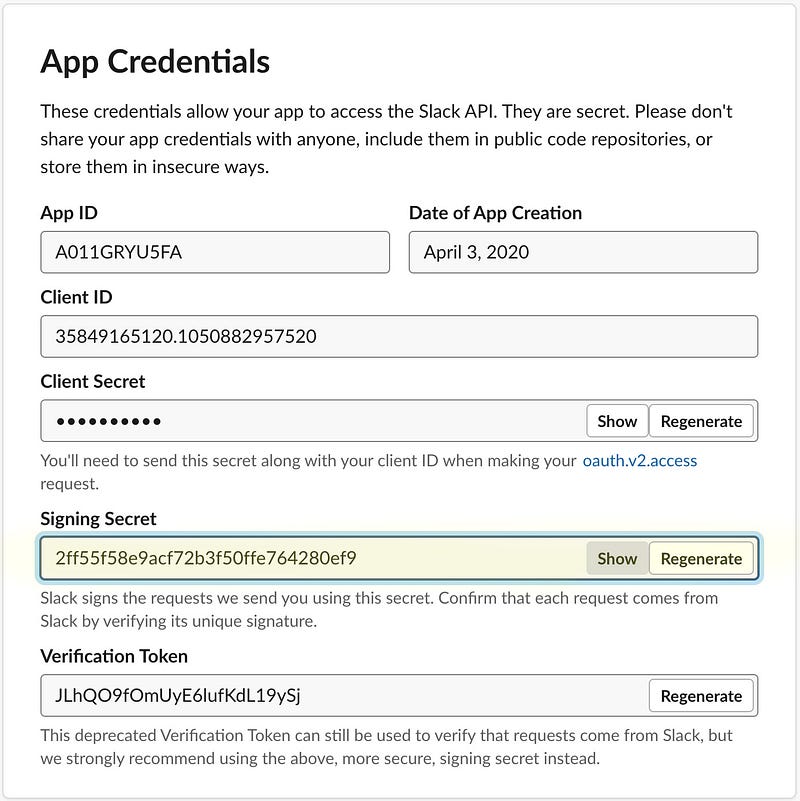
Configuration of the Slack Bot is a bit tricky. The generator generated a .env file that contains several empty entries. You must fill those entries with information from the Slack API website.
The CLIENT_SIGNING_SECRET and BOT_TOKEN are the most important to get the bot running.
You can retrieve the CLIENT_SIGNING_SECRET from the Slack API site. It is on Basic Information under the Settings tab. The site shows the following screen.
You need to copy the Signing Secret into your .env file.
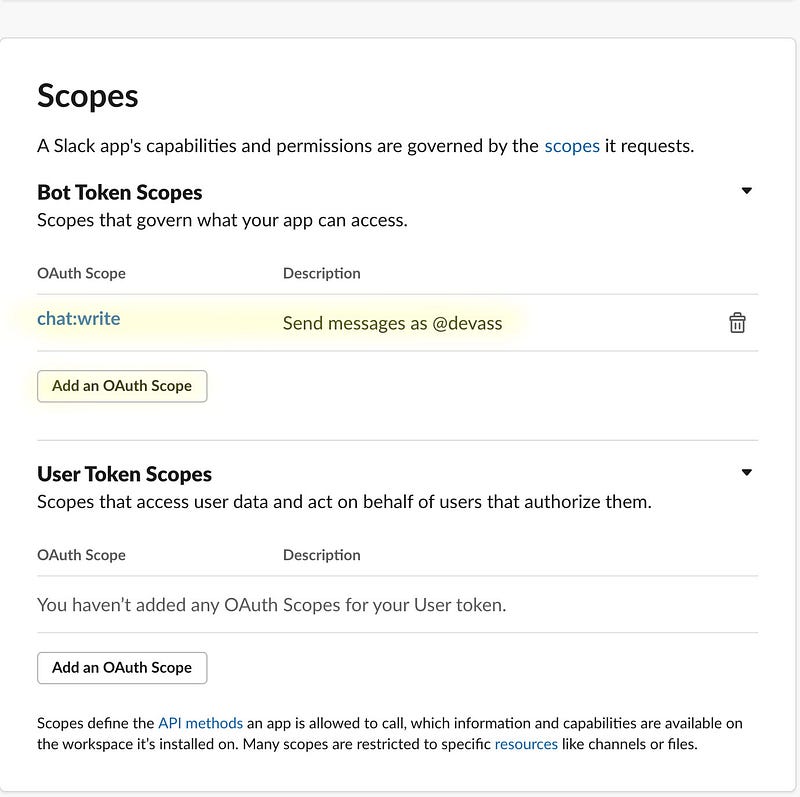
Before you can view the BOT_TOKEN, you have to add an OAuth Scope. OAuth scopes can be found below Features on the OAuth & Permissions tab. With OAuth Scopes, you determine the capabilities of your bot.
In the screen below, I gave the bot permission to send messages.
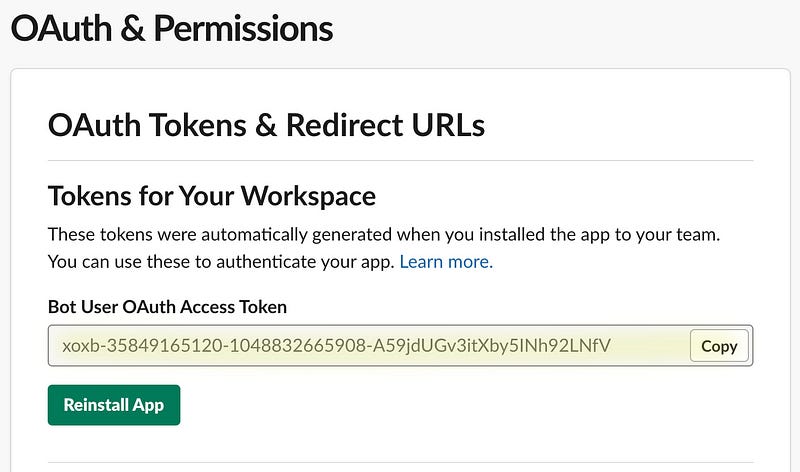
If all went well, you now can access the BOT_TOKEN in OAuth Tokens & Redirect URLs, see the screen below. Copy the value of the Bot User OAuth Access Token field that starts with xoxb and paste it in your .env file.
With all that configuration out of the way, we can start running your Slack Bot.
Running the Slack Bot locally
The Slack Bot is a Node.js application that needs to run somewhere and Slack should be able to connect to it. During development, you can use ngrok to set up a local connection. Ngrok exposes your local bot to the public internet over a secure tunnel.
When you start the Slack bot, it will listen for messages on port 3000. To expose the Slack Bot via ngrok, we can use the following command.
ngrok http 3000
This will start ngrok and create a proxy internet address that can be used to access your Slack Bot.
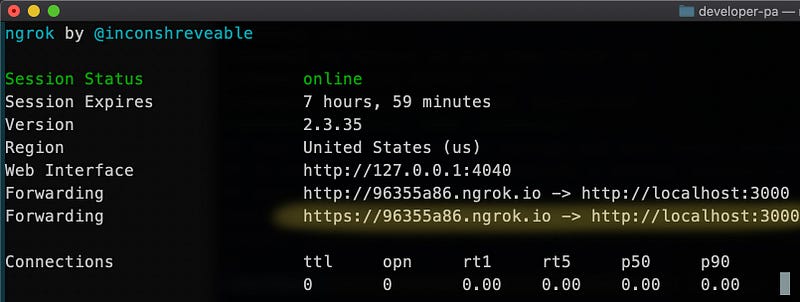
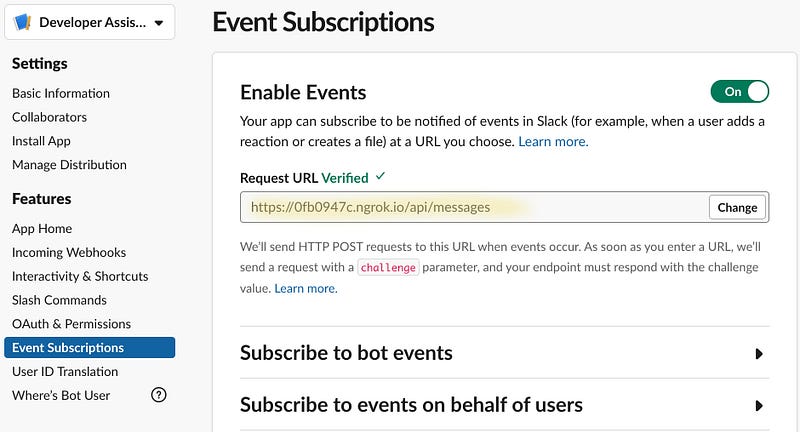
The generated proxy UR, https://96355a86.ngrok.io should be configured on the Slack API website
On the Slack API site, set the Request URL field on the Event Subscriptions tab. Make sure that ngrok is running once you save the Request URL, as Slack will directly validate it.
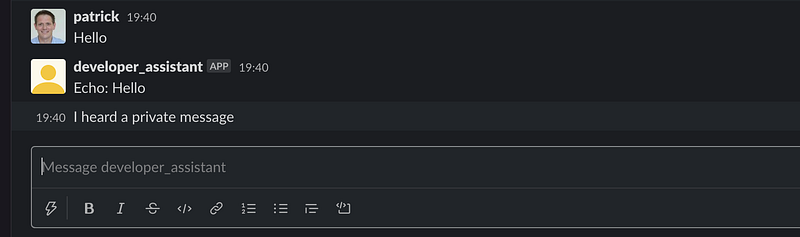
If it all went well and your Slack Bot is running, you should be able to send a direct message and the Bot will respond.
One thing to remember is that when you stop and restart ngrok, it will generate a different proxy URL. That means you have to reconfigure the Request URL on the Slack API website. Nrgok also has a commercial offer that lets you keep a fixed URL.
Reading and Reacting to a Message
You can use the hears() method on a controller to specify what your bot should do once it receives a message.
In the example below on row five, I specify what the bot should do when it receives the message 'Which story did you work on today?'. The second argument of hears specifies which type of messages it should react to. In this case, 'message,direct_message' tells the bot to react to any message in a channel or a direct message to the bot.
If the message matches, it performs a query to search for stories that are in progress. When it returns stories, it generates a string with the information from the stories. I finally use bot.reply to send the reply message.
Regular expressions
The hears method on the controller also accepts regular expressions. Regular expressions make matching the incoming phrases more flexible. For example, see the regular expression used below.
controller.hears(new RegExp(/^What story did(.*?)$/i), ‘message,direct_message’, async (bot, message) => {This controller reacts to phrases like ‘What story did you work on?’ but also ‘What story did you work on today?’.
Dialogs
Botkit has a feature to define dialogs or conversations. You define a dialog by creating an instance of a BotkitConversation and adding messages and questions to it. Below an example of a conversation.
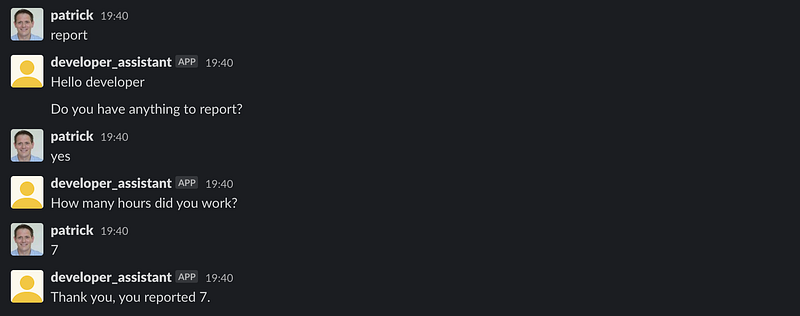
In line five, I add a question that asks if the user has anything to report. Depending on the answer, I use convo.gotoThread to jump to the next message.
The second argument of addMessage specifies the thread on which the message should be displayed. So, if the user answers “no” it continues with the thread has_no_hours and displays the message “Thank you”.
reportHoursDialog.addMessage(‘Thank you’, ‘has_no_hours’);
You have seen that it is possible to define conversation in code. There is also a different possibility to define conversations in a visual way using Botkit CMS.
Using Botkit CMS to Implement Conversations
Botkit CMS is a visual tool for implementing interactive dialog systems. It is open-source and can be run locally on your workstation. Check the Github repository for information on how to install Botkit CMS.
With the tool, you can define the interaction that you want a user to have with your bot. In the example below, I created a simple conversation.
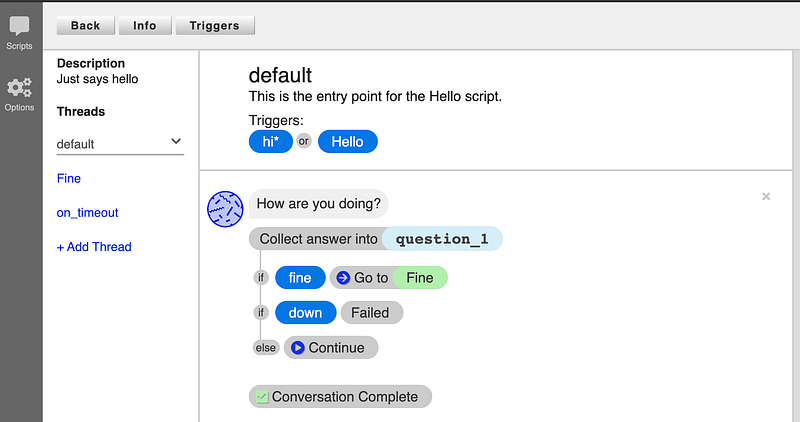
The conversation starts with a trigger — in this case, when you say “Hello” or a message that begins with “hi.” The bot will react with the question, “How are you doing?”. Depending on your answer, the bot will respond differently.
You can connect your Botkit Node.js bot to Botkit CMS. This means that you can add or change conversations while the bot is running, which is ideal for development and testing.
You can connect your bot to Botkit CMS by adding the following two variables to your .env file and restarting your bot. Yomen has already generated the source code to connect your bot to Botkit CMS.
CMS_URI=http://localhost:4000/
CMS_TOKEN=your token
To make your bot somewhat more intelligent, you can add natural language machine-learning by adding LUIS.
LUIS (Language Understanding)
LUIS is a machine-learning service to build natural language into your bot. The main difference between LUIS and plain Botkit or Botkit CMS is that it uses intent and intent scores.
LUIS is a commercial service from Microsoft. You get 10,000 queries per month for free. Above that, you pay $1.50 per 1000 questions. The 10,000 free queries per month will be more than enough for my assistant bot.
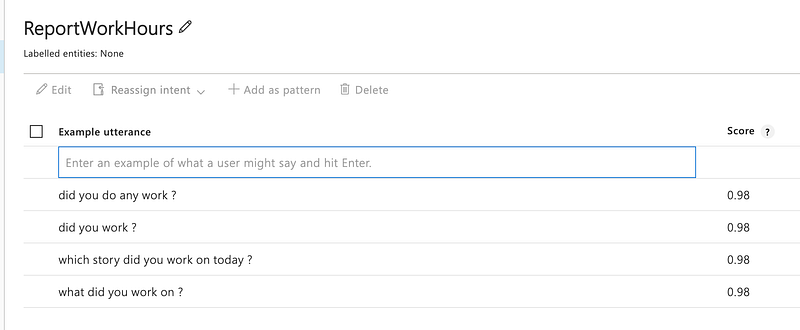
You start LUIS by creating all intents that you want your bot to performing the LUIS site. For my bot, I use a single intent called ReportWorkHours. After creating the intent, you have to add the questions a user might ask about this intent.
After you defined the possible questions, you have to train your model and publish the result. The result of publishing will be a LUIS URL. By sending an HTTP GET to this URL, you ask your questions. LUIS will respond with scores of the intents that were recognized. See an example response below.
To connect LUIS to your bot, you install the LUIS middleware for BotKit created by Steven Ickman. You can install it using npm install botkit-middleware-luis. After installation, you add the following code to configure the connection.
const luis = require(‘botkit-middleware-luis’);
const luisOptions = { serviceUri: process.env.LUIS_SERVICE_URI };controller.middleware.receive.use(luis.middleware.receive(luisOptions));In your .env file, you have to define LUIS_SERVICE_URI and set it to your LUIS URL, which can be found in your LUIS dashboard.
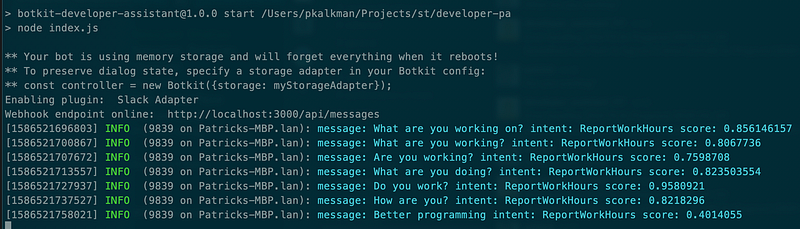
From that moment on each message that the bot receives will be sent to LUIS. The recognized intent and score are added to the message that you receive in hears on the controller.
Instead of listening to a specific request, I use the regular expression .* on line one. The result is that I receive all messages in the controller.
On line five, I use message.topIntent, which is filled by the LUIS with the recognized intent. I check if it is the ReportWorkHours intent. Further, on line seven, I validate if the score is above 0.7. This determines if it was the ReportWorkHours intent. If so, I retrieve the tasks that are in progress and respond to them.
The beautiful thing is that you can add phrases to the intent in LUIS that it did not understand. You can then train and republish without having to change or restart your bot.
Conclusion
With all the bot tools and frameworks that are currently available, it has become easy to create a complex bot. Think about how you could create and use a bot to automate a part of your development workflow.
In this article, I explained how to implement a modern SlackBot using BotKit. I used Botkit CMS to add more complex dialogs to the bot and finally integrated natural language machine learning using LUIS.
The source is available on Github
Thank you for reading.


