
How to Build a Python Clicker for Claps on Medium
Not Your Typical Guide
Disclaimer 1: This is for educational purposes only.
Life’s too short for slow claps. Seriously.
You’re here on Medium.com, you stumble across a masterpiece that resonates, and you want to show your appreciation. But holding down the clap button? That’s for amateurs. Your time is a currency, and you’re about to invest it wisely.
Welcome to the “I don’t just read, I make my claps thunderous” tutorial. Let’s build a Python clicker that can do the clapping for you — faster, stronger, and smarter. Because if you’re going to clap, you might as well clap like a standing ovation at a TED talk.
Being an IT Specialist at my job and part nerd in my free time, besides being an awesome writer, I thought it would be fun to share some of the nerdy stuff.
This is a tutorial for Windows. I never touched a MacBook (yet).
Step 1: Set the Stage for Your Python Applause Machine
Before you start, make sure you have Python installed and Visual Studio Code. If you don’t, go download it. I’ll wait. If you have no clue on how to do this, I can write another article on that if you’d like.
For me, the instructions you find on these websites are clear, but that does not mean that this is also the case for you, and that is totally okay.
Step 2: Get the Tools for the Job
You’ll need some Python libraries:
tkinter for the GUI (you know, Graphical User Interface).pyautogui for the clicking.keyboard for hotkey interactionthreading to keep things running smoothly without crashing your clapping ambitions.
Install them using pip:
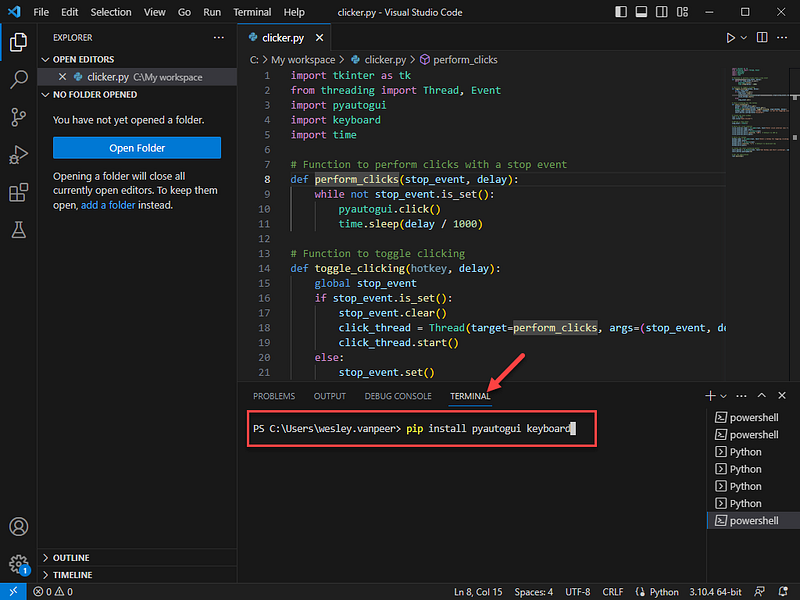
pip install pyautogui keyboard
Copy that stuff and paste it by clicking your right mouse button in your terminal:
What The Hell is ‘pip’?
If you’re stepping into the realm of Python, “pip” is a term you’ll hear often, like a spell wizards whisper to conjure libraries from the vast repositories of Python’s ecosystem. But what is pip exactly?
Simply put, pip is a tool that helps you install and manage software packages written in Python. Think of it as your digital librarian, fetching books (packages) for you from a grand library (Python Package Index — PyPI) and neatly arranging them on your shelf (computer).
What if pip Isn’t Recognized?
Imagine you’re trying to cast a spell, but your wand isn’t responding. If the Command Prompt or PowerShell (and in our case our terminal in Windows Visual Studio Code, which = Powershell — this is evident from the “PS” prefix in the command line prompt, which stands for PowerShell.) tells you that “pip is not recognized,” it’s like saying, “I don’t understand this spell.”
This usually means that Python isn’t installed correctly, or pip wasn’t added to your system’s PATH. Remember, when installing Python, there was an option to “Add Python to PATH”? If you forgot to check that box, your computer doesn’t know where to find Python or pip.
But fear not. You can either re-install Python and make sure to check the “Add Python to PATH” option or you can manually add Python and pip to your system’s PATH. For beginners, re-installing might be the easiest way to fix this.
Step 3: The Heart of Your Applause — The Code
You’ve already laid eyes on the spell book. Now let’s interpret the incantations, Tarantino-style:
import tkinter as tk
from threading import Thread, Event
import pyautogui
import keyboard
import time

# This is where the magic happens, or the clapping, rather.
def perform_clicks(stop_event, delay):
    while not stop_event.is_set():
        pyautogui.click()  # This is the click. The standing ovation.
        time.sleep(delay / 1000)  # We pause, because even robots need to breathe.

# This toggles your applause on and off. Because sometimes, you've got to stop clapping.
def toggle_clicking(hotkey, delay):
    global stop_event  # Global, because this signal needs to be loud and clear.
    if stop_event.is_set():
        stop_event.clear()  # Clear the signal, it's showtime.
        click_thread = Thread(target=perform_clicks, args=(stop_event, delay))
        click_thread.start()  # The curtain rises, and the clicking begins.
    else:
        stop_event.set()  # And when it's time to lower the curtain, we signal to stop.

# Listen for the cue, the hotkey, like a performer awaiting their entrance.
def start_listening():
    hotkey = hotkey_entry.get()  # You decide the secret passphrase.
    delay = int(click_interval_entry.get())  # The rhythm of the claps.
    keyboard.add_hotkey(hotkey, toggle_clicking, args=(hotkey, delay))
    hotkey_label.config(text=f"Hotkey '{hotkey}' is set for toggling clicking.")  # Cue cards are set.
    start_button.config(state="disabled")  # And the stage is set.

# The theater itself, our main window.
root = tk.Tk()
root.title("Auto Clicker")

# The red stoplight backstage.
stop_event = Event()

# Now for the makeup and costume - the settings for our performance.
click_interval_label = tk.Label(root, text="Enter click interval (ms):")
click_interval_label.pack()
click_interval_entry = tk.Entry(root)
click_interval_entry.insert(0, "100")  # The default beat, 100ms.
click_interval_entry.pack()

# Choosing your stage whisper - the hotkey.
hotkey_label = tk.Label(root, text="Enter a hotkey for toggling clicking:")
hotkey_label.pack()
hotkey_entry = tk.Entry(root)
hotkey_entry.insert(0, "\\")  # The backslash, a simple flick of the wrist.
hotkey_entry.pack()

# The green room button, ready to walk onto the stage.
start_button = tk.Button(root, text="Set Hotkey and Start Listening", command=start_listening)
start_button.pack(pady=10)

# And... Action!
root.mainloop()
Some Background Info on the Import Statements
In the spellbinding world of Python, each import statement is like an incantation that invokes a module's powers. With import tkinter as tk, we call forth the tkinter module, the standard Python interface to the Tk GUI toolkit, and give it the alias tk for easier reference. This allows us to create a graphical user interface (GUI, remember?) for our clicker application with ease.
The line from threading import Thread, Event beckons the concurrency enchantments from the threading module. Thread is akin to creating a magical familiar that can perform tasks concurrently with our main program, while Event is a signaling mechanism that tells the threads when to start or stop, ensuring they work in harmonious synchrony.
import pyautogui brings in the wizardry of pyautogui, a module that grants us control over the mouse and keyboard, empowering our program to simulate the clicking action in the physical realm of our GUI.
With import keyboard, we harness the module keyboard, which listens for our incantations—keystrokes—to trigger events in the program, like starting or stopping the clicker.
import time invokes the time module, the master of temporal spells, allowing our program to pause and resume actions, syncing the clicks to the rhythm of our desires. Each of these imports is a fundamental component in our Pythonic grimoire, essential for crafting a clicker that can automate our applause on Medium with both precision and grace.
Step 4: Launch and Let It Rain Claps
Run your script. A window will pop up, asking for the interval between claps and the hotkey of your choice. Set them. Hit that “Set Hotkey and Start Listening” button and switch over to your Medium.com tab.
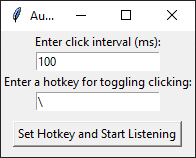
Now, press your hotkey and watch your claps fire away like a round of applause at a rock concert. Press the hotkey again to stop. It’s like having the power of an enthusiastic crowd at your fingertips.
Personally, I find it works better if I hold down the hotkey and set the ms to ‘1’. Works like a charm. You can also make that the default in your code.
Step 5: Use Responsibly
A word of caution: With great power comes great responsibility. Use your clapper wisely. Don’t spam. Clap because you mean it. Clap because the content moved you. Not because you can.
Now go forth and spread appreciation with the efficiency of a coder. You’ve just saved yourself countless seconds, maybe even minutes. Spend them writing, creating, and living the life you want.
That’s it. That’s the tutorial. No fluff, no nonsense. Just straight-up coding badassery. Now go use your new tool!
Disclaimer 2: Look, I get it. You’ve got this shiny new auto-clicker and the world’s your oyster. But let’s lay down some truth: I’m not your babysitter, your lawyer, or the magical fairy that saves you from the consequences of your own actions. This tool? It’s for kicks, for learning, for those brave souls who want to live on the edge of convenience without tipping over into the abyss of stupidity.
So if you’re thinking of using this to, say, rig a game, spam someone, or embark on a digital crime spree, remember — I can’t be held responsible for your life choices. My part? I showed you how the thing works. Your part? Use it like a grown-up with a functioning moral compass.
And if that compass goes haywire and you find yourself knee-deep in hot water, remember this: I told you so. Use this tool at your own risk and for the love of sanity, use it ethically. We clear? Good.
Now go click something worthwhile.